- Joined
- Nov 27, 2021
- Messages
- 241
- Likes
- 1,000
- Location
- Silver Spring, MD
- Website
- www.transpirationturning.com
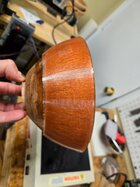
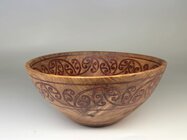
It took me four attempts, but I have finally reached something close to my desired outcome. The idea was to cut a rim design in a bowl, fill it with epoxy resin, and then thin the inside enough that the resin would be continuous from the inside to the outside of the piece.
The challenges are primarily in the resin pouring and then the internal hollowing, so this is really mostly about overcoming those.
I personally hate the clean-up following a resin turning, so I avoid it whenever possible, but it is also pretty darn expensive, so one goal was to minimize resin waste.
After shaping the outside as part of the second turning, the first step was to probe the profile of the bowl to create a 3D model. I didn't take an pictures, but I used this bowl for an instructional video so you can see that process here.
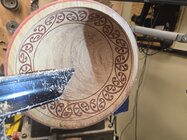
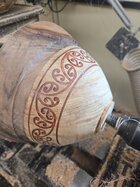
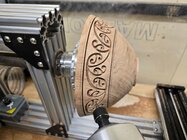
This was followed by cutting the design in the rim using the LatheEngraver. I have always really liked the symmetry of the traditional Maori wave designs, and this was one that I had cut multiple times before. The design had to be scaled to fit, which involves measuring the diameter at the center of the cut site to get the circumference. Since it is continuous, the design is scaled to that circumference value. The LatheEngraver cutter just has to be put normal to that cut site. One thing that I had failed on in the past was cutting deep enough. In this case the depth-of-cut was 7mm in 1mm passes. Following the cutting I dosed the entire thing in shellac to seal the end grain and prevent the resin from spreading significantly when in the pressure pot.
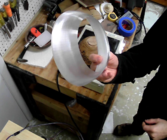
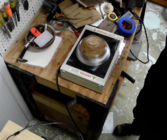
The major advantage of having the 3D model is that it can be used to create a "shell" for holding the resin, meaning there is very little waste. The model was scaled up slightly and the top cut off (it only needs to cover the design plus a bit more) and then the shell was 3D printed in vase model, which is just a single extrusion around the perimeter. One tip, I highly recommend printing in clear PETG and cranking up the temperature (275 C) which will make the shell stronger and more transparent. The shell fits over the bowl with a gap to allow pouring the resin. One area where I had failed previously was not leaving enough of a gap. The shell diameter should be at least 6-8mm larger than the bowl diameter. Of course, the bottom also has to be sealed. Hot glue would work, but is slow. What I did is to put down a piece of PET film (transparency film) on a UV light box with some UV-curable resin on it. Put the bowl and shell into the resin and then turn on the light for a minute or two.
To further avoid waste I actually measured the area of the design (easy to do in Inkscape) and then multiplied that by my depth of cut to get the volume I needed to fill the cuts. Then I did something similar finding the volume from the difference of the original 3D model and the scaled model. Together it all came out to something like 120 mL, so I upped that to 150 mL (SPOILER: I ended up with about 20 mL left over).
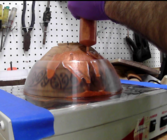
Then using a 60mL syringe, the shell was filled. It took about 12-15 minutes. I let it sit until the resin started getting fairly tacky, but I might have waited just a bit too long because there were still some bubbles, even after being in the pressure pot.
The challenges are primarily in the resin pouring and then the internal hollowing, so this is really mostly about overcoming those.
I personally hate the clean-up following a resin turning, so I avoid it whenever possible, but it is also pretty darn expensive, so one goal was to minimize resin waste.
After shaping the outside as part of the second turning, the first step was to probe the profile of the bowl to create a 3D model. I didn't take an pictures, but I used this bowl for an instructional video so you can see that process here.
This was followed by cutting the design in the rim using the LatheEngraver. I have always really liked the symmetry of the traditional Maori wave designs, and this was one that I had cut multiple times before. The design had to be scaled to fit, which involves measuring the diameter at the center of the cut site to get the circumference. Since it is continuous, the design is scaled to that circumference value. The LatheEngraver cutter just has to be put normal to that cut site. One thing that I had failed on in the past was cutting deep enough. In this case the depth-of-cut was 7mm in 1mm passes. Following the cutting I dosed the entire thing in shellac to seal the end grain and prevent the resin from spreading significantly when in the pressure pot.

The major advantage of having the 3D model is that it can be used to create a "shell" for holding the resin, meaning there is very little waste. The model was scaled up slightly and the top cut off (it only needs to cover the design plus a bit more) and then the shell was 3D printed in vase model, which is just a single extrusion around the perimeter. One tip, I highly recommend printing in clear PETG and cranking up the temperature (275 C) which will make the shell stronger and more transparent. The shell fits over the bowl with a gap to allow pouring the resin. One area where I had failed previously was not leaving enough of a gap. The shell diameter should be at least 6-8mm larger than the bowl diameter. Of course, the bottom also has to be sealed. Hot glue would work, but is slow. What I did is to put down a piece of PET film (transparency film) on a UV light box with some UV-curable resin on it. Put the bowl and shell into the resin and then turn on the light for a minute or two.


To further avoid waste I actually measured the area of the design (easy to do in Inkscape) and then multiplied that by my depth of cut to get the volume I needed to fill the cuts. Then I did something similar finding the volume from the difference of the original 3D model and the scaled model. Together it all came out to something like 120 mL, so I upped that to 150 mL (SPOILER: I ended up with about 20 mL left over).
Then using a 60mL syringe, the shell was filled. It took about 12-15 minutes. I let it sit until the resin started getting fairly tacky, but I might have waited just a bit too long because there were still some bubbles, even after being in the pressure pot.


