• Congratulations to Kevin Jesequel winner of the November 2024 Turning Challenge (click here for details)
  • Congratulations to Clayton Thigpen for "Bradford Pear Jewelry Box" being selected as Turning of the Week for December 2, 2024 (click here for details)
  • Welcome new registering member. Your username must be your real First and Last name (for example: John Doe). "Screen names" and "handles" are not allowed and your registration will be deleted if you don't use your real name. Also, do not use all caps nor all lower case.

lathe cabinet design

Joined
Jan 14, 2020
Messages
206
Likes
58
Location
Austin, TX
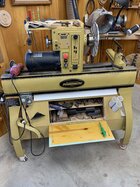
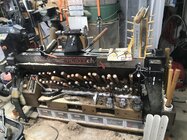
Hi, Here is picture of the cabinet I built for my lathe when I first got it. Now, I know what you are thinking. Why he must have spent hours cleaning that thing for this photo! But no. That's just how I roll. You may also be impressed by my bold use of drawer front / no drawer front architecture. Please don't steal my style it is my signature.
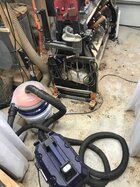
But in fact, the reason I am posting is because, do to a grave flaw in lathe design, it seems that my lathe collects a wee bit of dust in the legs. And around the legs, and everywhere. And it's pretty hard to clean out. I was wondering if anyone else used an under lathe cabinet and how they might deal with this.
Thanks for your thoughts
 

Attachments

  • PXL_20241115_010613439.jpg
    PXL_20241115_010613439.jpg
    571.5 KB · Views: 135
Joined
Feb 2, 2016
Messages
559
Likes
472
Location
Clinton, TN
Here is picture of the cabinet I built for my lathe when I first got it.

Nice cabinet.

Does it get in the way of your feet? I tried something similar and discovered I want/need about 12" of free space from the front of the PM3520b legs to the first foot obstruction (I keep a big chip tub under the lathe.) On that lathe I'm comfortable with 4" of foot space past the front side of the lathe bed. If not, I stand too far back my back hurts. Buy maybe I'm a wimp. Or maybe I turn different things.

To control chips, perhaps some cover on the inside and outside of the legs would work. Maybe something thin held with magnets.

JKJ
 
Joined
Jul 30, 2021
Messages
279
Likes
84
Location
Aurora, CO
To control chips, perhaps some cover on the inside and outside of the legs would work. Maybe something thin held with magnets.

@Raif Harik As John said here: Magnets and cheap shower curtains! Wonderful stuff. I've got a bunch of areas covered with magnet-held crops of shower curtain, and its wonderful. It doesn't keep the dust out entirely, of course, but you don't have the problem of massive amounts of chips and dust piling up. Its a really cost effective way to coral off areas you want easy access to so they stay cleaner for longer.
 
Joined
Jan 14, 2020
Messages
206
Likes
58
Location
Austin, TX
Thanks. Well, everything I got hurts so I can't tell, maybe this part of the problem :). I do find I lean on it a bit, maybe not the best.
I like the idea of like some 1/8" hard board with magnets or something, but it'll be hard to seal it off.
 
Joined
Feb 2, 2016
Messages
559
Likes
472
Location
Clinton, TN
Its all just magnets anyway! ;)

I haven't counted, but I'll bet a nickle I use at least 3 dozen magnets in my shop for a variety of things. Some are small even tiny, some with countersunk holes to fasten to wood, some large and strong (1" diam, 1/4" thick), some 1" square, and two so powererful it's all I can do to get them off the back of my bandsaw - if one ever got a hand or other part between the two it would be a trip to the hospital (or maybe a machine shop).

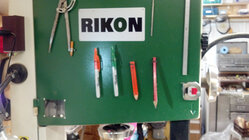
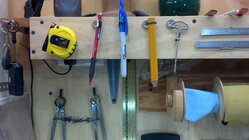
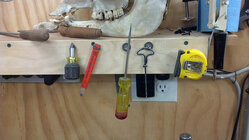
I hang rulers, dividers, pens and pencils (wrap a bit of soft iron wire around so they'll stick), measuring tapes, awls, screwdrivers, scissors, calipers, center punches,...

Just a few (old pictures).
magnets3.jpg
magnets.jpg
magnets2_.jpg
 
Last edited:
Joined
Jan 14, 2020
Messages
206
Likes
58
Location
Austin, TX
Point taken, magnets rock! I presume the horse skull is attached with no less. I hate it when I misplace mine!
I was looking at the lathe and realized it's kind of messed up cuz if I wrap it in a shower curtain, there'll be a gap because the legs flair out/in at the foot. Plus, brilliantly I made it a pretty tight fit.
Still, this idea is the best so far.
I feel like I've missed an opportunity to reference Dexter here. But I don't need to beat a dead horse.
Thanks y'all
 
Joined
Jul 30, 2021
Messages
279
Likes
84
Location
Aurora, CO
Point taken, magnets rock! I presume the horse skull is attached with no less. I hate it when I misplace mine!
I was looking at the lathe and realized it's kind of messed up cuz if I wrap it in a shower curtain, there'll be a gap because the legs flair out/in at the foot. Plus, brilliantly I made it a pretty tight fit.
Still, this idea is the best so far.
I feel like I've missed an opportunity to reference Dexter here. But I don't need to beat a dead horse.
Thanks y'all

I think you can do it. Pick up a couple of those packs of rectangle magnets from Home Depot or such. They are usually around four bucks for a pack of two, and I figure you could use six. I like these, for the curtain bit, because they are pretty strong, and quite cheap. You can also get disc magnets, and a pack of six for like six bucks. But, they are a lot weaker strength.

If you wrap a cheap shower curtain around the legs from one side, across the front at the upper level where you have solid metal from the bed running all the way across, and around to the back of the other leg. You would use one magnet at the back of each leg to hold the curtain on with tension there. Then use the other four, to hold the curtain to the front metal of the bed. Since its a seamless wraparound, it should do a pretty good job of keeping the dust out from underneath the lathe.

The only bit I haven't figured out, is the shavings and dust that fall through the gap between the ways. I was thinking you could wrap a strip of another shower curtain from the front of the bed, underneath it, to the back of the bed. A few more magnets on the back would hold it up, and it would catch shavings falling through the ways. But...I don't know if its entirely practical. Would fill up and need to be cleaned out fairly often. Might be a pain in the butt. Perhaps if you could get some pieces of wood at the ends of the ways, angled down and awaqy, so that any chips and shavings fell to the outside of the legs? Seems like it gets complicated there. If you are willing to vacuum up the shavings that get caught if you wrap a strip of curtain under the bed, then that should help keep the vast majority of shavings from falling underneath.

If you wanted easier access to your cabinet. You could slice the curtain up such that you have two pieces to wrap around each leg, up to the edge of the cabinet, with clearance so you can open the drawers. Then take the final length of curtain, and drape it down the front of the lathe, with magnets holding it to the bed as previously described. The nature of the overlaps would still keep the shavings out from under the lathe for the most part. When you needed access to the cabinet, just lift that front curtain and access what you need, then let it back down again. Maybe a couple of clips to hold the bottom corners of that front piece, to the corners of the pieces wrapping around the legs for maximum shaving blocking effect.
 
Joined
Jan 22, 2009
Messages
481
Likes
792
Location
Crossville, TN
I built a storage cabinet under my 3520 with sloped sides that ~match the leg angles and it rests on the legs above the ground a few inches so it adds ballast to the lathe and makes it easy to put my toes under, or sweep. (I even incorporated a false bottom in it initially and put ~300lbs of plate steel scrap in to add more ballast - it only allowed ~10% speed improvement so I didn’t bring that extra weight along when I moved 8yrs ago). Important features are storage holes on front and back for tool rests, tubes to hold gouges while turning, and a pointed top so shavings slide to front or rear and don’t collect on the top.
1731806069476.jpeg
 
Joined
Feb 6, 2010
Messages
3,159
Likes
2,250
Location
Brandon, MS
I built a cabinet for my Delta Midi moved to the Jet and moved it to the PM for a bit . I
That got kinda old because even with inset drawer dust got in and since mounted on lathe the vibration caused the drawers to open. So that and the need for more space lead to making two more cabinets. Which are now stacked behind me when at the lathe.IMG_0722.JPGIMG_0343.JPGIMG_4842.jpg
 
Joined
Feb 2, 2016
Messages
559
Likes
472
Location
Clinton, TN
Point taken, magnets rock! I presume the horse skull is attached with no less. I hate it when I misplace mine!

Ha! I just now saw this. I wish I had a horse skull but all my horses appear to be healthy for now.

That’s actually a llama skull sitting on the shelf. Horse and llama skulls have some similarities but also some distinct differences.

I got that skull from a man who operated a llama sanctuary, a place for elderly, ailing, and injured llamas to live and get care. I like it for educational reasons, to show people the internal structure of a llama’s head and teeth. (For example, an interesting factoid: llamas have razor sharp “fighting” teeth they use to defend theirselves and disable opponents and rivals in the “wild”. They can castrate a rival but if they injure a leg, the rival is as good as dead.)

I should get pictures of my skull collection on that side of the shop. I have a lion skull, a deer skull with asymmetrical antlers, plus fox, squirrel, and skunk skulls. I have a human skull too, but it’s a Revell plastic glow-in-the-dark model kit from the ‘70s! The “life” sized model is great for education, and for halloween when my kids were young - I’d carry “Yourik” draped in a hoodie up to houses to see if anyone would offer him candy!

The story about the lion skull is sad - my son’s friend’s dad operated a lion refuge and for some reason the government shut it down and killed all the lions. He had a big trash can full of lion skulls and gave me one.

What does all this do for woodturning? It makes things more interesting for visitors and students! After one friend visited my shop he said he went home and told his wife it was more fun than going to the Smithsonian. Ha!

JKJ
 
Joined
Jul 26, 2015
Messages
396
Likes
571
Location
Hot Springs, AR
One reason I bought aNova DVR-XP a dozen years ago was because it did NOT come with legs. I wanted to build my own stand. lots of storage, 300lbs of sand in the bottom supplemented by some 175lbs of barbell weights. retractable casters for when I need to move it.
 

Attachments

  • DSCN0735.JPG
    DSCN0735.JPG
    441 KB · Views: 35
Joined
Jan 14, 2020
Messages
206
Likes
58
Location
Austin, TX
Lots of good stuff.
@Jon Rista I think just a half shower curtain per leg would be fine. I can scrape the shavings off the top of the cabinet onto the floor or trashcan pretty easily. It's just the legs that get packed in.
@Ron Solfest I like the idea of putting it on a shelf on the bottom of the lathe. more weight, some foot room. and I don't use the bottom shelves because they are too close to the floor and get blocked by mountains of shavings. So I'll pull it out, cut off the bottom drawer and add a shelf between the legs and put the cabinet there. That said, It may complicate things with the shower curtains. We'l have to see.
@John K Jordan The real question is if you have an alien skull out there!
Thanks folks
 
Joined
May 26, 2018
Messages
68
Likes
57
Location
Houston, TX
Raif, I built the tool chest shown herein to fit within the legs of my first lathe, a Jet 1236 (with a reeves drive). Passed the lathe on to a beginning turner but kept the tool chest. I turned the knobs, and have an insert in them. It has a p-lam top on it for a bit of durability. Dust does collect on either side of it and on top, but it’s not a big deal for me. I keep tools that don’t get used too often in the third drawer down. Note my chuck storage on either side. I drilled three 1/4” holes in each of the two front legs, put a 3” bolt through the hole from the back, with a nut on either side of the leg. Then a piece of that clear tubing on the bolt and Voilé! Also note the storage on the right leg for the ‘everyday’ tools.

IMG_5280.jpegIMG_5282.jpeg
 
Joined
Dec 23, 2014
Messages
199
Likes
318
Location
Sebastopol, California
I'll be a contrarian here. After weighting down my Stubby with sandbags on a shelf underneath the bed, and trying to close off the space (unsuccessfully) I have left the under-bed space entirely open on my Powermatic 3520C. I can slide a modest garbage can underneath to catch shavings, and it's quick and easy to vacuum up at the end of the session, plus my legs/feet don't bump into anything. I also do use magnets, and every inch of wall space, and I especially like the tool holder at the headstock end and the storage space in the tailstock. I don't miss having cabinets/drawers and such collecting dust and shavings in every nook and cranny under the lathe.
 
Joined
Feb 2, 2016
Messages
559
Likes
472
Location
Clinton, TN
I'll be a contrarian here. ...I have left the under-bed space entirely open on my Powermatic 3520C. I can slide a modest garbage can underneath to catch shavings, ...

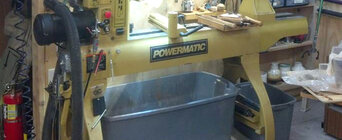
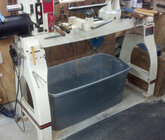
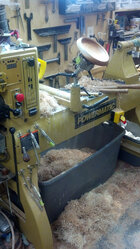
I think there are many who like that method. I do the same, but use a large plastic tub below the lathe that catches almost everything.

I think I posted this picture at some point. The back of the tub is pushed up against the wall so almost nothing gets behind.
(The small tub is for used sandpaper, etc) Works for me.
lathe_PM_tub.jpg

And one under another lathe in the shop (same size tub but the Jet has a longer bed):
tub_lathe.jpg

I put a cabinet with drawers and shelves behind me and more past the end of the lathes.

JKJ
 
Joined
Oct 13, 2016
Messages
1,146
Likes
1,750
Location
Rainy River District Ontario Canada
I'll be a contrarian here. After weighting down my Stubby with sandbags on a shelf underneath the bed, and trying to close off the space (unsuccessfully) I have left the under-bed space entirely open on my Powermatic 3520C. I can slide a modest garbage can underneath to catch shavings, and it's quick and easy to vacuum up at the end of the session, plus my legs/feet don't bump into anything. I also do use magnets, and every inch of wall space, and I especially like the tool holder at the headstock end and the storage space in the tailstock. I don't miss having cabinets/drawers and such collecting dust and shavings in every nook and cranny under the lathe.
Same here Steve, I build my lathe on a heavy base and kept it wide open, picture here shows my lathe in my previous shop, moved to my new place and set up like that, but with more room around my lathe.
Now I can walk around and turn out board again with storage behind me, learned that I have more use of the wall behind the lathe than catching shavings on stuff that is hung on the wall.
Open under my tathes.jpg
 
Joined
Jan 14, 2020
Messages
206
Likes
58
Location
Austin, TX
There's something to the simplicity of the open space. I really only regularly use 2 drawers. But a) uh, I have big dumb cabinet and b) I don't have much room in my shop. Maybe I'll search the forum for threads about shop layout and stuff and see if I can get some ideas about storage that could accommodate my needs with out taking up too much space.
 
Joined
Feb 26, 2019
Messages
1,919
Likes
1,507
Location
Lebanon, Missouri
We may “roll” similarly with shop cleanliness. I already had a pretty full shop when I started turning ~12 yrs ago, and no wall space, so I designed “stuff holding” (tools and accessories) to get as much as possible on the lathe. A different lathe and several design iterations later, here is how mine is setup. The under cabinet is much more open than yours and collects a lot more chips and dust. I ruled out a curtain or cover because I want the tools and acc readily available when turning. I do have a plastic sheet stapled to a stick, with magnets, that sticks to the side of the lathe bed when I swing the head 90 deg and wet sand with finishes. Hard to see in the photo, the is a “chip cover” (plywood) that attaches up under the lathe bed, over the tools, to the back of the lathe legs. Chips that fall through the bed gap hit it and fall behind the lathe.

For cleanup, I use a Dust stopper pro and my shop vac. The unit graps the chips and most dust, and the shop vac gets the fine dust, so it doesnt fill up. The unit is easy to lift off the 5 gal bucket to dump chips. I use the paint brush to knock a lot of the chips to the floor and broom sweep them up. I use vac hose solid extensions to reach all around and into the cabinet and lathe. I have a 2hp DC with 4” hose I use while turning but the hose the 4” hose is too big to easily move around for cleanup.

1732121480638.jpeg


1732121567500.jpeg

Dustopper:
 
Joined
Jan 20, 2011
Messages
530
Likes
653
Location
Traverse City, MI
I decided lights up on the ceiling were too far away, so I built a cabinet above and mounted lights to the underside. I like that stuff doesn't get buried in chips/shavings above. The space below had almost 900 pounds of sand on a shelf to dampen the lathe.
 
Joined
Jul 30, 2021
Messages
279
Likes
84
Location
Aurora, CO
Raif, I built the tool chest shown herein to fit within the legs of my first lathe, a Jet 1236 (with a reeves drive). Passed the lathe on to a beginning turner but kept the tool chest. I turned the knobs, and have an insert in them. It has a p-lam top on it for a bit of durability. Dust does collect on either side of it and on top, but it’s not a big deal for me. I keep tools that don’t get used too often in the third drawer down. Note my chuck storage on either side. I drilled three 1/4” holes in each of the two front legs, put a 3” bolt through the hole from the back, with a nut on either side of the leg. Then a piece of that clear tubing on the bolt and Voilé! Also note the storage on the right leg for the ‘everyday’ tools.

View attachment 68940View attachment 68941
How hard was it to drill those holes in the legs for your chucks? I really like that idea... I've got a Powermatic 3520C which probably has room to do the same kind of thing. Currently, I hang my chucks on my pegboard walls, but, its not ideal, the chucks are heavy and the walls not quite sturdy enough for holding a bunch of chucks.
 
Joined
Feb 2, 2016
Messages
559
Likes
472
Location
Clinton, TN
How hard was it to drill those holes in the legs for your chucks? I really like that idea.

I don't know about his lathe, but in general cast iron is quite easy to drill and tap. I did that on my lathe to mount lights on flexible necks with threaded ends. (More secure than a magnetic base)

PM3520b
lamp_mount_IMG_20171228_214144_854.jpg

JKJ
 
Joined
May 26, 2018
Messages
68
Likes
57
Location
Houston, TX
How hard was it to drill those holes in the legs for your chucks? I really like that idea... I've got a Powermatic 3520C which probably has room to do the same kind of thing. Currently, I hang my chucks on my pegboard walls, but, its not ideal, the chucks are heavy and the walls not quite sturdy enough for holding a bunch of chucks.
Jon, it’s been a while since I did it, but my recollection is that it wasn’t too hard (no pun intended). A sharp drill bit, a few drops of some oil for each hole, and a little bit of patience. After posting that I thought to myself that the hole I drilled was probably a little smaller than 5/16” — whatever the next larger size drill bit from 1/4” was. It really has worked well for me. Hope it works for you too.
 
Joined
Dec 16, 2022
Messages
140
Likes
198
Location
Mesa, AZ
I love the Rubbermaid idea. I keep a kitchen style trash under my lathe right now, but I think I'm going into the attic tomorrow to get down one of my totes and task it out. In the past I've wanted to put shelves on my leg key points, but I've noticed big bowl turning always rattles the tools
 
Joined
Jan 14, 2020
Messages
206
Likes
58
Location
Austin, TX
Well ... I cut off the bottom drawer and raised the cabinet up essentially making it part of the lathe, adding weight. I then tried to add a shower curtain. First part went well. Second part... Idk. It was not easy, partly because the cab tolerance at the top is next to nothing. I think I'll just leave one end covered and see if I like it. Maybe a small shop vac is the way to go .
 

Attachments

  • PXL_20241202_005316804.jpg
    PXL_20241202_005316804.jpg
    734 KB · Views: 13
  • PXL_20241202_005339739.jpg
    PXL_20241202_005339739.jpg
    567.6 KB · Views: 13
Back
Top