• January Turning Challenge: Thin-Stemmed Something! (click here for details)
  • Conversations are now Direct Messages (click here for details)
  • Congratulations to Scott Gordon for "Orb Ligneus" being selected as Turning of the Week for January 20, 2025 (click here for details)
  • Welcome new registering member. Your username must be your real First and Last name (for example: John Doe). "Screen names" and "handles" are not allowed and your registration will be deleted if you don't use your real name. Also, do not use all caps nor all lower case.

Large (32") Walnut Vase

Randy Anderson

Beta Tester
Beta Tester
Joined
May 25, 2019
Messages
941
Likes
1,427
Location
Eads, TN
Website
canthony.gallery
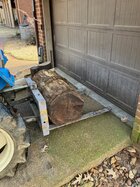
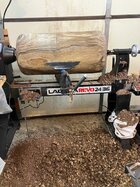
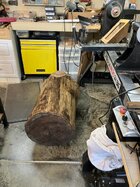
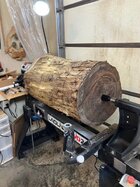
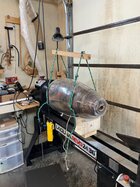
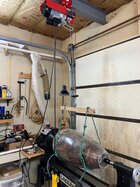
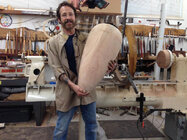
I have a huge stockpile of large walnut that my nephew brought to me a few months ago. It was cut from a tree that blew over in the hurricane they had last summer along the gulf coast. I ended up getting most all of the tree, including the massive root ball. I started yesterday on the first of quite a few large pieces and decided I would try to keep up with a project thread on the process. Here are some pics of getting it into the shop with my tractor, rolled in place and then lifted up with my ceiling hoist I have over the lathe. I forgot to take a pic of the hoist process. Per the online log weight charts it weighs approx. 300lbs. I was able to peel off the bark with a pry bar in about 45 minutes rather than try and deal with it on the lathe. Worth the time vs the absolute mess and fight it can be with a rouging gouge.

I currently have the Clark 1 1/4" hollowing bar setup but have ordered his 1 3/4" bar setup for this one and others to come. I've hollowed to 32" before with what I have but even with an 1 1/4" bar it's a tough slog and battle for the last 12-15", depending on the wood. I debated hollowing from both ends, a viable option I've done before, but would prefer not to. The goal for the next couple of days is to decide on which end will be top and bottom and begin shaping. It's 33" x 16".
 

Attachments

  • IMG_9667.jpg
    IMG_9667.jpg
    673.3 KB · Views: 44
  • IMG_9671.jpg
    IMG_9671.jpg
    103.2 KB · Views: 40
  • IMG_9668.jpg
    IMG_9668.jpg
    92.5 KB · Views: 43
  • IMG_9669.jpg
    IMG_9669.jpg
    88 KB · Views: 41
Randy,
Can't wait to see the progress of this project. I hope you post some pictures of it.

As for picking which end will be the top and bottom, I like to use the philosophy of Japanese woodworker, Tadao Arimoto, that a piece of wood should stand as it stands in nature. If you can figure out which way was up, that could help you decide. I know sometimes that it just won't work out that way, but it is a good starting point.

Tim
 
Tim, standing as it grew is often a good choice, if I can determine it. Sometimes it's just a subjective decision you have to make. For smaller pieces I get a basic shape and then stand it on my bench to look at it upright from different angles. Amazing how often my opinion of shape and top vs bottom will vary vs what it looked like horizontal on the lathe. A shape profile on the lathe can look all wrong standing up on my bench. Not an option with this piece. Still far too heavy for me to wrestle around on and off the machine.
 
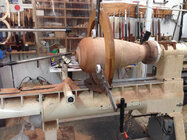
Basic shaping done. Since it's still just between a spur drive and live center I need to flip it around and mount with the tenon I currently have on the tail stock end. I can then focus on final shape, cleaning up the curve profile and putting my steady rest collar on the top. I typically turn an oversized tenon on the top, knowing I will turn it off after drying and second turning. Current thinking is the fat end is the bottom. Seems to flow better with the grain patterns best I can tell so far. Will see. I need to stop for a break anyway. Mountain of chips to high to even work around the lathe.
 

Attachments

  • IMG_9672.jpg
    IMG_9672.jpg
    540.6 KB · Views: 36
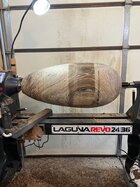
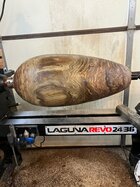
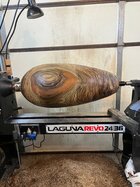
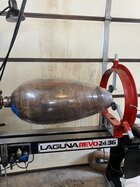
End of day step 2 done - outside shaping. Top is at tail stock end. Dia 15 1/2", 32 1/4" tall. You can tell on the top half where I thought I was done, started cleaning up and then caught my eye that I very slightly lost my curve a little less than halfway down. Went back and took about a 16th off from there, tapered to the top. I spend a lot of time going back and forth, different angles, stand it up on the bench if I can (leaving chuck on to keep alignment true) to make sure the curves flow and don't flatten out or ever so slightly change angle out of line with the rest of the surface. It's hard to get right and something I struggle with, especially on larger pieces. Sometimes all it takes is a few passes with a NR scraper to fix the issue. This will get a second turning once dry but critical I think to start right rather than think I'll fix it then. Will start hollowing in a couple of days. Wrapped in plastic until then.
 

Attachments

  • IMG_9676.jpg
    IMG_9676.jpg
    586.4 KB · Views: 38
  • IMG_9675.jpg
    IMG_9675.jpg
    561.1 KB · Views: 38
About all I can say right now Randy, is WOW!
That’s huge! Walnut is my favorite to turn. I’ll definitely be watching this thread
 
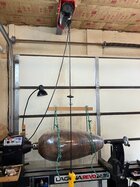
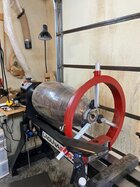
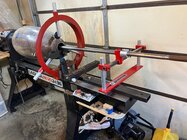
Plan to at least drill my pilot hole today. Needed to get the steady rest in place on the collar I turned. I should have made the collar just a bit taller but the wheels have a good enough purchase to hold well. If it begins to look like I need more I'll bring up the center again and add about 1/4" to it. Doing that also changes the top size a bit, changing that means more shaping, etc, etc. I included a picture of the lift system I use. Same setup for the intimal mounting. Here I simply lift to get decent tension on the ropes then tap a block under the end and slide the tail stock away. Hopefully it doesn't drop or move. Usually doesn't. Then mount the steady rest and push the bottom wheels in, tighten them down and give it a slow test spin. If it spins true then bring the top wheel down and tighten it. Remove the hoist rigging and all set for the next steps. Remember to move the tool rest outside the steady rest. More than a few times I've gotten all set up and then realized my tool rest is to the left, up against the head stock - start over.

Safety note: You can't see it but under the bottom of the piece I have a rope tied between the two large loops going around the blank. Without this on a curved piece the ropes can slip up and out along the curves on both ends. Net, the piece can slide out of the loops. Not usually an issue with a rough log that's still basically a cylinder but here, especially with the slick plastic wrap, it can happen. Some day I intend to make a woven cradle instead of the two loops.
 

Attachments

  • IMG_9678.jpg
    IMG_9678.jpg
    491.9 KB · Views: 38
  • IMG_9679.jpg
    IMG_9679.jpg
    556 KB · Views: 39
  • IMG_9677.jpg
    IMG_9677.jpg
    554.3 KB · Views: 39
Last edited:
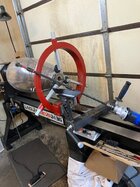
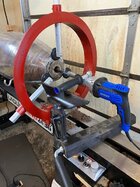
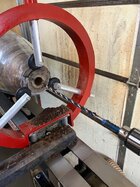
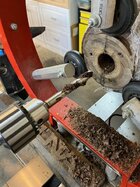
Drilling the pilot hole.

I've tried a number of different methods for drilling a pilot hole in my large pieces and this, so far, seems to be an effective one. I start out with a short 1/2" bit to get a good start on the hole. I then switch to a longer 12" bit and then finish with a 17 1/2" auger bit. That's as deep as I go with 1/2" bits. I do that work with a Jacobs chuck mounted in the tail stock being sure to back out and clear the bit often. From there I switch to a hand drill using Milwaukee switchblade bits. You can get them in various sizes online or at one of the big HW stores. I've been using the 1 3/8" bit lately but have done them with the 2 1/8" and even the 2 1/2". In the past I would use a Jacobs chuck in the tail stock for the larger bits but the torque, stress and wear and tear on the chuck, the quill in the tail stock and the tail stock itself is just too much. After destroying a few jacobs chucks and chewing up tapers I decided it was time for a different solution. The old fashioned way - by hand. It takes a big powerful hand drill with a handle and a few extensions. Using the tool rest to absorb the torque it doesn't take that long to bore the hole. This one is drilled to 31 1/2". The smaller 1 3/8" hole does mean a bit more wood to hollow out but in the big picture it's a lot easier than trying to punch a 2 1/2" hole that deep. I've done it more than a few times and it's a tough chore.

Drilling that deep there's no way to avoid hole wobble. By the time you get to the bottom it will have some degree of corkscrew to it. The bit flexes, the extensions will flex and wiggle at the joints, the bit will follow the pith or weak spots in the wood, your angle of holding the drill can be slightly off, etc. Starting with a straight hole helps but I've not been able to avoid some degree of being off center by the time I get to the bottom. Just takes a bit of work with the hollowing bar to get it centered again and then you're back in business. The 1 3/8" hole actually makes it easier to work with than a larger dia hole at that depth.

Safety note: be careful and take it slow and easy. If the drill binds up it can easily twist around and break a finger or a wrist. Use the tool rest to absorb the torque but even then be careful. Clear the chips often. All the way out of the hole. I've had one bind up deep inside, chuck and all, and then had to hollow around it to finally get it out.
 

Attachments

  • IMG_9687.jpg
    IMG_9687.jpg
    80 KB · Views: 36
  • IMG_9686.jpg
    IMG_9686.jpg
    87.1 KB · Views: 37
  • IMG_9685.jpg
    IMG_9685.jpg
    89 KB · Views: 37
  • IMG_9684.jpg
    IMG_9684.jpg
    92.7 KB · Views: 34
Last edited:
This is so fascinating! I can't even fathom how difficult it must be to hollow out a piece this large. Really looking forward to seeing how you do it, and also the final piece. The shape is gorgeous 😍
 
Thanks Maggie. The right tools help a lot but, things are still big and heavy, even the tools. Glad you like the shape. I get it right most of the time but it's not uncommon to think I'm done, go inside for lunch and come back out and wonder what I was thinking. There's no substitute for standing them up on the bench, leaving for overnight and then look again the next morning. Not uncommon to remount and adjust the shape a bit. Not really and option here.
 
I'll be waiting about a week to start the hollowing. Keith Clark had to do some modifications to the larger hollowing setup for me to accommodate my shop space and it will take a bit for the new HW to arrive. I could have started on the hollowing with my current 1 1/4" setup but I know from experience that the last 12" or so in a piece this size would be a very rough ride. I also didn't feel comfortable hollowing essentially the top half and then setting aside. The difference in thickness and possible drying could create issues. Until my new/larger HW arrives I have it wrapped in plastic sitting on a large furniture dolly out of the way.

Tools & Turning

For initial rouging I use a standard 2" rouging gouge until I get a cylinder shape. I'll then put a bit of a taper on each end but not too much. It's easy to get too far around the end and begin to cut mostly end grain. Not something that's safe to do with a roughing gouge. I then take a 1" roughing gouge that I've ground with the same profile as a spindle gouge (very close to what's called a continental gouge) and work to get very close to final shape. I use a standard 1/2" spindle gouge to put a tenon on the tail stock end. Once I flip the piece and have it mounted on the tenon in the head stock I'll use my standard 1/2" spindle gouge to refine the shape and clean things up.

Safety Note: Be very careful when working with the large rouging gouge. On pieces with numerous high and low spots it's easy to have a high spot catch the left or right wing of the gouge and grab the tool. Even at low RPMs that much mass is quite a shock to your tool and body. You can rotate the tool a bit to keep it from catching on the high side but it can still grab and surprise you. I've found working the entire length, working the high spots directly and then moving the tool rest in, working the full length again, moving in, etc. is a much safer approach. Don't try to get a smooth cylinder shape and then expect to move over and work the next 12" or so down to that same level if the difference in height is too much.
 
Last edited:
Fascinating! I'll prob never turn something like that but I can't wait for the next installment!

Kind of reminds me of following the play-by-play of one on David Mark's blog a few years back.
david_marks_vessel_3.jpg david_marks_vessel_2.jpg
david_marks_vessel.jpg

JKJ
 
John, I've watched some of his large vessel turning videos. Very inspirational and some good tips to pick up for dealing with large pieces. I don't have the artistic eye for the embellishments he adds but I do like his approach to forms. The pottery and glass artists figured it out long ago. No need to reinvent the wheel.
 
IMO, David is inspirational about everything.

I met him in a bowl class almost 20 years ago, a real treat.
I got a great piece of burl with birds eye figure from him.
Still waiting until I get good enough to turn it! Maybe in another 20 years...

David_Marks-and-JKJ-small.jpg

JKJ
 
End of day step 2 done - outside shaping. Top is at tail stock end. Dia 15 1/2", 32 1/4" tall. You can tell on the top half where I thought I was done, started cleaning up and then caught my eye that I very slightly lost my curve a little less than halfway down. Went back and took about a 16th off from there, tapered to the top. I spend a lot of time going back and forth, different angles, stand it up on the bench if I can (leaving chuck on to keep alignment true) to make sure the curves flow and don't flatten out or ever so slightly change angle out of line with the rest of the surface. It's hard to get right and something I struggle with, especially on larger pieces. Sometimes all it takes is a few passes with a NR scraper to fix the issue. This will get a second turning once dry but critical I think to start right rather than think I'll fix it then. Will start hollowing in a couple of days. Wrapped in plastic until then.
Love the form, awesome!
 
Hollowing - Day 1

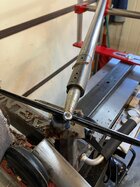
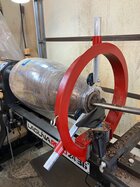
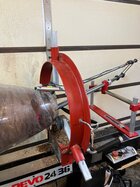
Started hollowing today. Took a few days longer than planned to get back to it - life happens. I start with my 1 1/4" bar and a cupped carbide cutter slightly tilted. I start by enlarging the opening and working my way down a bit to create some room to maneuver. I don't use the laser for thickness until much later in the process. It's not too hard to keep an eye on the wall thickness or use some improvised calipers to make sure I don't go too far. I try to keep it about 1" thick until I get as far down as I want to go with this bar, or to the bottom on a smaller piece. I can then mount the laser and begin working the inside wall to desired thickness. For a piece this size I went to 3/4". I typically shoot for between 1/2" - 5/8" but this being a larger piece I decided to go a little heavy. There's no sense having the laser and all the support structure to deal with during the entire process since all I'm doing is hogging out the bulk of the material. No precision required.

Once I have a bit of room to maneuver I start by picking up the edge of the pilot hole, get it rounded off since it's almost always off center, then pull up and out toward the edge. I essentially work a funnel shape all the way down. Find the center, true up the opening and then pull out and toward the side. Over and over and over. I stand to the side of the bar, left hand on the bar and tool rest, right hand on the tail end of the bar. After lots of hours at the wheel you get a sense for hand coordination to steer the bar where you want it.

There are times when a push cut can be a huge difference in cut efficiency and ease of cut. That was the case today. Lots of standard pull up and out cuts but also a good number of push cuts down the wall and into the funnel. I go back and forth on approach and there are times when one works better than the other. Trial and error. Also helps with muscle tension and strain from repetitive motion. Once I get close to the final wall thickness I try to avoid push cuts down the wall, especially if the piece curves inward. It's easy to push a bit too hard and create a deep groove or overshoot your wall thickness goal. I finish up with a number of very slow light passes from bottom to top, watching the laser barely graze the side of the piece, trying to keep it as steady as possible.

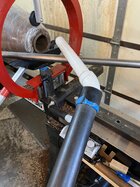
Clearing chips is more than just about minimizing the mess. On wet wood they will quickly build up and clump on the inside walls and prohibit your ability to maneuver the tool. They can also cause your tool to bind up, bounce and get away from you. Stop often and clear them out. You'll have more room as you go but they'll still get in the way sooner than you think. I don't use my air hose to clear chips. It makes a huge mess, the dust gets all in the air around me and not really that efficient. I have a piece of PVC at an angle on a big hose from my dust collection system. Pull the tool out, stick the tube in and clean up. Works great and keeps the mess to a minimum.

I got to a little over 15" in today with the walls at 3/4", tapered a bit deeper into the pilot hole. It's important to take the time at this stage to do some fine cleanup for the opening. On a piece this size I want to make sure the first 6-8 inches or so are neat, no tool mark ridges or valleys and a consistent surface. Once finished that's about as far in as anyone will be able to see or feel from a typical viewing angle. I may go deeper but no need to go very deep. I have a long NR scraper I use to clean up as far as I can reach inside.
 

Attachments

  • IMG_9718.jpg
    IMG_9718.jpg
    474.2 KB · Views: 4
  • IMG_9717.jpg
    IMG_9717.jpg
    460.8 KB · Views: 4
  • IMG_9716.jpg
    IMG_9716.jpg
    348.1 KB · Views: 4
  • IMG_9715.jpg
    IMG_9715.jpg
    484.3 KB · Views: 4
Back
Top