• Beware of Counterfeit Woodturning Tools (click here for details)
  • Johnathan Silwones is starting a new AAW chapter, Southern Alleghenies Woodturners, in Johnstown, PA. (click here for details)
  • Congratulations to William Rogers for "Ambrosia Maple Platter" being selected as Turning of the Week for September 16, 2024 (click here for details)
  • Welcome new registering member. Your username must be your real First and Last name (for example: John Doe). "Screen names" and "handles" are not allowed and your registration will be deleted if you don't use your real name. Also, do not use all caps nor all lower case.

I tried my Lyle Jamieson System

Joined
Nov 22, 2023
Messages
217
Likes
2,070
Location
Morganton, NC
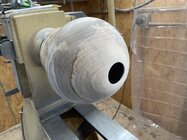
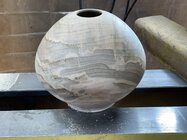
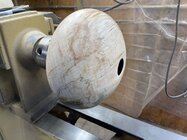
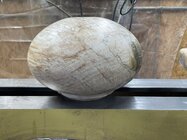
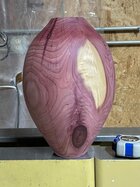
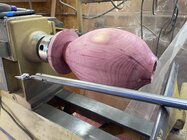
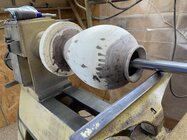
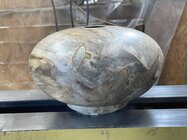
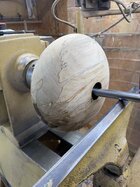
Received the system Saturday, assembled, and watched videos all Saturday night. I should have practiced first but I jumped right into it😁.
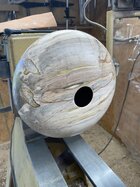
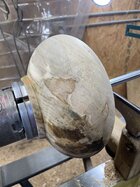
This one measures 9-1/2” x 5” when I reduce the foot, and the entrance hole is 1-5/8”.
Did a few things right but had a hard time reaching the widest point of the form and I adjusted everything I could think of, the bar would hit the entrance hole and prevent the reach I needed. Not the tools fault but the operator. Top is around 1/8” thick and probably 1/4” at the widest part, bottom is good.
I should have started with a larger entrance hole and maybe not as wide. The important thing is I learned a lot and didn’t do too bad for my first piece. However no one with long fingers will hold the form😂. I’ll try the carbide on the next one and try it on a piece of cherry.
1716862214363.jpeg
1716862171998.jpeg
1716862134793.jpeg
1716862067784.jpeg
 
Joined
Dec 17, 2006
Messages
132
Likes
426
Location
Traverse City, MI
Website
www.lylejamieson.com
Received the system Saturday, assembled, and watched videos all Saturday night. I should have practiced first but I jumped right into it😁.
This one measures 9-1/2” x 5” when I reduce the foot, and the entrance hole is 1-5/8”.
Did a few things right but had a hard time reaching the widest point of the form and I adjusted everything I could think of, the bar would hit the entrance hole and prevent the reach I needed. Not the tools fault but the operator. Top is around 1/8” thick and probably 1/4” at the widest part, bottom is good.
I should have started with a larger entrance hole and maybe not as wide. The important thing is I learned a lot and didn’t do too bad for my first piece. However no one with long fingers will hold the form😂. I’ll try the carbide on the next one and try it on a piece of cherry.
View attachment 63767
View attachment 63766
View attachment 63765
View attachment 63764
Hi David, Thanks for sharing the photos. Great piece, beautiful shape. I wish my first hollow form looked that good. You picked a very difficult shape for the first piece using the captured boring bar. With the small entry hole and flat top there is a fiddle factor to reach it all. You can do any shape you like but some just take a lot more time to reach the entire inside shape with a nice clean surface. And the need to use all three of the reach capabilities of the hollowing system. Did you use the swivel cutter in the other end of the boring bar with the 45 degree hole, to get way over to the largest diameter?? May I suggest you review my DVD again and consider using a faceplate. A chuck is a weak link that might lead to some vibration issues with vessels that size. Keep in touch.
 
Joined
Aug 14, 2009
Messages
2,275
Likes
1,356
Location
Peoria, Illinois
Bent hollowing bars make that easier. I have both the Jamieson and a DIY articulated hollowing system that was based on the KOBRA design. I've worked through 5/8" holes with the KOBRA design and some custom tool bars. You can also hollow through the bottom and fill that hole with a plug of wood taken from the same blank. Then you can show a 1/4" hole in the top if you want to. There is also the late John Jordan's technique to hollow through a larger hole, then add a contrasting material to make a collar with a smaller opening.
 
Joined
Nov 22, 2023
Messages
217
Likes
2,070
Location
Morganton, NC
Hi David, Thanks for sharing the photos. Great piece, beautiful shape. I wish my first hollow form looked that good. You picked a very difficult shape for the first piece using the captured boring bar. With the small entry hole and flat top there is a fiddle factor to reach it all. You can do any shape you like but some just take a lot more time to reach the entire inside shape with a nice clean surface. And the need to use all three of the reach capabilities of the hollowing system. Did you use the swivel cutter in the other end of the boring bar with the 45 degree hole, to get way over to the largest diameter?? May I suggest you review my DVD again and consider using a faceplate. A chuck is a weak link that might lead to some vibration issues with vessels that size. Keep in touch.
Thanks Lyle! I didn’t use the 45* bar but thought about it. I knew this was not the piece to start with but I’m hardheaded😁. I figured I’d see just how good I could do for a first attempt. I used every fiddle factor you show except the 45*😁. The maple was not a hard turn so I decided to give the chuck a go instead of the faceplate. I’ll use the faceplate for the next one and try an easier shape. The system works great and very happy with it, I just need more practice.
 
Joined
Nov 22, 2023
Messages
217
Likes
2,070
Location
Morganton, NC
Bent hollowing bars make that easier. I have both the Jamieson and a DIY articulated hollowing system that was based on the KOBRA design. I've worked through 5/8" holes with the KOBRA design and some custom tool bars. You can also hollow through the bottom and fill that hole with a plug of wood taken from the same blank. Then you can show a 1/4" hole in the top if you want to. There is also the late John Jordan's technique to hollow through a larger hole, then add a contrasting material to make a collar with a smaller opening.
I’m sure once I turn a few it will get easier and then go to more challenging pieces. I’ve seen the hollowing through the bottom and plugging but really don’t want to go that way. I like a challenge and can’t wait to try my next form.
 
Joined
May 4, 2010
Messages
2,545
Likes
1,988
Location
Bozeman, MT
For a wide hollow form, that's a really good result. Impressive. It took me about 8 years to feel competent as a wood turner, and another 5 to get over doing things the hard way. You're on your way!
 
Joined
Nov 22, 2023
Messages
217
Likes
2,070
Location
Morganton, NC
For a wide hollow form, that's a really good result. Impressive. It took me about 8 years to feel competent as a wood turner, and another 5 to get over doing things the hard way. You're on your way!
Thank you, I have been turning for about 5 years however only halfway knew what I was doing for the last 2-1/2 years after finally watching some videos. Self taught and have a passion for turning( no longer build hobby furniture😁). The hollow form is something I really want to conquer and then get into more artistic pieces.
 
Joined
Jan 12, 2014
Messages
92
Likes
395
Location
Crossville, TN
Received the system Saturday, assembled, and watched videos all Saturday night. I should have practiced first but I jumped right into it😁.
This one measures 9-1/2” x 5” when I reduce the foot, and the entrance hole is 1-5/8”.
Did a few things right but had a hard time reaching the widest point of the form and I adjusted everything I could think of, the bar would hit the entrance hole and prevent the reach I needed. Not the tools fault but the operator. Top is around 1/8” thick and probably 1/4” at the widest part, bottom is good.
I should have started with a larger entrance hole and maybe not as wide. The important thing is I learned a lot and didn’t do too bad for my first piece. However no one with long fingers will hold the form😂. I’ll try the carbide on the next one and try it on a piece of cherry.
View attachment 63767
View attachment 63766
View attachment 63765
View attachment 63764
Great form on this piece, would love to see the bottom when finished!
 
Joined
Aug 14, 2009
Messages
2,275
Likes
1,356
Location
Peoria, Illinois
I’m sure once I turn a few it will get easier and then go to more challenging pieces. I’ve seen the hollowing through the bottom and plugging but really don’t want to go that way. I like a challenge and can’t wait to try my next form.
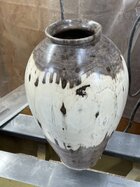
Nothing wrong with going through the bottom. This one is 6" tall and weighs 2.9 ounces. 5/16" hole in the top. Pictures of the form and the bottom
 

Attachments

  • IMG_3293.jpg
    IMG_3293.jpg
    112.7 KB · Views: 34
  • IMG_3294.jpg
    IMG_3294.jpg
    137.2 KB · Views: 34
Joined
Nov 22, 2023
Messages
217
Likes
2,070
Location
Morganton, NC
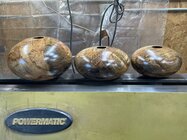
Turned my second and third hollow forms today, both cherry.
First one I’m not happy with the shape but it was for practice. I was able to keep the walls a uniform thickness and measures 6-1/4 x 7-1/2.
Second one was harder but I kept the thickness uniform and used every piece of Lyle’s system 😁, measures 7/1/4 x10-1/4.
I’ve have a long ways to go but starting to get the hang of it.
1717370559497.jpeg
1717370528385.jpeg
1717370493303.jpeg
1717370465155.jpeg
 
Joined
Feb 26, 2019
Messages
1,897
Likes
1,488
Location
Lebanon, Missouri
Like Lyle said, it takes some fiddling with all the options supplied with his system to figure out what configuration is best for various areas. Your forms look pretty good to me. The more you do the better you get.
 
Joined
Jun 17, 2021
Messages
64
Likes
41
Location
Calgary, CA
Received the system Saturday, assembled, and watched videos all Saturday night. I should have practiced first but I jumped right into it😁.
This one measures 9-1/2” x 5” when I reduce the foot, and the entrance hole is 1-5/8”.
Did a few things right but had a hard time reaching the widest point of the form and I adjusted everything I could think of, the bar would hit the entrance hole and prevent the reach I needed. Not the tools fault but the operator. Top is around 1/8” thick and probably 1/4” at the widest part, bottom is good.
I should have started with a larger entrance hole and maybe not as wide. The important thing is I learned a lot and didn’t do too bad for my first piece. However no one with long fingers will hold the form😂. I’ll try the carbide on the next one and try it on a piece of cherry.
View attachment 63767
View attachment 63766
View attachment 63765
View attachment 63764

I used the Stewart system bar for the piece to the left. The part is RS210 made by Sorby: https://federatedtool.com/robert-sorby-rs210-reversible-hooker-for-rs2000-system/

Oneway makes something similar: https://www.thewoodturningstore.com...-with-cutter-for-the-oneway-hollowing-system/

I don't know whether either of these would fit Lyle's system but I've made several similar bars for smaller openings from hot-rolled steel bars.
 
Joined
Nov 22, 2023
Messages
217
Likes
2,070
Location
Morganton, NC
I used the Stewart system bar for the piece to the left. The part is RS210 made by Sorby: https://federatedtool.com/robert-sorby-rs210-reversible-hooker-for-rs2000-system/

Oneway makes something similar: https://www.thewoodturningstore.com...-with-cutter-for-the-oneway-hollowing-system/

I don't know whether either of these would fit Lyle's system but I've made several similar bars for smaller openings from hot-rolled steel bars.
Not sure if they would fit. Lyle has a 45* on one of the bars and it really helps with the reach.
 
Joined
Feb 28, 2021
Messages
1,343
Likes
1,191
Location
Roulette, PA
Website
www.reallyruralwoodworks.com
What Richard said - I usually just go by what I think it is worth to me, considering the wood, my time, and just by how it looks (Do I think it's pretty, etc.) - If it doesn't sell by the last market of the year, I appraise it for whether I feel it is good enough to go to the artisan center (and add a bit of markup to it) , otherwise I set it out next year with a marked down price. On the other hand, If they seem to sell quickly I will bump my starting prices up a touch, until it seems people will *almost* buy it but see the price and put it back down, then I can back off on it a bit. In other words, it is a moving target, no set formula.
 
Joined
Nov 22, 2023
Messages
217
Likes
2,070
Location
Morganton, NC
What Richard said - I usually just go by what I think it is worth to me, considering the wood, my time, and just by how it looks (Do I think it's pretty, etc.) - If it doesn't sell by the last market of the year, I appraise it for whether I feel it is good enough to go to the artisan center (and add a bit of markup to it) , otherwise I set it out next year with a marked down price. On the other hand, If they seem to sell quickly I will bump my starting prices up a touch, until it seems people will *almost* buy it but see the price and put it back down, then I can back off on it a bit. In other words, it is a moving target, no set formula.
I do a similar pricing but use the basic formula as a starting point for bowls. I was just wondering if there was a basic starting point for hollow forms.
 
Joined
Nov 22, 2023
Messages
217
Likes
2,070
Location
Morganton, NC
I'm pretty sure I can speak for most of us. I wish my first three hollow forms looked that nice.
Thank you! I figured by starting with a tougher shape I could learn more even if it took me longer to complete. Some great looking hollow forms on this site and I know I have a lot more to learn. Since I have about 120 bowls drying I thought this would be a good time to start learning hollow forms!
 
Joined
Nov 22, 2023
Messages
217
Likes
2,070
Location
Morganton, NC
Just curious, what finish did you use on the completed ones? They all look great!
I applied two coats of Tried and True Danish Oil, once dry I applied 3 coats of satin lacquer. The fourth coat was semi gloss which I picked up by mistake and after this photo was taken I applied another coat of satin to bring the sheen down some.
 
Back
Top