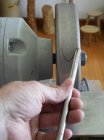
Has anybody on this forum any information/tips/guidance on how to sharpen the Ray Key signature spindle gouge. It is the one Ray uses for hollowing and scraping, has a long edge ground on the left side of the flute. I have one that I used for box making but it is getting pretty dull and needs to be sharpened. My one way jig is useful for the tip which is a finger nail grind, but the long edge is a challenge. Thanks
-
February 2026 Turning Challenge: Cookie Jar! (click here for details) -
Congratulations to Dean Center for "After Life" being selected as Turning of the Week for February 16, 2026 (click here for details) -
AAW Symposium demonstrators announced - If the 2026 AAW International Woodturning Symposium is not on your calendar, now is the time to register. And there are discounts available if you sign up early, by Feb. 28. Early Bird pricing gives you the best rate for our 40th Anniversary Symposium in Raleigh, North Carolina, June 4–7, 2026. (There are discounts for AAW chapter members too) For more information vist the discussion thread here or the AAW registration page
-
Welcome new registering member. Your username must be your real First and Last name (for example: John Doe). "Screen names" and "handles" are not allowed and your registration will be deleted if you don't use your real name. Also, do not use all caps nor all lower case.
You are using an out of date browser. It may not display this or other websites correctly.
You should upgrade or use an alternative browser.
You should upgrade or use an alternative browser.
How to Sharpen Ray Key Spindle gouge
- Thread starter Frank Calzaretta
- Start date
- Joined
- Jan 27, 2005
- Messages
- 13,210
- Likes
- 5,814
- Location
- Dalworthington Gardens, TX
- Website
- pbase.com
Set the arm of the Varigrind to the middle position, set the protrusion to about 2½", and adjust the slide on the Wolverine to give a 30° nose angle. The jig only controls the angle of the grind, it is up to you to control the shape.
I tried to make that Ray Key gouge out of an old spindle gouge as he describes in his video "The Basic Box" (at about 20:47 in the video). He recommends modifying a 3/8" spindle gouge. The only gouge I had on hand to play with was 5/8". I used the grinder platform to grind the long sweep on the side and make it thinner. Seems to work OK, but I need more experience with it. I am just starting out with small boxes.
Let me amplify on what Bill said. If you want to grind long wings that remain sharp to the end, you need to open up the arm angle to mid range or so. For short bevels, it almost doesn't matter what arm angle you use. Also, the protrusion has little effect as long as it is used consistently. For any choice of these parameters, set the desired nose angle by moving the v-arm in or out. If you try to obtain long wings using a small arm angle, you will find that the wing will fold over and become blunt toward the end.
Thanks to all for your response....It appears to me that the only way to sharpen this gouge is to free hand it. The varigrind jig won't allow for a grind 5 or so inches along the flute edge.
Thanks to all for your response....It appears to me that the only way to sharpen this gouge is to free hand it. The varigrind jig won't allow for a grind 5 or so inches along the flute edge.
Thanks to all for your response....It appears to me that the only way to sharpen this gouge is to free hand it. The varigrind jig won't allow for a grind 5 or so inches along the flute edge.
Frank, I have never seen one these gouges and I am not sure what the is the function of the extremely long wing. However, I would suggest that unless you are an accomplished free-hand sharpener, you should grind the gouge using a varigrind jig, as Bill described, as far out as you can and then switch to free-hand for the remainder of the wing. This gives you the benefit of the jig for properly shaping the more critical parts of the gouge profile. The far out part of the wing will be used only as a scraper and will be more tolerant. Note that you can increase the length of wing that can be produced with the jig by increasing the protrusion. As I mentioned before, The protrusion not a critical parameter and can be pretty much compensated for by adjusting the v-arm position to produce the desired nose angle.
I was lucky enough to take Ray Key's class at Arrowmont, even luckier to be his assistant for the next two years. If the gouge is still close to the original profile, practice with the grinder off. Set the platform as a rest for your left hand, your left hand supports the gouge a few inches behind the tip. Hold the gouge handle or ferrule with your right hand (fingertips, no death grip) and with the gouge tip bevel on the wheel, rotate tool clockwise while lowering the handle, this should be sharpening the right side of the gouge, start rising the handle and rotate the tool counter clockwise, when the flute is at 12 o'clock, start lowering the handle to work the left side of the gouge. What ends up happening is you start to see that you are scribing a small U on the face of the wheel. when you are on the left side of the U you are sharpening the right side if the gouge and vice versa for the left. When you are ready to extend the right wing about 2 inches or so down the side, stay on the right bevel and keep rolling the tool clockwise till the flute is about 9 o'clock, at the same time pushing the tool up the wheel, bringing the edge back as far as you want. Even tho it is called "free hand" you are using your body as a jig. Practice practice practice with the grinder off. Then go for it... Stay loose... I know pics would help, I think there are some in another post but I could not find them. I'm out of town battling a flooded basement, I'll do a better write up with pics when I get home.
- Joined
- Jan 27, 2005
- Messages
- 13,210
- Likes
- 5,814
- Location
- Dalworthington Gardens, TX
- Website
- pbase.com
I found some information on the Henry Taylor site. The nose angle is is about 60°, the left wing is fairly short, and the wing on the right looks like it goes back between 1.5 and 2 inches. The total flute length is only 4 inches so I made an estimate of the flute length by looking at a photo of the right side. As far as I could tell the length isn't at all critical because it seems to be mainly important for drilling the initial depth hole. I have seen numerous demonstrators drilling with a spindle gouge and they used numerous different grinds.
Ray does a lot of things with his specially ground spindle gouge. One thing not mentioned is using it as a scraper to finish the surface of the inside of the box. I believe that function is the main reason for the long edge. This is one of those situations where a picture is worth 1000 words and a video would be worth 1,000,000.
Now, I am confused. Which side of the Ray Key gouge is ground back. Frank referred to the left side, which sounded reasonable to me but other posts refer to the right side. If it is the right side, I can't imagine how it would be useful on the inside of a box. Is it for shear scraping the exterior?
- Joined
- Jan 27, 2005
- Messages
- 13,210
- Likes
- 5,814
- Location
- Dalworthington Gardens, TX
- Website
- pbase.com
Ray does a lot of things with his specially ground spindle gouge. One thing not mentioned is using it as a scraper to finish the surface of the inside of the box. I believe that function is the main reason for the long edge. This is one of those situations where a picture is worth 1000 words and a video would be worth 1,000,000.
I believe that the advantage of the tool is that it cuts rather than scrapes on the interior of the box using the short left side.
Now, I am confused. Which side of the Ray Key gouge is ground back. Frank referred to the left side, which sounded reasonable to me but other posts refer to the right side. If it is the right side, I can't imagine how it would be useful on the inside of a box. Is it for shear scraping the exterior?
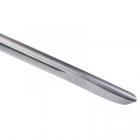
It's the right side with the long wing. The left side has a very short wing.I agree with Dennis. There's better tools for shear scraping and I prefer shear cutting.
Here is a picture.
I was lucky enough to take Ray Key's class at Arrowmont, even luckier to be his assistant for the next two years. If the gouge is still close to the original profile, practice with the grinder off. Set the platform as a rest for your left hand, your left hand supports the gouge a few inches behind the tip. Hold the gouge handle or ferrule with your right hand (fingertips, no death grip) and with the gouge tip bevel on the wheel, rotate tool clockwise while lowering the handle, this should be sharpening the right side of the gouge, start rising the handle and rotate the tool counter clockwise, when the flute is at 12 o'clock, start lowering the handle to work the left side of the gouge. What ends up happening is you start to see that you are scribing a small U on the face of the wheel. when you are on the left side of the U you are sharpening the right side if the gouge and vice versa for the left. When you are ready to extend the right wing about 2 inches or so down the side, stay on the right bevel and keep rolling the tool clockwise till the flute is about 9 o'clock, at the same time pushing the tool up the wheel, bringing the edge back as far as you want. Even tho it is called "free hand" you are using your body as a jig. Practice practice practice with the grinder off. Then go for it... Stay loose... I know pics would help, I think there are some in another post but I could not find them. I'm out of town battling a flooded basement, I'll do a better write up with pics when I get home.
Thanks Clifton...thi is helpful...any pictures would also be helpful....sorry for the flooded basement...been there...
Now, I am confused. Which side of the Ray Key gouge is ground back. Frank referred to the left side, which sounded reasonable to me but other posts refer to the right side. If it is the right side, I can't imagine how it would be useful on the inside of a box. Is it for shear scraping the exterior?
Dennis sorry for the confusion...I mis-spoke it is the right side as shown in the photo provided by Bill....
And then the long right wing, altho it's only about 1 1/2 " long.
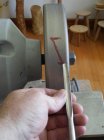
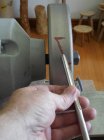
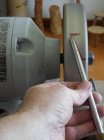
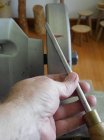
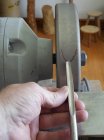
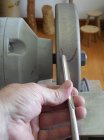
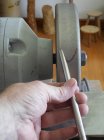
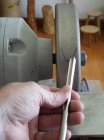
Hopefully post #7 makes more sense with these pics. A few tips are, light grip on tool and touching the heel first then lifting the handle till the full bevel contacts the wheel. Also, practicing with the grinder off. Hope this helps...
c


Hopefully post #7 makes more sense with these pics. A few tips are, light grip on tool and touching the heel first then lifting the handle till the full bevel contacts the wheel. Also, practicing with the grinder off. Hope this helps...
c
Last edited:
john lucas
AAW Forum Expert
Here is my video on sharpening spindle gouges. About 5:50 I sharpen a gouge similar to what Clifton is showing. Hopefully this will help you.
View: https://www.youtube.com/watch?v=BOEL7Q3CpZc
2:40 to 3:15 showes a good free hand "heel first then lift till bevel contacts"
I like your slide the tool in the vee pocket work around if you don't have the wolverine jig.
I like your slide the tool in the vee pocket work around if you don't have the wolverine jig.
Thanks all ...really appreciate the help

