• Beware of Counterfeit Woodturning Tools (click here for details)
  • Johnathan Silwones is starting a new AAW chapter, Southern Alleghenies Woodturners, in Johnstown, PA. (click here for details)
  • Congratulations to Peter Jacobson for "Red Winged Burl Bowl" being selected as Turning of the Week for April 29, 2024 (click here for details)
  • Welcome new registering member. Your username must be your real First and Last name (for example: John Doe). "Screen names" and "handles" are not allowed and your registration will be deleted if you don't use your real name. Also, do not use all caps nor all lower case.

How do you get a smooth bottom?

Joined
Dec 29, 2007
Messages
64
Likes
6
I've been turning off and on for a few years. I like smaller (under 4in) boxes, bowls, gobblets etc. I'm finally getting close to the finish I want EXCEPT I just can't seem to eliminate the center nib at the bottom of my stuff.

I've used every chisel I have that will fit, but in the end, I can always feel that nib in the center of the turning. On the outside foot, when I pare away the tennon, there is always the telltail dot- small, but its there.

I know I need to keep practicing, but does anyone have any techniques or advice to make this a little less trial and error?

Thanks
Dick
 
Joined
May 16, 2005
Messages
3,540
Likes
15
Sandpaper is the final answer, but it's tough to do, because you've got such a nice cut elsewhere. Breaks my heart to clean the nub with 100, considering what it does to the rest of the bottom, but it does take out the nub with a firm backing. Where I can reach I use the flex edge Power Locks. The Kirjes (sp?) pneumatic sander is a good finisher.

Minimize by taking a skewed scrape at the last, trying not to press, because that makes those white rings where you press the grain. I wet before sanding to stand that area up.

For the parting nub there are the chisel types or the knife types. I'm a knife type. Curved blade knife can be worked with one hand while holding the piece in the other, which is safer than trying to chisel it off, because you can pare round and round until it's time for - sandpaper.
 
Joined
Apr 11, 2007
Messages
628
Likes
2
Location
Northwest Arkansas
Dick,
I've had good results with the following:
On an end grain piece, use the teardrop scraper as Barb advised, or a 1/2" rounded nose scraper, freshly sharpened for best results. Work your way across the bottom, L to R or R to L, very lightly. You should be seeing only shavings, kind of powdery. When you first start, you'll notice that there will not be a steady cut, instead it will cut the hills and leave the valleys. Keep working the tool smoothly and slowly back and forth until you have a cut that scrapes across the bottom the entire distance the tool travels. Some people do this with a shear cut, but I like the scraping cut.
On side grain, try using the scraping cut, and watch out for the transition between the bottom and the side wall, it's your most likely place to catch. Try to maintain the shear angle and a consistent presentation toward the piece.
Hope this helps!
KurtB
 
Last edited:

john lucas

AAW Forum Expert
Joined
Apr 26, 2004
Messages
8,340
Likes
3,600
Location
Cookeville, TN
Are you able to turn the whole bottom or do you have to stop the lathe and carve it off by hand? If you can turn the whole bottom then what is probably happening is you are pushing the gouge too fast and pulling wood out of thecenter. remember the wood is rotating very slowly past the cutter in the center so you have to slow the cutter down to a crawl. That last 1/8" takes forever to cut cleanly.
If you are having to carve it away just use sharp tools and take small bites. I cut the little tenon off using a dovetail or coping saw and then carve away the little nub that's left.
 
Joined
Dec 15, 2006
Messages
328
Likes
2
Location
Sierra Foothills
If you're willing to try something a bit out of the ordinary, this little knife (with a little modification work to get the edges sharpened to a keen edge) does a great job in cutting away that nasty nub. I like it best when the piece is still on the lathe, with the lathe turned off, and turning the finished piece by hand. http://www.amazon.com/SCI-Scandicrafts-Inc-Peach-Pitting/dp/B000IJB45S
 

Steve Worcester

Admin Emeritus
Joined
Apr 9, 2004
Messages
2,694
Likes
97
Location
Plano, Texas
Website
www.turningwood.com
The nib in the inside is different from the outside. For the outside, try this technique Mr Ellsworth teaches. I show it on this page of one of my How To articles.
http://www.turningwood.com/square4.htm

Basically a very small shallow gouge ground in a teardrop sort of, and supported with a live center with a small point on it.
 
Joined
Aug 8, 2005
Messages
284
Likes
1
Location
Ballard (Seattle) WA and Volcano, Hawaii....on top
The nib in the inside is different from the outside. For the outside, try this technique Mr Ellsworth teaches. I show it on this page of one of my How To articles.
http://www.turningwood.com/square4.htm

Basically a very small shallow gouge ground in a teardrop sort of, and supported with a live center with a small point on it.

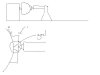
I use the same method as Steve. I had a bit of trouble seeing what he was referring to in his link though so I took a minute to scratch out a picture.


To remove the bottom nib on the outside. I usually hold the piece with the opening of the bowl or hollow form facing the headstock, using a jam chuck, with the live center up against the bottom of the bowl. Pressure from the tail is just enough for the piece to turn without spinning loose.

As Steve said, I use a small detail gouge that had been ground to a teardrop or even a spear like point. I start with the flute facing the headstock and make cut 1. Then I reverse the flute and make cut 2. I repeat that until I am left with a little cone at the bottom of the bowl, shown in the circle labeled goal. The tip of the cone is pretty small and delicate at this point.

Then, I position my gouge for cut 2 with the cutting tip not quite touching the tip of the cone. I am only holding it with my right hand. The lathe is probably running at only 200 to 300. Pretty slow. With my left hand I shut off the lathe. As it spins down I quickly move my left hand under the bowl, and then push lightly with the gouge to cut off the cone. The bowl will drop into your left hand. It will not fly away. The tip of the cone at that point was obviously pretty delicate for a light push to sever it.

Before I do this I usually lay a cloth or thin sheet of foam rubber on the bed of the lathe under the bowl. Just in case I don't catch it. Hasn't happened yet, but Murphy and I are good friends and I know it will happen.

This really produces a clean bottom surface. The process seems really scary, but the first time you do it you will say....woooohooo! That was easy.

The earlier description of eliminating the inside nub is how I usually tackle that. That also works great most of the time. It works whether I am using a scraper as described, or my Kelton hollowers (small scrapers if you think about it) or my bowl gouge. Very clean. Little sanding needed. Unlike the bottom nib removal we described this seems so simple but takes a little to get used to. You might try it on a bowl well before you are actually ready to finish the bottom. Let a nib form, remove it. Continue hollowing the bowl. Let a nib form, remove it, etc. By the time you are ready to finish it off you will be comfortable with the process.

Be sure to holler at us if we (me? <grin>) made no sense to you and we can try explaining it again.

Dave
 

Attachments

  • Nib removal.JPG
    Nib removal.JPG
    19.3 KB · Views: 404
Joined
May 29, 2004
Messages
995
Likes
2
Location
billerica, ma
I use Udder Balm. Non-greasy and works wonderfully. Put it on right before bedtime and the wife just loves that silky, baby-skin feel.

dk

(happy 08 :D)
 
Joined
Dec 29, 2007
Messages
64
Likes
6
As a (relatively) new grandpa- 1-18mos and 1-6weeks I guess I should have seen that coming! I use Desitin myself, but its pretty messy. ;)

Ive been using a 1/4 gouge for the outside tenon (1/4 detail gouge is on my next tool wish list). I can get a pretty small point, but now that you mention it, I'm sure Im being too agressive for that final cut. My lathe doesn't go slower than 500- maybe I'll try shuting it off and rotate by hand- I forgot about Elsworth.

My favorite for the inside is an old diamond point that I turned into a narrow scrapper with a rounded left edge. I find I don't get the catches with the smaller tool. Never thought of practicing removing the nib on the way down inside.

Thans for all the suggestions- (don't stop now). I see I've got a lot of practice in front of me!

Happy New Year to all of you.
Dick
 
Joined
Jan 27, 2005
Messages
100
Likes
0
Dietrich,

I like your solution better than mine (sitting on sandpaper and wiggling around)! :D :D

Joe
 
Joined
May 29, 2004
Messages
995
Likes
2
Location
billerica, ma
I'd been struggling for days and finally had to give in.

Now for the bowl, the diagram for a pressure chuck followed by a quick power sand is the way I do it.

The other option is to turn the base first with a slight undercut, chuck it in expansion mode, and go for it.

dk
 
Back
Top