• December Turning Challenge: Tree! (click here for details)
  • Congratulations to José Esteban Cruz"Rocking Horse" being selected as Turning of the Week for December 16, 2024 (click here for details)
  • Welcome new registering member. Your username must be your real First and Last name (for example: John Doe). "Screen names" and "handles" are not allowed and your registration will be deleted if you don't use your real name. Also, do not use all caps nor all lower case.

Homemade Threading Jig

Joined
Mar 19, 2016
Messages
1,337
Likes
1,684
Location
Haubstadt, Indiana
A club member made a threading jig using a cross slide vise. It appears to work well. I am going to build one using his concept, however my lathe is a 25” swing where his is an 18” swing. So I need to make some modification. To account for the difference in swing I am going to mount the vise on a 4” wood base. Has anyone made a threading jig using a cross slide vise. I plan to use a cutter held by a collet. I would like to see pictures or any suggestions using a cross slide vise for cutting threads. I plan on two thread pitches, 8TPI and 10TPI. I could possibly do 16TPI, but guessing that would only work for the harder woods.

Yes, a Baxter would be nice, but$$$.

 
Joined
Feb 2, 2016
Messages
687
Likes
555
Location
Clinton, TN
Has anyone made a threading jig using a cross slide vise.

This is interesting. How do you rotate the piece? Maybe a little sketch? I've seen some home-made threading jigs but they all used the same technique (as the Baxter) of rotating a threaded rod by hand to advance and rotate the piece at the same time. Would the cross slide vise simply be used to position the wood?

I'm just mostly curious - I bought a Baxter years ago before the price sky-rocketed.

JKJ
 
Joined
Mar 19, 2016
Messages
1,337
Likes
1,684
Location
Haubstadt, Indiana
@John K Jordan I’ll post some pictures once built and tried (likely a couple of weeks). The cross slide will be used to position. The cutter will be in the lathe using a collet chuck. Advancement will be a threaded rod through nuts. I plan to drill the nuts and tap a 1/4-20 thread to install some nylon screws to help take out any play as the threaded rod is a regular commercial grade thread. I will leave the piece in the chuck and attach the chuck to the threaded rod for rotation. A faceplate could be used also.
 
Joined
Aug 14, 2009
Messages
2,351
Likes
1,429
Location
Peoria, Illinois
@John K Jordan I’ll post some pictures once built and tried (likely a couple of weeks). The cross slide will be used to position. The cutter will be in the lathe using a collet chuck. Advancement will be a threaded rod through nuts. I plan to drill the nuts and tap a 1/4-20 thread to install some nylon screws to help take out any play as the threaded rod is a regular commercial grade thread. I will leave the piece in the chuck and attach the chuck to the threaded rod for rotation. A faceplate could be used also.
Surely you didn't mean 1/4-20 for mounting the chuck? 20 threads per inch can cause some chipping trouble with some wood species. I had a Kein fixture decades ago, sold it since I almost never used it. I also have an old Carbatec threader that is at least 25 years old and unused.
 
Joined
Mar 19, 2016
Messages
1,337
Likes
1,684
Location
Haubstadt, Indiana
No Richard. The 1/4-20 will be in the nuts of the threaded rods to install nylon screws for pressure against the threaded rods to help eliminate play. I will have two threaded rods, one 1 1/4-8 for 8TPI threads and one 3/4-10 for 10TPI threads.
 
Joined
Aug 14, 2007
Messages
5,781
Likes
3,090
Location
Eugene, OR
I think Baxter makes bases for their threading jigs to fit most lathes. For me, I use the mini lathe, and having 2 of them really helps so I can keep the thread cutter on one lathe and do all my turning on the other. If I was to use one of my big lathes, I would want a long base for support. Like Paul up above says, a couple of big wing nuts, maybe springs. Not too difficult to make. I did make a jig for cutting the tenon and recess. Well, had a machine shop make it. I will make another out of wood, but use the same ideas. The measuring to make sure the recess and tenon are spot on parallel is a pain.

robo hippy
 
Joined
Dec 5, 2015
Messages
897
Likes
437
Location
Seattle, WA
YouTube has some ideas for threading jigs.

When our kids were young I made sets of large nuts and bolts as toys (kinda like a wood erector set). I used the screw off an old car bumper jack, 4 tpi. The wood was held in the lathe's chuck. There was a wood slide assembly that carried a small Stanley router with a router bit reground to cut 60 degree threads. The 20,000 rpm of the router cut smooth threads in hard maple.

The 4 tpi screw had a vee belt to the lathe spindle so when the spindle was turned the slide carrying the router moved to cut the threads.
 
Joined
Jul 19, 2018
Messages
1,863
Likes
2,614
Location
Ponsford, MN
YouTube has some ideas for threading jigs.

When our kids were young I made sets of large nuts and bolts as toys (kinda like a wood erector set). I used the screw off an old car bumper jack, 4 tpi. The wood was held in the lathe's chuck. There was a wood slide assembly that carried a small Stanley router with a router bit reground to cut 60 degree threads. The 20,000 rpm of the router cut smooth threads in hard maple.

The 4 tpi screw had a vee belt to the lathe spindle so when the spindle was turned the slide carrying the router moved to cut the threads.
Back in the late 1980's I had a similar setup on a Delta 12" lathe. The setup had a 1 1/2 height block with a small shaft to drive the 4TPI lead screw, then I shoe horned a sprocket mounted on a bearing with a means of locking it to the spindle shaft into the head stock spindle and connected via roller chain to a sprocket at 1/2 half the tooth count on the lead screw. The lead screw then drove a carriage with the router resulting in a 2 TPI thread for a 2.5" diameter bench vice screw.
 
Joined
Feb 2, 2016
Messages
687
Likes
555
Location
Clinton, TN
For large threads, don't forget about the tap and die sets available at Woodcraft and elsewhere. I have two sizes and use them often.

gavels.jpg

Great for things sometimes subject to forces.
 
Joined
Aug 14, 2009
Messages
2,351
Likes
1,429
Location
Peoria, Illinois
No Richard. The 1/4-20 will be in the nuts of the threaded rods to install nylon screws for pressure against the threaded rods to help eliminate play. I will have two threaded rods, one 1 1/4-8 for 8TPI threads and one 3/4-10 for 10TPI threads.
Sorry, still don't understand. "nuts of the threaded rods to install nylon screws for pressure against the threaded rods"? Too many threaded rods and nuts for what I am used to. Thinking about your description, thinking a couple more words may help. Words like cross feed threaded rod and chuck mounting threaded rod?
 
Last edited:
Joined
Jan 10, 2024
Messages
485
Likes
233
Location
Bournemouth, UK
I can’t help William, but looking forward to see what you come up with. I was going to make a jig using the Simon Hope spindles but decided to buy the whole lot instead! It wasn’t too bad at £285 including one spindle. Spare spindles are £69 each.
 
Joined
Feb 28, 2021
Messages
1,424
Likes
1,253
Location
Roulette, PA
Website
www.reallyruralwoodworks.com
Sorry, still don't understand. "nuts of the threaded rods to install nylon screws for pressure against the threaded rods"? Too many threaded rods and nuts for what I am used to. Thinking about your description, thinking a couple more words may help. Words like cross feed threaded rod and chuck mounting threaded rod?
I believe his reference to 1/4-20 threads is that he plans to drill holes perpendicular to the threads in the main threaded nuts (which the main threaded rod for attaching the chuck will be run through - typically 1-1/4" or 1" or 3/4" threaded rod) so as to install nylon set screws, which, when snugged up against the threaded rod , will serve to minimize any slop or play in the threads so the threaded rod (carrying the chuck) can feed the wood smoothly and accurately into the cutter
 
Joined
Jan 20, 2011
Messages
550
Likes
671
Location
Traverse City, MI
Last year, I did a demo for our club with a homemade threading jig. Our president decided to buy th Chef-Ware jig and was going to demonstrate that. I mentioned that I had some ideas for a way to build one, so he said we could share the demo slot if I got it done in time. Of course, I got busy and didn't make the the jig until just a week before, so I didn't get much practice, but it went OK.

View: https://youtu.be/GeCL43EGDuE
 
Joined
Jul 19, 2018
Messages
1,863
Likes
2,614
Location
Ponsford, MN
For large threads, don't forget about the tap and die sets available at Woodcraft and elsewhere. I have two sizes and use them often.

View attachment 69978

Great for things sometimes subject to forces.
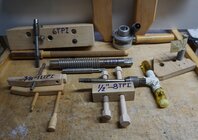
I watched the video from Woodcraft and saw that the threads were very poor and there was not enough clearance so they would only work for something that you may just want to put together. I have a set like that which I only tried once. The picture below shows some of the threading tap & die sets that I have plus some taps that I made on my metal lathe. The 6TPI 0n the left background was purchased from the estate of an old cabinet maker in about 1980. The aluminum body die on the right background was purchased from Woodcraft when they were still mail order only. The die is stamped 1" made in west Germany but I believe it is really 25mm and the pitch does not match any TPI size. Notice that the pilot end is hollow and the cutting edge is formed by a hole bored thru the point of a thread. The remaining taps were made using my metal lathe and the method of cutting was copied. The male threads are cut on my metal lathe with a router mounted to the cross slide and for extra long threads I use a 60 degree dovetail mill with the router set to 30 degrees to the lathe axis. The hanscrews are highly usable except for the small one with the 3/8"-11 thread which is mostly a conversation piece. The 1/2" - 8 thread is for a replacement drawer handle on early oak dressers.DSC01569.JPG
 
Joined
Jan 10, 2024
Messages
485
Likes
233
Location
Bournemouth, UK
I believe his reference to 1/4-20 threads is that he plans to drill holes perpendicular to the threads in the main threaded nuts (which the main threaded rod for attaching the chuck will be run through - typically 1-1/4" or 1" or 3/4" threaded rod) so as to install nylon set screws, which, when snugged up against the threaded rod , will serve to minimize any slop or play in the threads so the threaded rod (carrying the chuck) can feed the wood smoothly and accurately into the cutter
Yes, that was my understanding. My commercial jig has a plastic slug backed up by an M8 Socket Set Screw locked in place with a nut.

Edit: Here’s a picture of the setup.

IMG_2858.jpeg
 
Joined
Apr 20, 2006
Messages
1,378
Likes
1,171
Location
Erie, PA
I bought my first Baxter around 15 to 20 years ago. It was purchased for my Nova DVR3000. After thinking about the possibility of losing that lathe I asked Victor if he could make an adapter so I could use it on my 3520b which he did. But my Nova DVR3000 is still chugging away so I have not needed to use it on the 3520b. Forward a bunch of years and I did a video for Victor using the Baxter (why I put on a chuck that I had never used on it is beyond me but it being a heavy chuck when I loosened the Baxter it fell forward a little. Victor saw this and said he fixed that years ago so he said bring it with me to the Tennessee Symposium and he fixed it by the time said symposium was done). Next I get a chance to buy the Baxter BTM-12.5 at a great price which does 3" pieces so I ask Victor can this be updated to the 5" version (this one was at least 20 years old) and sure enough the parts are dead on still and now it can do the full 5". Having been using metal machinery my entire working life I can only appreciate the machining of the Thread Master as it is precision made and so accurate. And chances are if you walk into my shop you will see both of the Baxter threaders mounted on lathes. In my opinion there is not another threading system that comes close to the Baxter. You tell me that you own a $8000 lathe and you are looking to scrimp on a threading system?
 
Joined
Mar 19, 2016
Messages
1,337
Likes
1,684
Location
Haubstadt, Indiana
You tell me that you own a $8000 lathe and you are looking to scrimp on a threading system?
Bill, I did watch you video. I’m retired and on fixed income. I didn't start out with my Robust, it took time and saving. Something I won’t discuss here, I’ve had some very large non-woodturning expenses lately. The Baxter threading jig is the cream of the crop and only a dream right now, maybe someday. It’s really not trying to scrimp, but doing what I can with what I have.
 
Last edited:
Joined
Jan 10, 2024
Messages
485
Likes
233
Location
Bournemouth, UK
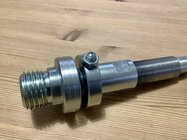
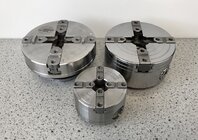
Any threaded boxes I’m likely to make won’t be much over 3” diameter. Most 4” chucks are quite heavy and although obviously fine for turning, they are perhaps a bit heavy for mounting on supplementary equipment like threading jigs? I noticed this with my Simon Hope threading jig. As a result I’m now using my little Record Power SC2 chuck for boxes. These chucks are nicely made and quite inexpensive. There are not many accessory jaws for them at present but the standard jaws that come with it are fine for small boxes.

This is the SC2 at the bottom, with my Axminster SK100 and Supernova 2.

IMG_1275.jpeg

William. One thing that seems to be unique to the Simon Hope threading jig is the ability to flip the chuck out of the way to check your progress. It also makes it easier to apply superglue to strengthen the thread. It would be well worth trying to include this feature in your shop made jig if you can. Check out this video to see the feature in action.

 
Joined
Mar 19, 2016
Messages
1,337
Likes
1,684
Location
Haubstadt, Indiana
@Bill Alston That is a unique feature on Simons’s jig. My design I am hoping to use the bed ways to move everything back without affecting the setup, therefore I won’t be using the banjo. Simon does make good tools, I have his hollowing system I bought when he was shipping to the USA. I plan on using my SK100 chuck and my old Barracuda 2 chuck (this one is 20 years old and actually a decent chuck). If they prove too heavy I will use faceplates. There are a lot of videos on this subject. Mike Peace even has one where he built a wood cross slide for threading. My goal for this post was to see what ideas I could incorporate into my design to build the best homemade threading jig with what I can incorporate.

@Darryl Fective I watched your video and that is what gave me the idea on the nylon screws. Thanks
 
Last edited:

john lucas

AAW Forum Expert
Joined
Apr 26, 2004
Messages
8,499
Likes
4,065
Location
Cookeville, TN
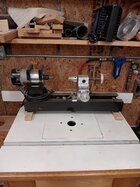
here are 2 of my set ups. I built a small angle iron lathe and used a router for the headstock. I sold the kathe that my Baxter threader fit in. this works well because it's always ready and I can travel with it to do threading demos.
the cross feed drill.pres vice works well. i took the slop out of the shaft and nuts buy cutting a nut in half and using a 1/4 x20 nut to.push it down against the shaft. your kind of limited on the thread size due to the thread count of all thread rod.
 

Attachments

  • 20230808_184808.jpg
    20230808_184808.jpg
    494.6 KB · Views: 31
  • 20220706_085731.jpg
    20220706_085731.jpg
    609 KB · Views: 32
Joined
Feb 2, 2016
Messages
687
Likes
555
Location
Clinton, TN
I bought my first Baxter around 15 to 20 years ago. … After thinking about the possibility of losing that lathe I asked Victor if he could make an adapter so I could use it on my 3520b which he did.

I got a Baxter about the same time, sized for the Jet 1642 I was using at the time. Same experience - when threading I still use the Baxter on the Jet and turn with the PM3520b. Now a friend is interested in using it on his 3520 - I think I could machine an adapter. But from his catalog I can see the design change he made for the taller swing so we’ll call and see what he suggests - would be easier to just buy the new parts rather than make them!

I have NEVER bought anything from BWT that wasn’t flawlessly and professionally machined - he’s a wizard! I recently got a second of his carving/finishing posts just to have it on hand. (Occasionally someone else is using the first one and I don’t want to start a fight! :))

JKJ
 
Joined
Jan 20, 2011
Messages
550
Likes
671
Location
Traverse City, MI
@Bill Alston That is a unique feature on Simons’s jig. My design I am hoping to use the bed ways to move everything back without affecting the setup, therefore I won’t be using the banjo. Simon does make good tools, I have his hollowing system I bought when he was shipping to the USA. I plan on using my SK100 chuck and my old Barracuda 2 chuck (this one is 20 years old and actually a decent chuck). If they prove too heavy I will use faceplates. There are a lot of videos on this subject. Mike Peace even has one where he built a wood cross slide for threading. My goal for this post was to see what ideas I could incorporate into my design to build the best homemade threading jig with what I can incorporate.

@Darryl Fective I watched your video and that is what gave me the idea on the nylon screws. Thanks

I'm liking the idea of using the bed ways-- No monkeying around getting parallel.

The nylon bolts seemed like a good idea. It cured the up/down slop but there is still some side to side movement. Maybe 2 screws in each nut is needed? Another thought I had was splitting the nut. (plus a little squeeze) maybe 2 cuts (or 1 cut and 2 almost cut) and a hose clamp, assuming I can figure out how to make the cuts safely and easily.
 
Joined
Jan 10, 2024
Messages
485
Likes
233
Location
Bournemouth, UK
I'm liking the idea of using the bed ways-- No monkeying around getting parallel.
Setup of the Hope Jig is simple enough, no monkey needed! 😆 You mount the jig between centres once, square the banjo to the ways and lock the jig. When you need to move the jig, putting a square back on the banjo sets it again.

I’ve actually been thinking of drilling a register in the post and banjo so I can skip step one by just inserting a pin.

Edit: This is how I set the Hope jig. It only takes a minute then, as mentioned, if you need to move the jig you just need to put the square on the banjo again.

Advantages over some other jigs are: One screw spindle removal, thread depth stop (length of thread), comfortable crank handle for making the cut, click stop thread depth adjustment, and flip up hinge to check your progress.

IMG_9725.jpeg
 
Last edited:
Joined
Jan 10, 2024
Messages
485
Likes
233
Location
Bournemouth, UK
Just curious, why worry about the banjo being square if you have the jig aligned between centers? I guess I would just check between centers again as the banjo is a secondary reference.
The banjo is a useful reference.

You wouldn’t be able to use the centres once the chuck is mounted on the jig and the cutter is in place.

If you watch Simon Hopes videos you’ll see what I mean. He “eyeballs” the jig to get it square.

His early jigs had centre holes on both ends of the spindle, so very easy to set the jig between centres then lock it in the (squared) banjo. Later models omitted the centre hole on the nose of the spindle.

I mentioned my setup technique to Simon so he’s now producing spindles with centre holes on both ends again.

He kept the centre hole on the tailstock end of the spindle as a guide for setting the height of the jigs. Once positioned a locking collar maintains the correct height.

If you watch the video again I’m sure you’ll see what I mean.

My first spindle didn’t have the nose centre so I drilled one on my MW lathe.
 
Joined
Jan 10, 2024
Messages
485
Likes
233
Location
Bournemouth, UK
Well, I mentioned my idea to the guy who designed and manufactures it, Simon Hope, and he thanked me and after trying it himself he said he would change the instructions for setting up the jig for future customers.
 
Joined
Feb 2, 2016
Messages
687
Likes
555
Location
Clinton, TN
Well, I mentioned my idea to the guy who designed and manufactures it, Simon Hope, and he thanked me and after trying it himself he said he would change the instructions for setting up the jig for future customers.

Well, when you first described it I immediately thought "What a great idea!" My Baxter doesn't need it but those that use the banjo may benefit.

JKJ
 

john lucas

AAW Forum Expert
Joined
Apr 26, 2004
Messages
8,499
Likes
4,065
Location
Cookeville, TN
I have an early model of the Chefwarekits threader. It works somewhat like the Simon hope in that you eyeball the threaded rod to be parallel with the bed. Pretty easy to do to get close enough. Just for fun I cut threads with it purposely out of square. I couldn't tell it made any difference in the thread. Most of my threads are only 3/8" long. I guess this is too short to see if a tapered thread would make a difference.
 
Joined
Aug 8, 2024
Messages
76
Likes
45
Location
Blairstown, NJ
I watched the video from Woodcraft and saw that the threads were very poor and there was not enough clearance so they would only work for something that you may just want to put together. I have a set like that which I only tried once. The picture below shows some of the threading tap & die sets that I have plus some taps that I made on my metal lathe. The 6TPI 0n the left background was purchased from the estate of an old cabinet maker in about 1980. The aluminum body die on the right background was purchased from Woodcraft when they were still mail order only. The die is stamped 1" made in west Germany but I believe it is really 25mm and the pitch does not match any TPI size. Notice that the pilot end is hollow and the cutting edge is formed by a hole bored thru the point of a thread. The remaining taps were made using my metal lathe and the method of cutting was copied. The male threads are cut on my metal lathe with a router mounted to the cross slide and for extra long threads I use a 60 degree dovetail mill with the router set to 30 degrees to the lathe axis. The hanscrews are highly usable except for the small one with the 3/8"-11 thread which is mostly a conversation piece. The 1/2" - 8 thread is for a replacement drawer handle on early oak dressers.View attachment 69991
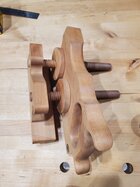
I made the threads on this kerfing plane with one of those woodcraft thread cutters (about 10 years ago I think) - I went back for the larger one also. The trick is to saturate the piece you intend to cut with oil before you cut it. 20200502_235138.jpg
 
Back
Top