• January Turning Challenge: Thin-Stemmed Something! (click here for details)
  • Conversations are now Direct Messages (click here for details)
  • Congratulations to John Lucas for "Lost and Found" being selected as Turning of the Week for January 13, 2025 (click here for details)
  • Welcome new registering member. Your username must be your real First and Last name (for example: John Doe). "Screen names" and "handles" are not allowed and your registration will be deleted if you don't use your real name. Also, do not use all caps nor all lower case.

Hollowing tool help

Joined
Feb 9, 2011
Messages
51
Likes
23
Location
Palm Harbor, Florida
I have the 14" Sorby Swan Neck Hollowing Tool and it seems to me to be much more trouble than helpful. It is probably "operator error" but I can't find any online vids that show anything except the Sorby Hollowmaster, which is a different altogether.

Anybody got any advise, other than getting another tool?
 
The swan neck tools need to be used with the straight section on the tool rest and on centerline. I only use the ones that I have to undercut when I can no longer reach with an Ellsworth style hollower and it's that far reach in the shoulder area where the curve transitions down from horizontal.

Hope that helps.

S
 
I agree with Steve. Any of the bent shaft style hollowing tools should be used with the tool rest on the straight part of the shank. Ideally the tips of the tools should be inline with this straight part. when you have the tool rest on the crooked part you get lots of twisting motion to the cutter. If you have the tool rest on the straight part of the shank it helps arrest the twisting motion.
 
Thanks, guys. I got that part figured out. What I am having trouble with is the fact that the cutter doesn't seem to be cutting/scraping. It is a very tedious process just to get some little bit of sawdust out of it.

I am using the tool as shown in the directions sheet. I am addressing the wood with the tool parallel to the ways, and the curve horizontal. I have also turned the curve/cutter slightly down, as well, with no better results. I am beginning to wonder if the cutting head is dull. If so, it didn't take long for it to get that way. I still think it may be my technique, but I just don't know.

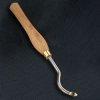
Below are a photo of the tool and the results of my tool scraping.
 

Attachments

  • Sorby_Hollowing-14_in.jpg
    Sorby_Hollowing-14_in.jpg
    18.9 KB · Views: 63
  • IMG_6539.JPG
    IMG_6539.JPG
    378.8 KB · Views: 78
I also have one of those and it isn't a hogging tool. Your work looks like the shaft is deflecting and giving that uneven cut. I bet it is pretty loud doing those cuts too. They do get dull pretty quickly. I only use like mine like stated before, undercuts and maybe a real light cut to blend in an area that is uneven.
 
Hi Allen I also have one of these and had the same problem. I changed the bevel on the cutter to look like the bottom picture the stock grind looks more like the top. I now get much better cuts but I still have to take small cuts. It looks likes your takking too much at once and the tool is being thrown out of the cut. Try starting with the cutter at about 7:00 and bring it up slowly until it starts cutting.
 

Attachments

  • Cutter.jpg
    Cutter.jpg
    18 KB · Views: 83
Agree with Mark on the bevel of the cutter being better suited around 70 degrees vs. the 85 or so that comes out of the box.

As others have also pointed out, the tool is better as a shear scraper for finishing that it is for hogging out interiors. I suspect that you are pushing too hard on the walls, which cause them to deflect (not the tool) and that explains your uneven cut. I personally hate "big cutters" for hollowing because the engage too much edge and tend to be very hard to control. All of my hollowing is with a 1/8" HSS cutter.

If the tool came with another cutter, try that one first, then switch to this for the final cuts.

S
 
Beginning to wonder if the cutter is dull is a sure sign its not. Nearly every problem in woodturning can be attributed to tool sharpness. It is always the first thing to do before you start, and every time there's a problem, and always for the finish cuts.

The handle on that tool is nearly unusable, too short and light.

The other advice you got is good too, but sharpness is always #1.....and 2 and 3. 🙂

John
 
Thanks, everyone, for the help/advise. I put a little steeper angle on the cutter head and eased up on the aggressiveness of my cuts. The combination got me where I needed to be (shavings, to sawdust, finally!). Here are the results. It's about 5"wx4"h with 3/16" walls. The knot didn't flare as much as the rest of the shoulder, I guess because it had some punky material in it that I did the sawdust/CA filler to. Critique is welcome!
 

Attachments

  • Rosewod_B1260-birdseye-sm.JPG
    Rosewod_B1260-birdseye-sm.JPG
    227.3 KB · Views: 49
  • Rosewood_B1260-inside-sm.JPG
    Rosewood_B1260-inside-sm.JPG
    223.4 KB · Views: 51
  • Rosewood_B1260-side1-sm.JPG
    Rosewood_B1260-side1-sm.JPG
    206.4 KB · Views: 46
Last edited:
Back
Top