• January Turning Challenge: Thin-Stemmed Something! (click here for details)
  • Conversations are now Direct Messages (click here for details)
  • Congratulations to Scott Gordon for "Orb Ligneus" being selected as Turning of the Week for January 20, 2025 (click here for details)
  • Welcome new registering member. Your username must be your real First and Last name (for example: John Doe). "Screen names" and "handles" are not allowed and your registration will be deleted if you don't use your real name. Also, do not use all caps nor all lower case.

Holding Hollow Forms for Bottom Finishing?

Joined
Oct 23, 2015
Messages
21
Likes
349
Location
Pine Bush, NY
Looking for best practices for holding hollow forms on the lathe when trying to finish the bottom. On this one I made a sort of cap chuck that fit in the hole and hot glued it in place but it did not hold. I tried taping and plastic wrap but no good. I finally finished it flat, by hand but need to revist it so I can get a concave bottom. I also have a couple of mini jaws, but I'm afraid to ruin the inside of the mouth so I didn't try them.
Photo on 1-30-17 at 9.55 AM #2.jpg
 
What I do is make a jam chuck to snugly fit the opening (not too tight)and bring up the tailstock against the bottom using a small conical tip in the live center. This enables me to turn the foot except for a small nub about 1/8" in diameter. I can use a carving chisel to remove the nub and then sand smooth.

Don't try to do this without tailstock support. It will put too much strain on the opening. And don't do expansion chucking. There's not enough supporting wood for that.
 
to me have some extra wood between tendon and hf bottom, jam chuck just as you would a bowl, finish bottom turning leaving nib between hf and tailstock, either turn nib off or cut it off while lathe turned off, sand bottom.....Posting in unison with Bill
 
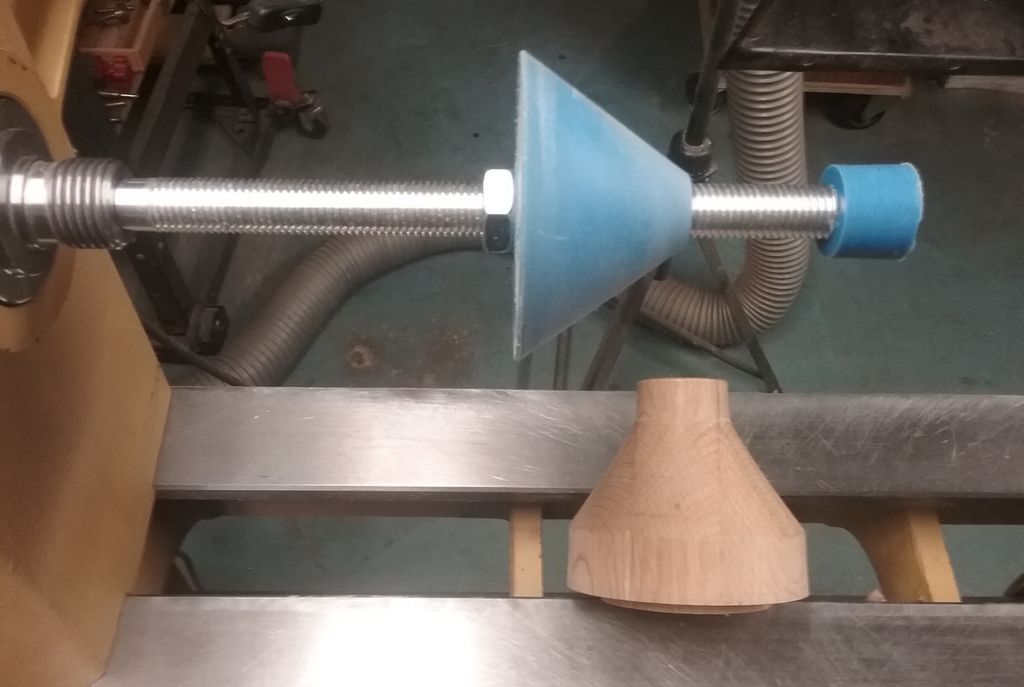
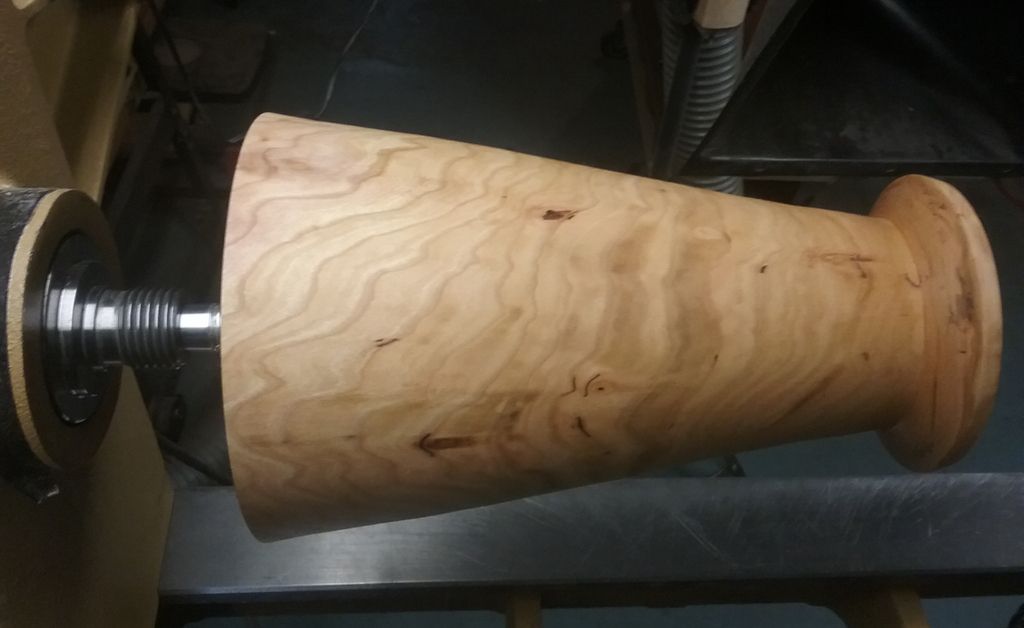
+2, 3 or 4 on the jam chuck solution. Here's pic of one that does double duty for me on a form like yours and also as a cup for some of my spheres. Had a chance to try out the reverse chucky that Paul mentioned that was gifted to me for X-mas over the weekend for the first time on a twice turned, pith-in cherry vase. Little bit of extra rig-a-ma-roll to get it set up to the cone to the proper depth but I liked the feel of how the cone material gripped the slightly out of round inside surface for truing-up the tenon and then for taking the tenon off.

jc3_zpsvjs9oprg.jpg


jc4_zpsvkwicwj8.jpg
 
to me have some extra wood between tendon and hf bottom, jam chuck just as you would a bowl, finish bottom turning leaving nib between hf and tailstock, either turn nib off or cut it off while lathe turned off, sand bottom.....Posting in unison with Bill

That is what I usually do, however this blank was short and I didn't have enough to leave.
 
What I do is make a jam chuck to snugly fit the opening (not too tight)and bring up the tailstock against the bottom using a small conical tip in the live center. This enables me to turn the foot except for a small nub about 1/8" in diameter. I can use a carving chisel to remove the nub and then sand smooth.

Don't try to do this without tailstock support. It will put too much strain on the opening. And don't do expansion chucking. There's not enough supporting wood for that.

I was hesitant to expansion chuck, I did pull up the tailstock and try to keep it wedged, but the bottom was a little too thin and I didn't want to ram the tailstock into it to tight for fear of it cracking. I might just carve the bottom out with a spoon gouge. I don't really have to take that much off it. But thanks for the reply.
 
Looking for best practices for holding hollow forms on the lathe when trying to finish the bottom. On this one I made a sort of cap chuck that fit in the hole and hot glued it in place but it did not hold. I tried taping and plastic wrap but no good. I finally finished it flat, by hand but need to revist it so I can get a concave bottom. I also have a couple of mini jaws, but I'm afraid to ruin the inside of the mouth so I didn't try them.
View attachment 21875

Here is the method that I generally use for finishing the bottoms of hollow forms, vases, jars, bottles and just about anything that has an inner diameter larger than the neck opening. Basically, it consists of a draw bar that runs through the headstock with a toggle on one end that will dip into the neck opening and rest on the inside shoulder of the workpiece. The toggle pulls the workpiece against a chuck piece that has been cut to fit snugly inside or outside the mouth of the workpiece. The following pictures illustrate this for a small jar that I recently completed.
IMG_4919p.jpg

IMG_4921p.jpg


This method is very stable in most situations and is very simple to set up and use. Unlike vacuum chucking, which I use for many purposes, this technique is self centering and repeatable if you have to dismount and remount the piece. The toggles usually are made of plywood of a thickness appropriate to the size of the opening. They are infinitely reusable and can be quickly resized as needed on a sander or bandsaw. Here is part of my current stock.

IMG_4923p.jpg


For items with very small openings, such as bottles, I use the “nuts” of common hardware store toggle bolts instead of wooden toggles. They are mounted on the draw bar as shown below. To use them, you unscrew the toggle away from the washer and jam nut until the toggle will fold enough to insert into the bottle. Then you unscrew the draw bar from the bottle so that toggle migrates up against the washer and jam nut. This leaves the toggle fully expanded and unable to pull out. To remove the toggle, simply reverse the process. A word of caution: check the metal toggle carefully before you use it. Some are poorly made and can pull apart at the pivot joints.

IMG_4924p.jpg
 
Looking for best practices for holding hollow forms on the lathe when trying to finish the bottom. On this one I made a sort of cap chuck that fit in the hole and hot glued it in place but it did not hold. I tried taping and plastic wrap but no good. I finally finished it flat, by hand but need to revist it so I can get a concave bottom. I also have a couple of mini jaws, but I'm afraid to ruin the inside of the mouth so I didn't try them.
View attachment 21875

What you need is a vacuum chuck! 🙂 😀 In this case a "drum" type (?) chuck would work best…..one that is close in size to the largest diameter shoulder is best (more holding power), but any size larger than your opening would work without putting any stress on the opening. You can make all sorts of "chucks" to hold almost anything you can imagine! I've been using vacuum chucking for 23 years now……don't know how I could live (turn 😉) without it.
Make the investment in a pump and some effort in making a few simple chucks ……you will never regret it.
 
I had to laugh the other day when I selected a video on YouTube and they showed
placing the bowl on a vacuum chuck and tried to use a roughing gouge to remove
wood from the interior of the bowl.

With all of the effort put into turning a bowl or hollow form, it is worth the extra time and
effort to use your tail stock and live center to support the vessel while removing material
from the bottom to finish the piece. I learned my lessons over the years trying to save a
couple of minutes with a short cut and watching your finished piece "pop" out of the chuck
and hit the ways and bounce off the floor. I did expand my vocabulary exponentially in those days.
 
I was surprised that someone, Tom Gall, finally suggested vacuum chuck because that is what you usually get first. Many years ago I purchased a vacuum system. Once I was finishing the bottom of a hollow form and the vacuum pump overheated and shut off. I was lucky that I didn't lose the bowl. Even if the pump doesn't fail I am always concerned about the ball bearings in the vacuum adapter seizing up on me. Nowadays I use a "donut chuck" (http://www.turnedwood.com/tools&jigs.html). It takes a little time to set up but it works every time. I much rather have a positive grip than a negative one. I am a segmented turner and I simply can't afford to lose something that I have spent tons of hours to make!
 
With all of the effort put into turning a bowl or hollow form, it is worth the extra time and
effort to use your tail stock and live center to support the vessel while removing material
from the bottom to finish the piece.

Yes it is.
 
Once I was finishing the bottom of a hollow form and the vacuum pump overheated and shut off. I

That's exactly why, if and when I build such a system, it'll have a vacuum reserve tank. A 10 or 20 gallon re-purposed air compressor tank that sits in between the vacuum pump and the lathe. I wouldn't feel at all secure with the pump direct to the work.
 
I tend to avoid vacuum for thin turnings and hollow forms are usually thin.
I have broken a few thin forms with too much vacuum.

Getting the right amount of vacuum is complicated by the thin wall allowing writ through them.

I use a jamb chuck usually with a long post to the inside bottom like shown above
or wide padded chuck that the shoulder rests against.
 
That's exactly why, if and when I build such a system, it'll have a vacuum reserve tank. A 10 or 20 gallon re-purposed air compressor tank that sits in between the vacuum pump and the lathe. I wouldn't feel at all secure with the pump direct to the work.

Something that needs to be mentioned ... well, actually Mike already said it and you affirmed it, but this applies to vacuum chucking as well as jam chucking or whatever other reverse chucking ... KEEP THE TAILSTOCK AGAINST THE TURNING. Despite the probability of power failing or the thermal overload switch turning off the vacuum being very low, it isn't zero. I've also experienced sudden loss of vacuum when the thermal overload switch activated. Having the tailstock in place saved the piece from bouncing all over the shop floor. By keeping the tailstock in place, the vacuum chuck defaults to being a jam chuck ... not a great jam chuck, but better than nothing. The RPM should be as low as practical for the final few seconds it takes to remove the center nub after the the tailstock is removed.

The motors on vacuum pumps tend to run hot and running with full vacuum for hours greatly increases the chance of thermal overload. My one experience with this happened when the pump had been running continuously for several hours. I couldn't believe how blistering hot it was and I was afraid that I had cooked the motor. Fortunately, after about a half hour it was running again. Now, I've learned to periodically check the temperature of the motor by seeing if I can stand to hold my hand on it. And, I no longer leave the pump running continuously for hours.

I'm a bit skeptical about the benefit of a reserve vacuum tank. At best, the guage pressure will only be about -13 PSIG (~ 26 inches of mercury) and that's at sea level. If you happen to be at nine thousand feet elevation, you will be doing well to get -9 PSIG delta pressure out of the vacuum pump. When you consider the system leaks at the bleed valve, rotary coupler, and through the wood as well as pressure drops through the plumbing, air filter, quick disconnects, and check valves, the reserve tank isn't buying you very much time. I mentioned check valves because having a reserve tank without also having a check valve between the pump and the tank would eliminate any benefit that the reserve tank provides.

My comments are based on the characteristics of the Gast nonlubricated rotary vane vacuum pump which is what I have. Your mileage may vary.
 
It seems to me that there are two threads going here. In one, the objective is to finish off the bottom a turning neatly and so that it rests stably on a table. This probably is appropriate for the vast majority of woodturnings. In the other thread, the objective is to finish off the bottom with decorative features such as beads, chatterwork, etc that says “a journeyman turner lives here”.

In the first instance, finish turning with tailstock support until the very end, followed by off-lathe cleanup is probably the fastest way to proceed in most cases.

In the second instance, one needs the bottom of the turning fully exposed and stably presented. In the case of open bowls and, platters there are many ways to accomplish this including the various named bowl chucks, vacuum chucks, and improvised mountings using a plywood disk attached to a faceplate. However, in the case of hollow forms, often there is no outer lip to clamp to. Also, often they are long compared to the size of the mouth diameter so inaccuracy or instability in the seating of the mouth translates to larger movement of the base.

The toggle mount method described in my earlier post is the way I generally handle the difficult cases. I also use vacuum mounting when it seems appropriate. The problem with using vacuum mounting for elongated or small turnings is that the interface medium between the chuck and the turning is compliant to some degree and not necessarily uniform all the way around. I have had the experience of mounting a turning onto a vacuum chuck using the tailstock center to hold the piece as while I gradually brought up the vacuum and finding, as I retracted the tailstock, that the turning was no longer centered. Furthermore, I have observed creeping of the turning under tool pressure.
 
It seems to me that there are two threads going here. In one, the objective is to finish off the bottom a turning neatly and so that it rests stably on a table. This probably is appropriate for the vast majority of woodturnings. In the other thread, the objective is to finish off the bottom with decorative features such as beads, chatterwork, etc that says “a journeyman turner lives here”.

I try to follow all of the discussions,but I seem to be missing something because I can't find any hint of the second thread that you mentioned. At first I assumed that you were talking about a parallel discussion within this thread ... Maybe I'm not very alert because I can't find it. Next I searched other threads and still empty handed. Can you toss this old dog cat a bone?

EDIT: Were you referring to your own post as the second thread? 🙂
 
Nicholas asked for ideas on how to "finish" the bottoms of hollow forms. I took this to mean "add decorative turning" to the bottoms as opposed to "make the bottoms neat and stable". The responses fell into two categories, ones that would and ones that would not support decorative turning on the bottom.
 
If decorating the bottom does not require going all the way to the center, this can be done with the tailstock up for limited access or on the vacum chuck for full access. Yes I have done both ways, but I do not do a tremendous amount of bottom embellishment usually only one feature ring with spiraling or just 3 cut rings.
IMG_4246.JPG
 
I'm a bit skeptical about the benefit of a reserve vacuum tank
Agree, exciting moments on the wood lathe are best avoided. The things are a study in stored energy.

I learned about the utility of the reserve tank while building vacu-molds for the thermal vacuum forming industry. The larger the reserve tank was the more sure the molding process could be because, in spite of the manifold leaks in a worn system, the reserve tank keeps on sucking in atmosphere ensuring the complete formation of the formed product. It provides time.

On a wood lathe, my intent for the the reserve would be provide time to shut down or duck - or run away screaming - assuming the operator can know that there is a fault in the system. A 20 gallon tank should offer 10 or 20 seconds if all that happens is a pump failure or power outage. a Line fail to the lathe would be catastrophic; ergo the tailstock.

I really should build or buy a vacuum chucking system, I have a Sergeant Welsh twin stage rotary vein #1450 pump that I picked up for nothing in the 1990s and have hardly used.

I've contemplated how serious a failure might be with my doughnut chucking approach. A small shift in the work piece might lead to a very exciting moment. Lengths of all thread, the work, and the front clamping plate all flapping about would be something. With the vacuum chuck approach, it's just the workpiece.
 
Just how often do vacuum chucks fail.....1 in 100, 1 in 1000. ???????
 
A careful hold with a chuck the inside of the opening and a steady rest to hold the outer end on this piece should be a way to safely hold it, even if a strip of tape is needed to prevent damage to the wood, not a fits-all, it should work here well IMO
 
Just how often do vacuum chucks fail.....1 in 100, 1 in 1000. ???????

Didn't we put you in charge of gathering those statistics? Maybe we forgot to inform you.

I have had a number of unscheduled dismounts when jam chucking, but I still use jam chucking.

Don't forget to give us a full report when you have all the dismount data on vacuum chucking. 😀
 
Didn't we put you in charge of gathering those statistics? Maybe we forgot to inform you.

I have had a number of unscheduled dismounts when jam chucking, but I still use jam chucking. Who volunteer s to be on committee, preferred Turner's with a vacuum chuck, maybe bounce some ideas around, set up 1st meeting Feb 30........

Don't forget to give us a full report when you have all the dismount data on vacuum chucking. 😀
 
A vacuum chuck is similar to tightening the lug nuts on your car finger tight and then driving on the expressway waiting to see how long your tire will stay on before coming off on a curve with cars in front of you, behind you, and along side of you. 🙂

It really comes down to knowing the limitations of the amount of pressure you can put a piece mounted in the vacuum chuck, each piece is a different size and the amount of vacuum differs by the wood and its porosity, so there are unknown variables each time. How tall the piece is versus the diameter also increases the chance of the piece working its way out of balance quickly. Each wood turner usually learns over time the limitations of the equipment they are using and how far they can push the limits before they incur the wrath of the turning gods.

I would guess that most failures with a vacuum chuck are operator error, get in a hurry and apply too much tool pressure on the piece and you exceed the holding capacity of the vacuum. The failure happens quickly and most turners are reliving their lives during the moment of trying to shut the lathe off, trying to catch the piece, and trying to run for cover, and crapping their shorts all at the same time.

We need to start a support group for wood turners that have suffered VCF, vacuum chuck failure.
Mike are you talking VCF or turners failure to head safety precautions (TFHSP) . VCF is system failure and TFHSP is operator error. Like everyone else I suggest keeping tailstock up as long as possible. Even if you have to cut the final nib off lathe that is a simple process and sanding is easy to get a smooth flat surface.
 
I need to post a video I watched on YouTube earlier in the week, the turner had a bowl mounted
in a vacuum chuck and approached the interior of the bowl with a gouge.
Needless to say the bowl popped out of the vacuum chuck and bounced off the ways on to the floor.
There are tasks you can perform with just the vacuum chuck holding the piece, lite sanding and
applying a finish. You can also add fine detail lines with a lathe tool if slowly applied to the piece.
The pressure applied to the piece needs to be exerted directly against the face of the vacuum chuck.
If you have to question yourself if you think the vacuum chuck will hold the piece then you need
additional support for the piece. Everyone who starts using a vacuum chuck usually learns these lessons
the old fashion way at least once. (The hard way)
If possible a secondary support system is the best practice when using a vacuum chuck.
Getting in a hurry and taking a short cut in the last steps of finishing a piece is usually when a person
in a hurry will make that mistake they regret. I always think about the hours of work I have in a piece
and rationalize in my mind is this short cut worth the risk, 99% of the time I take the extra steps required
to protect my investment in the piece.
If you turn the same pieces on a regular basis you usually find the best way to perform each step, mistakes
are usually made on a new process or a new project that you are trying to create. It really helps to think through the entire process prior to starting any project so you have all of your steps and equipment and jigs needed to complete the project safely.
 
It really comes down to knowing the limitations of the amount of pressure you can put a piece mounted in the vacuum chuck, each piece is a different size and the amount of vacuum differs by the wood and its porosity, so there are unknown variables each time. How tall the piece is versus the diameter also increases the chance of the piece working its way out of balance quickly. Each wood turner usually learns over time the limitations of the equipment they are using and how far they can push the limits before they incur the wrath of the turning gods.

I would guess that most failures with a vacuum chuck are operator error, get in a hurry and apply too much tool pressure on the piece and you exceed the holding capacity of the vacuum.

Mike is correct of all counts.
I guess I've just been lucky all these years of using vacuum chucking (23 yrs.)! I've only had two "dismounts" that I can remember. 😉 The first was shortly after setting up my system (I didn't have a filter installed before the pump) and a small piece of brass debris from one of the fittings got sucked into the pump and literally destroyed the vanes of the pump. Lesson learned! The second time was during a power outage….not much I could do, standing there in my dark basement shop!

Of course the tailstock should be used whenever possible (I usually use it to center the piece anyway) and only removed for the very last cut. Especially if the piece is taller than it is in diameter! Most open bowls have enough surface area and don't need the tailstock pressure for support, …..unless it makes you feel better! 😀
 
A vacuum chuck is similar to tightening the lug nuts on your car finger tight and then driving on the expressway waiting to see how long your tire will stay on before coming off on a curve with cars in front of you, behind you, and along side of you

Lol. I bought a Used Olds 442 ( great car) when I was a kid. I had a lot of work to do before taking it out on the road and Yup I failed to tighten the lug nuts on the driver's front tire. The tire came off while I was on Route 128 outside of Boston going I dunno somewhere between 55 and something much faster. As a kid I was nothing if not reckless. It was the strangest thing. The car seemed to just want to go left. But the power steering and the incredible force of the motor through the 4:11 Posi rear and 14" Mickey Thompsons kept bring it back under control. Eventually I just had to see why it was so handling strangely, so I pulled over to find the tire and wheel had come off and lodged in the wheel well.
 
Back
Top