• Beware of Counterfeit Woodturning Tools (click here for details)
  • Johnathan Silwones is starting a new AAW chapter, Southern Alleghenies Woodturners, in Johnstown, PA. (click here for details)
  • Congratulations to William Rogers for "Ambrosia Maple Platter" being selected as Turning of the Week for September 16, 2024 (click here for details)
  • Welcome new registering member. Your username must be your real First and Last name (for example: John Doe). "Screen names" and "handles" are not allowed and your registration will be deleted if you don't use your real name. Also, do not use all caps nor all lower case.

Hold small boxes with Collet chuck

Joined
Jul 5, 2022
Messages
236
Likes
54
Location
Lima, Peru
Hello everyone, I hope you’re all doing well.

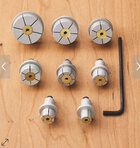
I’m planning to turn some boxes and, as a relatively new woodturner, I’ve made just two small boxes ranging from 3 1/2” to 5”. I often struggle with securely holding the box and lid without damaging them. Now that I have the Beall collet chuck, I’m considering purchasing the Collet IX, which is an expanding collet. My plan is to create a recess in both the bottom of the box and lid to hold them with the Beall Collet IX. However, I haven’t found much information on this technique. If any of you have experience with this method, I would greatly appreciate your insights and advice. As always, I’m very grateful for your guidance.

Thank you in advance!
 
Joined
Jul 5, 2022
Messages
236
Likes
54
Location
Lima, Peru
To use a recess it's necessary to have a fair amount of wood outside the recess fir strength. Hollowing boxes puts a fair amount of stress on the holding method. I would not trust a recess.
Hello, thank you so much for your input. When I hollowed the box, I initially held the piece with my Talon chuck and finished the top. However, when I reversed it to work on the bottom, the chuck marred the box walls. When I tried to re-center it afterward, it was very difficult to get it aligned properly. That’s why I was considering making a recess and using it after hollowing, just for cleaning and sanding. But now I’m wondering if it’s still unsafe and not a good option. Maybe I should explore other methods.
 
Joined
Apr 1, 2019
Messages
396
Likes
291
Location
Bashaw, Alberta
Hello, thank you so much for your input. When I hollowed the box, I initially held the piece with my Talon chuck and finished the top. However, when I reversed it to work on the bottom, the chuck marred the box walls. When I tried to re-center it afterward, it was very difficult to get it aligned properly. That’s why I was considering making a recess and using it after hollowing, just for cleaning and sanding. But now I’m wondering if it’s still unsafe and not a good option. Maybe I should explore other methods
The tried and true method is a jam chuck for finishing the bottom. It takes some practice to get right. You could also try some painters tape on your chuck jaws.
 
Joined
Aug 14, 2007
Messages
5,641
Likes
2,991
Location
Eugene, OR
I use tenons on the lids and bottoms of my boxes. Most are threaded so I have waste block chucks that are threaded for the bottom to screw into to finish the bottoms. I finish the lids while they are screwed onto the bottoms. For larger pieces, not sure how I would do it. Probably finish the lid the same way, while it is jammed onto the bottom. For the bottom, I would jam it into a recess on a waste blank. The problem with using a recess, or even cole jaws, if you have extended ones, is that by expanding, you are pretty much trying to split the wood. Maybe soft jaws for compression, and engage the tailstock till 99% of the tenon is removed, and then saw or cut off the little remnant. I have a couple in that 5 inch range, and don't usually make them that big. Wood movement can be a problem that may end up with not being able to pull the lid off.... If they are made from the same piece of wood, then, at least in theory, they should move the same amount and the lid may not be able to spin around, but it should come off.

robo hippy
 

john lucas

AAW Forum Expert
Joined
Apr 26, 2004
Messages
8,446
Likes
3,895
Location
Cookeville, TN
to finish the bottom of boxes I use a jam chuck with the tailstock up as long as possible. You can't push the gouge fast. I concentrate on pushing the bevel into the bottom and very gently forward into the cut. ( contrary to most of my turning where Ii'm trying to not push on the bevel} This pushes into the jam chuck with seems to work well. I've done hundreds of boxes.
 
Joined
Jul 5, 2022
Messages
236
Likes
54
Location
Lima, Peru
Thank you so much for all your explanations and recommendations. The boxes I’m planning to make now are not threaded, and I think that the Collet XI, even though it has aluminum soft expanding jaws, might still have a tendency to split the wood as you mentioned.
I use tenons on the lids and bottoms of my boxes. Most are threaded so I have waste block chucks that are threaded for the bottom to screw into to finish the bottoms. I finish the lids while they are screwed onto the bottoms. For larger pieces, not sure how I would do it. Probably finish the lid the same way, while it is jammed onto the bottom. For the bottom, I would jam it into a recess on a waste blank. The problem with using a recess, or even cole jaws, if you have extended ones, is that by expanding, you are pretty much trying to split the wood. Maybe soft jaws for compression, and engage the tailstock till 99% of the tenon is removed, and then saw or cut off the little remnant. I have a couple in that 5 inch range, and don't usually make them that big. Wood movement can be a problem that may end up with not being able to pull the lid off.... If they are made from the same piece of wood, then, at least in theory, they should move the same amount and the lid may not be able to spin around, but it should come off.

robo hippy

Thank you so much for all your explanations and recommendations. The boxes I’m planning to make now are not threaded, and I think that the Collet XI, even though it has aluminum soft expanding jaws, might still have a tendency to split the wood as you mentioned.
Here is the Beall Collet IX picture I was talking about I forgot to add the picture in my post.

IMG_7186.jpeg
 
Joined
Jul 5, 2022
Messages
236
Likes
54
Location
Lima, Peru
to finish the bottom of boxes I use a jam chuck with the tailstock up as long as possible. You can't push the gouge fast. I concentrate on pushing the bevel into the bottom and very gently forward into the cut. ( contrary to most of my turning where Ii'm trying to not push on the bevel} This pushes into the jam chuck with seems to work well. I've done hundreds of boxes.

Thank you so much. Before I start making my boxes, I’m planning to watch some videos to incorporate all your recommendations and advice.
 
Joined
Jul 5, 2022
Messages
236
Likes
54
Location
Lima, Peru
The tried and true method is a jam chuck for finishing the bottom. It takes some practice to get right. You could also try some painters tape on your chuck jaws.

Thanks, I’ll look for some videos and give it a try. Right now, I’m using pieces of hose to prevent my jaws from marring my pieces.
 
Joined
Jan 10, 2024
Messages
398
Likes
193
Location
Bournemouth, UK
I wanted to securely hold a small box but couldn’t find any suitable jaws for my chuck. I ended up buying the little Record Power SC2 chuck which happened to have pin jaws of the size I needed. Lovely little chuck and cheap too. Maybe there’s something bigger to suit your needs. This is what I bought:

Chuck

Jaws
 
Joined
Jul 5, 2022
Messages
236
Likes
54
Location
Lima, Peru
I wanted to securely hold a small box but couldn’t find any suitable jaws for my chuck. I ended up buying the little Record Power SC2 chuck which happened to have pin jaws of the size I needed. Lovely little chuck and cheap too. Maybe there’s something bigger to suit your needs. This is what I bought:

Chuck

Jaws

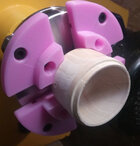
“Thanks so much! I also know that there are soft nylon jaws that can be shaped to your needs. I’m not sure if I can make something similar from wood, MDF, or plywood.

IMG_7187.jpeg
 

Michael Anderson

Super Moderator
Staff member
TOTW Team
Joined
Aug 22, 2022
Messages
1,559
Likes
4,828
Location
Chattanooga, TN
Joined
Jan 10, 2024
Messages
398
Likes
193
Location
Bournemouth, UK
“Thanks so much! I also know that there are soft nylon jaws that can be shaped to your needs. I’m not sure if I can make something similar from wood, MDF, or plywood.
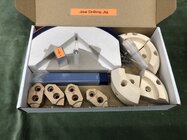
Some time ago I made a simple jig to enable me to easily drill wooden segments to make my own accessory jaws. I also ground a suitable size step drill from an ordinary bit. The jig looks a bit odd because I made it from part of an old bowling ball of mine that had a badly spit coverstock. Ply or MDF would be just as good. It just holds the segments accurately in place while you drill the two holes on a drill press for the mounting screws.

IMG_1682.jpeg
 
Joined
Jun 1, 2023
Messages
4
Likes
2
Location
Calgary, AB
On internet archive.org is a copy of Hugh O'Neill's book, Woodturning - A manual of techniques. It contains a detailed description of his box-making process, with sketches, most of which is using a screw chuck, finishing with a 'reverse' chuck which I believe is the same as a jam.
 
Joined
Jul 5, 2022
Messages
236
Likes
54
Location
Lima, Peru
I find this video extremely helpful when learning to turn boxes. It’s by John Lucas, who has chimed in above.

View: https://m.youtube.com/watch?v=koou0WIonio&noapp=1


Of course, there are countless methods, but this one is efficient.
Hello, thanks so much! Very interesting video, there’s a lot to learn. Maybe next week, I’ll start working on the plans and making boxes. It’s going to be a lot of fun! Great video from Jhonatan Lucas.
 
Joined
Jul 5, 2022
Messages
236
Likes
54
Location
Lima, Peru
On internet archive.org is a copy of Hugh O'Neill's book, Woodturning - A manual of techniques. It contains a detailed description of his box-making process, with sketches, most of which is using a screw chuck, finishing with a 'reverse' chuck which I believe is the same as a jam.
Thanks so much! I’ll definitely be checking out and reading those books. Great information!
 
Joined
Jul 5, 2022
Messages
236
Likes
54
Location
Lima, Peru
Some time ago I made a simple jig to enable me to easily drill wooden segments to make my own accessory jaws. I also ground a suitable size step drill from an ordinary bit. The jig looks a bit odd because I made it from part of an old bowling ball of mine that had a badly spit coverstock. Ply or MDF would be just as good. It just holds the segments accurately in place while you drill the two holes on a drill press for the mounting screws.

View attachment 65945
Hello, thank you so much! I appreciate you sharing pictures of your work—it looks great. Now I’m even more enthusiastic about making my own.
 
Joined
Sep 19, 2023
Messages
703
Likes
1,330
Location
Columbia, TN
Hello, thanks so much! Very interesting video, there’s a lot to learn. Maybe next week, I’ll start working on the plans and making boxes. It’s going to be a lot of fun! Great video from Jhonatan Lucas.

Same here. I've experimented with boxes, but so far haven't turned a good one.
 
Joined
Aug 14, 2007
Messages
5,641
Likes
2,991
Location
Eugene, OR
One key to turning boxes so they don't move, no matter how "dry" your blanks are, rough turn them at least once before finish turning. Tape the top and bottom together so the pieces don't get mixed up or lost. Eric Lofstrom does boxes, maybe 2 or 3 inch diameter, and turns about a 1 inch tenon on them. He turns them down 4 or 5 times before final turning. They have a 3 to 5 second drop time as in pick it up by the lid and it takes 3 to 5 seconds for the bottom to drop off. One he wouldn't pass around because just hand temperatures would make the lid not fit properly. Don't remember which type of wood that was. The lid/recess was spot on parallel to the lathe bed. The tenon/bottom had one spot in the middle of the tenon, about 1/2 inch or so, that was a "perfect" fit, and then it tapered very slightly to both sides. He uses a specialized scraper to form the tenon and recess, and the edge is ground parallel to the lathe bed so he just has to eyeball the tool against the lathe bed to get the fit perfect.

robo hippy
 
Joined
Jul 5, 2022
Messages
236
Likes
54
Location
Lima, Peru
One key to turning boxes so they don't move, no matter how "dry" your blanks are, rough turn them at least once before finish turning. Tape the top and bottom together so the pieces don't get mixed up or lost. Eric Lofstrom does boxes, maybe 2 or 3 inch diameter, and turns about a 1 inch tenon on them. He turns them down 4 or 5 times before final turning. They have a 3 to 5 second drop time as in pick it up by the lid and it takes 3 to 5 seconds for the bottom to drop off. One he wouldn't pass around because just hand temperatures would make the lid not fit properly. Don't remember which type of wood that was. The lid/recess was spot on parallel to the lathe bed. The tenon/bottom had one spot in the middle of the tenon, about 1/2 inch or so, that was a "perfect" fit, and then it tapered very slightly to both sides. He uses a specialized scraper to form the tenon and recess, and the edge is ground parallel to the lathe bed so he just has to eyeball the tool against the lathe bed to get the fit perfect.

robo hippy
Thank you so much for taking the time to explain everything. The beauty of constantly learning is that there’s always something new and exciting to discover each day. It’s truly inspiring to know that there’s always more to achieve and grow from.
 

Roger Wiegand

Beta Tester
Joined
Nov 27, 2018
Messages
825
Likes
974
Location
Wayland, MA
Website
www.carouselorgan.com
Richard Raffin's book and videos on box making are also a useful resource to look into. I typically finish the top when it is fit tight to the base, before the final fitting cut to size the tenon on the base. I finish the bottom of the base by fitting it to a tenon made of waste wood. Both are done gently-- it's a true jam chuck without the tailstock in place for the cuts that cross the centers of the pieces or where the tailstock would be in the way of accessing the inside of a bottom rim.
 
Joined
Dec 9, 2018
Messages
60
Likes
62
Location
Ottawa, Ontario
Here is a tip that works well for me to avoid splitting a box when using jaws to expand inside the box as an alternative to a jam chuck.

As with Bill Alston, I love the little Record SC2 mini chuck with its pin jaws for this, but my Oneway Talon chuck with smooth spigot jaws (as Oneway calls them) also works well. The problem is that, to keep the box from rotating on the pin jaws, you are tempted to expand them so much that they split the sides.

To reduce the risk of this, I put a particular kind of ultra high friction tape on the pin jaws, and with this tape they hold the box very firmly with only the slightest expansion pressure. I get this tape from Lee Valley, but there are probably other suppliers of the same or similar products. It is not like the gummy friction tape that we (used to) put on our hockey sticks, it is just some polymer that is super grabby without any adhesive or stickiness. The tape also reduces the risk of marring the inside of the box.

Here is a link to the Lee Valley product: https://www.leevalley.com/en-ca/sho...e/32184-super-high-friction-tape?item=99K3401
 
Joined
Jul 5, 2022
Messages
236
Likes
54
Location
Lima, Peru
Here is a tip that works well for me to avoid splitting a box when using jaws to expand inside the box as an alternative to a jam chuck.

As with Bill Alston, I love the little Record SC2 mini chuck with its pin jaws for this, but my Oneway Talon chuck with smooth spigot jaws (as Oneway calls them) also works well. The problem is that, to keep the box from rotating on the pin jaws, you are tempted to expand them so much that they split the sides.

To reduce the risk of this, I put a particular kind of ultra high friction tape on the pin jaws, and with this tape they hold the box very firmly with only the slightest expansion pressure. I get this tape from Lee Valley, but there are probably other suppliers of the same or similar products. It is not like the gummy friction tape that we (used to) put on our hockey sticks, it is just some polymer that is super grabby without any adhesive or stickiness. The tape also reduces the risk of marring the inside of the box.

Here is a link to the Lee Valley product: https://www.leevalley.com/en-ca/sho...e/32184-super-high-friction-tape?item=99K3401
Hello, thank you so much for the great recommendations! I also have the Talon chuck, but with the serrated spigot—I believe it’s called the premium profiled version. I wonder if tape could also work in this case.
 
Joined
Jul 5, 2022
Messages
236
Likes
54
Location
Lima, Peru
Richard Raffin's book and videos on box making are also a useful resource to look into. I typically finish the top when it is fit tight to the base, before the final fitting cut to size the tenon on the base. I finish the bottom of the base by fitting it to a tenon made of waste wood. Both are done gently-- it's a true jam chuck without the tailstock in place for the cuts that cross the centers of the pieces or where the tailstock would be in the way of accessing the inside of a bottom rim.
Thank you so much! I’ll definitely be checking out his videos. I’m really grateful for all the help and support from everyone.
 
Joined
Feb 28, 2021
Messages
1,343
Likes
1,191
Location
Roulette, PA
Website
www.reallyruralwoodworks.com
To reduce the risk of this, I put a particular kind of ultra high friction tape on the pin jaws, and with this tape they hold the box very firmly with only the slightest expansion pressure. I get this tape from Lee Valley, but there are probably other suppliers of the same or similar products. It is not like the gummy friction tape that we (used to) put on our hockey sticks, it is just some polymer that is super grabby without any adhesive or stickiness. The tape also reduces the risk of marring the inside of the box.
Hmm.. makes me wonder if that first aid bandage wrap (the kind that sticks to itself - often used with horses too, so cheaply had at tractor supply..) might do equally as well... Wrap some around the pin jaws just enough for a slight slip fit of the box, then expand out lightly to a nice snug box fit... I'll have to remember this and try it myself (I have a couple rolls of that tape I use for various things)
 
Joined
Dec 9, 2018
Messages
60
Likes
62
Location
Ottawa, Ontario
Hello, thank you so much for the great recommendations! I also have the Talon chuck, but with the serrated spigot—I believe it’s called the premium profiled version. I wonder if tape could also work in this case.
Yes, the tape helps with the profiled spigot jaws too, but the tape has less metal to stick to (just the high points of the profile ridges) so it can slip a bit (on the jaws, not on the box). I would get the smooth spigot jaws anyway, so you have some jaws that are less likely to mar the wood.
 
Joined
Jul 5, 2022
Messages
236
Likes
54
Location
Lima, Peru
Yes, the tape helps with the profiled spigot jaws too, but the tape has less metal to stick to (just the high points of the profile ridges) so it can slip a bit (on the jaws, not on the box). I would get the smooth spigot jaws anyway, so you have some jaws that are less likely to mar the wood.
Thank you so much for your answer. Maybe it would have been better if I had bought the soft ones. For now, I think I’ll try to make wooden spigot jaws and hope they work.”
 
Joined
Dec 9, 2018
Messages
60
Likes
62
Location
Ottawa, Ontario
If you are going to make wooden spigot jaws for your Talon chuck, get the Oneway flat jaws (basically plates) to mount the wooden jaws on; this is exactly what the flat jaws are made for. It is much easier and stronger to mount wooden (or UHMW polyethylene) jaws on the flat plates (which mount on the chuck like regular jaws) than to try to mount the wooden jaws directly on the chuck. And you can use one set of plates for any number of custom jaws.

Here is the link: https://oneway.ca/index.php?route=product/category&path=59_69_97_162
 

Tom Gall

TOTW Team
Joined
Feb 20, 2013
Messages
1,055
Likes
2,068
Location
Hillsborough, NJ
If you are going to make wooden spigot jaws for your Talon chuck, get the Oneway flat jaws (basically plates) to mount the wooden jaws on; this is exactly what the flat jaws are made for. It is much easier and stronger to mount wooden (or UHMW polyethylene) jaws on the flat plates (which mount on the chuck like regular jaws) than to try to mount the wooden jaws directly on the chuck. And you can use one set of plates for any number of custom jaws.

Here is the link: https://oneway.ca/index.php?route=product/category&path=59_69_97_162
I agree, Flat Jaws are good solution. Or, if you have Jumbo/Cole jaws you can use them as a larger version of the Flat Jaws (eliminates those PITA buttons). BTW, for items like boxes - compression mode is usually a safer option than expansion mode. The only disadvantage of these types of jaws, for me, was having to swap/change them out for other uses .... so I have a dedicated chuck just for these jaws! Probably the reason why I have about a dozen chucks. ;) I would usually try vacuum chucking as my first choice, but if that didn't work well then I would use a mechanical chuck.
 
Joined
Jul 5, 2022
Messages
236
Likes
54
Location
Lima, Peru
I agree, Flat Jaws are good solution. Or, if you have Jumbo/Cole jaws you can use them as a larger version of the Flat Jaws (eliminates those PITA buttons). BTW, for items like boxes - compression mode is usually a safer option than expansion mode. The only disadvantage of these types of jaws, for me, was having to swap/change them out for other uses .... so I have a dedicated chuck just for these jaws! Probably the reason why I have about a dozen chucks. ;) I would usually try vacuum chucking as my first choice, but if that didn't work well then I would use a mechanical chuck.
If you are going to make wooden spigot jaws for your Talon chuck, get the Oneway flat jaws (basically plates) to mount the wooden jaws on; this is exactly what the flat jaws are made for. It is much easier and stronger to mount wooden (or UHMW polyethylene) jaws on the flat plates (which mount on the chuck like regular jaws) than to try to mount the wooden jaws directly on the chuck. And you can use one set of plates for any number of custom jaws.

Here is the link: https://oneway.ca/index.php?route=product/category&path=59_69_97_162
hank you very much! Of course, I hadn’t noticed that detail. Yes, those are indeed the proper foundations to create any shape and size.
 
Joined
Jul 5, 2022
Messages
236
Likes
54
Location
Lima, Peru
I want to extend a big thank you to everyone for your comments, recommendations, and all-around support. You’ve saved me from making a costly mistake and buying the wrong accessories for what I had in mind. Instead, I might finally indulge in that 3/4-inch skew chisel from Carter and Son to upgrade my Crown HSS,that’s been tempting me for far too long. It seems my thoughts have been sharpening themselves for this purchase!
 
Back
Top