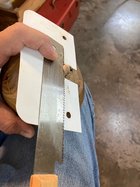
Variety of ways to get the bottom little stub/nub off of a piece depending on the wood. Sometimes I can use a thin parting tool and get a very small piece holding it on then a sharp chisel to clean it up. Sometimes the wood just isn't stable enough at that little spot to risk it breaking and coming off the lathe. Especially on hollow forms where the pith is the center and not that strong. I use a thick plastic card (an old car dealer drive out tag) with a notch cut in it to make it easier to use my cutoff saw to get rid of most of the nub. It's easier to then use a chisel for cleanup if there isn't as much material to deal with. I've tried without the card and invariably I will have a tooth from the saw rub on the bottom rim/foot of the piece or slip and cause a really nice deep scratch. This piece is Catalpa. Very soft and the pith was not strong enough to support using a tool any further.

-
We just finished moving the forums to a new hosting server. It looks like everything is functioning correctly but if you find a problem please report it in the Forum Technical Support Forum (click here) or email us at forum_moderator AT aawforum.org. Thanks! -
Beware of Counterfeit Woodturning Tools (click here for details) -
Johnathan Silwones is starting a new AAW chapter, Southern Alleghenies Woodturners, in Johnstown, PA. (click here for details) -
Congratulations to Dave Roberts for "2 Hats" being selected as Turning of the Week for April 22, 2024 (click here for details) -
Welcome new registering member. Your username must be your real First and Last name (for example: John Doe). "Screen names" and "handles" are not allowed and your registration will be deleted if you don't use your real name. Also, do not use all caps nor all lower case.
You are using an out of date browser. It may not display this or other websites correctly.
You should upgrade or use an alternative browser.
You should upgrade or use an alternative browser.
Getting the bottom nub off
- Thread starter Randy Anderson
- Start date
I have always done a cone shape toward the finished base and the babase is always concave such that the finished piece will sit solid on the outer ring of the base. I have done hundreds of hollow forms with th pith in the base and if you center the form on the outside dimension of the blank the pith is rarely in the center. The smaller the diameter of the nubin the slower it moves past the tool and, if you are using shearing cuts as you should, you can usually see when you are reaching the small size limit. The photo below shows the nubbin removed and the remaining wood sanded.
Don, my standard process is to use a small tenon and leave it as the last step to remove after sanding and final finishing. I use a cone chuck to work all but the last bit off, sand a bit and then slice it off with a sharp chisel, or my saw. A little sanding with a 2" disc and done. I try to keep the pith in center for what I pick as the top of the vase/form but don't fret too much on it being centered in the bottom. Sometimes it's close. Sometimes not. I try to keep my form centered around the pith on the top to keep the grain symmetry flow even. Sometimes it's a real challenge as I'm sure you know. Trees just won't cooperate and grow straight and even.
- Joined
- Apr 27, 2004
- Messages
- 8,642
- Likes
- 4,983
- Location
- Lakeland, Florida
- Website
- www.hockenberywoodturning.com
Like your saw protector it might work in a concave foot if it and the saw flex.
I usually turn the nub off at about 3 rpm by turning the piece by hand.
I leave a very slight nub as a safety net. Don’t want to risk pulling a fiber across the bottom
Turn the nub to less than an 1/8
Then rotate by hand to cut it free with the spindle gouge
I usually turn the nub off at about 3 rpm by turning the piece by hand.
I leave a very slight nub as a safety net. Don’t want to risk pulling a fiber across the bottom
Turn the nub to less than an 1/8
Then rotate by hand to cut it free with the spindle gouge
To remove the final nub afer taking the turning from the lathe
We had a production turner demostrate at our club He said to use a skew chisel and place your thumb on the side of the chisel close to the end , then use your thumb to push the skew and cut the fibres
This method gives better control of the tool
Another tip we were told you may find useful
It is difficult to get a perfect gloss finish on the inside of boxes so use fine steel wool to de nib and create a matt finish on the inside of box
i
Last edited:
I remove the bottom nub similarly to what Randy described, using cardboard from an old cereal box instead of the plastic. I like the idea of just cutting a slot in the cardboard/plastic. I've been punching a hole which is a bit more of a hassle and not any more effective.
I use a "flush cut" saw - Japanese pull cut style saw. It's very flexible, which helps to get close to the bottom on a concave foot.
I use a "flush cut" saw - Japanese pull cut style saw. It's very flexible, which helps to get close to the bottom on a concave foot.
I’ve been using a thin flush cut saw to remove the last bit. It’s flexible, so I bend it while cutting to ensure I don’t scratch the surface. I cut it a little bit proud (maybe 1/16” is left after sawing) and then use a spoon or hook knife to cut off the excess. Takes a bit longer than trying to saw flush, but prevents and accidental scratches.
After multiple cases of tearing the last bit and leaving a small dent, I have resorted to the donut chuck approach. Started with a small shop made one and later purchased the largest that my lathe can accept. Yes, it is another piece of kit and an additional step, but I have had zero tearout at the final attachment point and another benefit is I have not marred any of the bowl’s feet since using it. One lesson learned was to cushion the interior rim of the “donut” hole to prevent any burnishing or compression marks. I slit some vinyl tubing and placed it around the opening.
One method I use is to power carve the nib and then sand. But better still is to not have a nib. Use a worm screw and turn and finish recess. This way no nub to deal with and continue to hollow.
Being a woodcarver, turned woodturner, I use my carving tools to remove the vestige of a nub. Too many times, I have tried turning it down to nothing and the nub breaks after lots of time spent on the turning. So, I chose to play it safe, get the piece over to the bench and carve off the nib. I also have a 90 degree handpiece for my Foredom with a 1" velco sanding disc holder. This allows me to clean up the bottom to 400 grit
great thread and love the “card trick.”I use a thick plastic card
I've used a very sharp carving spoon with slow spinning lathe