• We just finished moving the forums to a new hosting server. It looks like everything is functioning correctly but if you find a problem please report it in the Forum Technical Support Forum (click here) or email us at forum_moderator AT aawforum.org. Thanks!
  • Beware of Counterfeit Woodturning Tools (click here for details)
  • Johnathan Silwones is starting a new AAW chapter, Southern Alleghenies Woodturners, in Johnstown, PA. (click here for details)
  • Congratulations to Dave Roberts for "2 Hats" being selected as Turning of the Week for April 22, 2024 (click here for details)
  • Welcome new registering member. Your username must be your real First and Last name (for example: John Doe). "Screen names" and "handles" are not allowed and your registration will be deleted if you don't use your real name. Also, do not use all caps nor all lower case.

Fuzzy surface

Joined
Jun 30, 2021
Messages
11
Likes
3
Location
Powell River, BC
I applied a few coats of Watco's Danish Oil to a bowl made of Western Alder, which is not quite a hardwood. This was a twice turned bowl which I had slowly drying for a year. Sanded to 600 grit and applied the oil and wiped. Now after a couple of days I notice some areas have this surface fuzziness about them which, if you wipe your hand across the surface in one direction disappears (see lower photo where I've wiped a finger on one section).
How do I eliminate what are obviously tiny fibers? 000 steel wool? a polishing compound like ultra-shine? I intend to apply a final finish of bees wax.
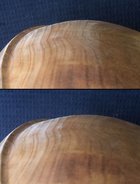
fuzzy surface.jpg
 
Joined
Sep 8, 2022
Messages
26
Likes
125
Location
Austin, TX
Sounds like raised grain, which sometimes happens after a finish is applied to a sanded surface. A light sanding with the highest grit paper you used the first time should get rid of it. good luck
 
Joined
Aug 14, 2007
Messages
5,491
Likes
2,842
Location
Eugene, OR
My first guess is that this is tear out. When turning bowls, in side grain orientation, for 1/4 of the revolution, you are cutting with the grain, then 1/4 against the grain, then repeat. One goal of turning is to reduce this tear out to the point where little sanding is needed to remove tear out. You will, most of the time, find the exact same spots on the inside as the outside, but they are in the opposite quadrants. Sharp tools, and I always use a freshly sharpened gouge for final finish cuts! Very light finish cuts. I prefer a shear scrape for my final passes as that seems to give me the best surfaces. When all else fails, you have to resort to the 80 grit gouge/abrasives. I have a bunch of videos up on You Tube, mostly about bowl turning. One on shear scraping. Alder is a nice wood, but it tends to not be the cleanest cutting wood out there. Pacific Madrone, cuts like butter. Oh, if the tear out is obvious when you are ready to sand, you may try spritzing a bit of water onto the wood, let it sit for a minute or two, and then taking VERT LIGHT cuts, turn off the wet stuff.

From a turner over at Woodturner's Resource, "Never take a finished piece from the shop into the house on a sunny day. Sunlight causes scratches." When sanding out your bowls, you need good light and good glasses. Natural spectrum works best. Off the shelf 'reading' glasses may help, but are poor quality.

robo hippy
 

Michael Anderson

Super Moderator
Staff member
TOTW Team
Joined
Aug 22, 2022
Messages
1,360
Likes
3,925
Location
Chattanooga, TN
Something worth mentioning. Given you mentioned the fuzz is only felt in one direction, did you sand in forward and reverse? If you only sand in one direction, some of the longer fibers that didn’t get cut (or are saturated with oil) tend to lay down in that direction. You also didn’t mention if you water-popped the grain prior to sanding higher grits. This can also help with the smoothness of the surface.
 
Joined
Feb 26, 2019
Messages
1,825
Likes
1,423
Location
Lebanon, Missouri
It appears that there is some very light tear out (the lighter areas) that need a bit more sanding, and sanding in both forward and reverse helps cut fibers that lay down in each direction. Properly sanded wood will not show the color variation present in the photos.

The piece can be wet sanded with 800 to 1000gr wet/dry paper and the DO. I prefer sandpaper to steel wool/scotchbrite as it cuts better
 
Joined
Jun 30, 2021
Messages
11
Likes
3
Location
Powell River, BC
My first guess is that this is tear out. When turning bowls, in side grain orientation, for 1/4 of the revolution, you are cutting with the grain, then 1/4 against the grain, then repeat. One goal of turning is to reduce this tear out to the point where little sanding is needed to remove tear out. You will, most of the time, find the exact same spots on the inside as the outside, but they are in the opposite quadrants. Sharp tools, and I always use a freshly sharpened gouge for final finish cuts! Very light finish cuts. I prefer a shear scrape for my final passes as that seems to give me the best surfaces. When all else fails, you have to resort to the 80 grit gouge/abrasives. I have a bunch of videos up on You Tube, mostly about bowl turning. One on shear scraping. Alder is a nice wood, but it tends to not be the cleanest cutting wood out there. Pacific Madrone, cuts like butter. Oh, if the tear out is obvious when you are ready to sand, you may try spritzing a bit of water onto the wood, let it sit for a minute or two, and then taking VERT LIGHT cuts, turn off the wet stuff.

From a turner over at Woodturner's Resource, "Never take a finished piece from the shop into the house on a sunny day. Sunlight causes scratches." When sanding out your bowls, you need good light and good glasses. Natural spectrum works best. Off the shelf 'reading' glasses may help, but are poor quality.

robo hippy
Thanks Reed, all very helpful. I will try the spritzing and a shear scraper (once I purchase one). My wife and I had a good chuckle about the sunlight - great quote. Totally agree about Madrone (a.k.a. arbutus here in B.C.) - one of my favourite species.

Guy
 
Joined
Jun 30, 2021
Messages
11
Likes
3
Location
Powell River, BC
It appears that there is some very light tear out (the lighter areas) that need a bit more sanding, and sanding in both forward and reverse helps cut fibers that lay down in each direction. Properly sanded wood will not show the color variation present in the photos.

The piece can be wet sanded with 800 to 1000gr wet/dry paper and the DO. I prefer sandpaper to steel wool/scotchbrite as it cuts better
Thanks Doug. I have the wet/dry paper, but it is black (aluminum oxide I think). I tried using it a while back and it left black marks on my piece so was not impressed. It may have been the type of wood, so I will give it a try.
Thanks!
Guy
 
Joined
Jun 30, 2021
Messages
11
Likes
3
Location
Powell River, BC
Something worth mentioning. Given you mentioned the fuzz is only felt in one direction, did you sand in forward and reverse? If you only sand in one direction, some of the longer fibers that didn’t get cut (or are saturated with oil) tend to lay down in that direction. You also didn’t mention if you water-popped the grain prior to sanding higher grits. This can also help with the smoothness of the surface.
Thanks Michael. Going in both directions and spritzing with water are good ideas which I will implement.

Guy
 
Joined
Feb 26, 2019
Messages
1,825
Likes
1,423
Location
Lebanon, Missouri
Thanks Doug. I have the wet/dry paper, but it is black (aluminum oxide I think). I tried using it a while back and it left black marks on my piece so was not impressed. It may have been the type of wood, so I will give it a try.
Thanks!
Guy
Yes the black silicon carbide wet/dry paper might do that if sanding bare wood, dry or wet - particles imbedding in a light color wood, and of it looked a bit like your previous photos those tear out areas could hold some of the grit.
 
Joined
Aug 14, 2007
Messages
5,491
Likes
2,842
Location
Eugene, OR
I do turn some big leaf maple, but as a rule, I don't prefer it. Main reason is that it is difficult to cut cleanly, kind of like the alder.

robo hippy
 
Back
Top