• We just finished a fairly major forum upgrade. If you are having problems using the forums, please clear your browser cache and that should clear up any issues. Otherwise post in the Help Thread or email us at forum_moderator@aawforum.org. Happy Holidays!
  • It's time to cast your vote in the December 2024 Turning Challenge. (click here for details)
  • Congratulations to Vincent Luciani for "Flower Pot" being selected as Turning of the Week for December 23, 2024 (click here for details)
  • Welcome new registering member. Your username must be your real First and Last name (for example: John Doe). "Screen names" and "handles" are not allowed and your registration will be deleted if you don't use your real name. Also, do not use all caps nor all lower case.

First Attempt-Segmented Bowl

Joined
Nov 27, 2024
Messages
17
Likes
14
Location
Mt. Jackson, VA.
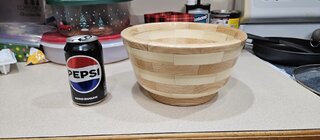
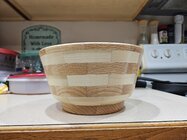
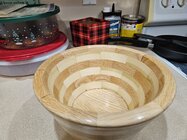
Even though I have very little turning experience I thought it would be a fun project to try a segmented bowl. While parts of it were fun, others were quite frustrating!! I think having all the proper tools would make a huge difference but getting all the pieces lined up and flat is no where near as easy as it looks on youtube. For tools all I used was my compound miter saw and lathe. The wood (Poplar and Red Oak) came from Lowe's. The joinery is not good I know but for the tools I had I dont think its horrible. I filled the gaps with Titebond Quick and Thick mixed with saw dust then A LOT of sanding. The finish is just gloss polyurethane.

All things considered with my inexperience, lack of tools and only instruction from youtube I dont think it turned out horrible but you guys be the judge. Brutal honesty is not going to hurt my feelings!! I am looking to improve.

Thanks,
Raymond
 

Attachments

  • 20241227_164940.jpg
    20241227_164940.jpg
    324.3 KB · Views: 48
  • 20241227_164904.jpg
    20241227_164904.jpg
    855.8 KB · Views: 48
  • 20241227_164918.jpg
    20241227_164918.jpg
    971.2 KB · Views: 48
Good first attempt. Cutting the segments with a miter saw is a challenge, a lot of careful adjustments are needed to get the saw dialed in to cut accurately. What did you use to flatten the rings after gluing the segments into a ring?
 
Great job! If you are going to get into more segmented turning, especially more complex designs with smaller pieces, I'd suggest researching and making a Wedgie Sled. It makes the accurate, precise cutting of segments much easier than a mite saw. The Wedgie Sled is meant for use on a tablesaw (don't know if that is one of your current tools). I have seen sleds built for bandsaws also, but am not sure whether the same level of accuracy can be achieved with a bandsaw. The fitting and final glue-up is much less frustrating with segments cut with a wedgie sled on a tablesaw.
 
Good first attempt. Cutting the segments with a miter saw is a challenge, a lot of careful adjustments are needed to get the saw dialed in to cut accurately. What did you use to flatten the rings after gluing the segments into a ring?
Thanks Mr. Goff. I used a handheld belt sander mainly to get the glue off. Eyeballing it, the boards looked pretty flat and in plane but sadly they were not. One of the biggest errors in my glue up process was all I had was 2" painters tape. After everything was set in place and glued when I closed the ring and tried to flatten everything out the extra tape under the ring in places made that impossible and I'm thinking was the main cause of my rings being so out of plane?
 
Great job! If you are going to get into more segmented turning, especially more complex designs with smaller pieces, I'd suggest researching and making a Wedgie Sled. It makes the accurate, precise cutting of segments much easier than a mite saw. The Wedgie Sled is meant for use on a tablesaw (don't know if that is one of your current tools). I have seen sleds built for bandsaws also, but am not sure whether the same level of accuracy can be achieved with a bandsaw. The fitting and final glue-up is much less frustrating with segments cut with a wedgie sled on a tablesaw.
Thanks Mr. Heinemann!! I don't currently have a tablesaw but one is in the works and I have been watching videos on how to make a Wedgie Sled. I have a pretty nice DeWalt compound miter radial arm saw that does fine for house trim but is no where near adequate for making these segments.
 
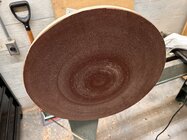
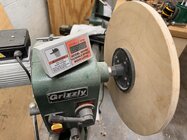
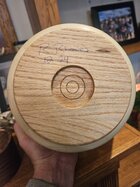
An inexpensive way to flatten the rings is to build a sanding disk that you can mount on your lathe. I have a 16" one that I keep on my old lathe and it is mostly used for flattening rings. All you need is a face plate, piece of MDF or plywood, and a large piece of sandpaper. Here are a couple of photos of mine. If the headstock on your lathe does not rotate, just make it a big as the swing of your lathe will allow. Just be careful, this is also a very effective tool for removing skin from knuckles.

IMG_5388.jpgIMG_5387.jpg
 
If you have a face plate for your lathe, mound a piece of plywood (thicker the better perhaps 2 glued together) and then glue sandpaper to it and use that to flatten the rings. I used and old cabinet formica door. A section of counter top would also work. The formica makes it easier to replace the sandpaper when it needs it. I use 4 - 6" wide rolls of sand paper with 3m 77 for adhesive. I use a block of wood instead of face plate with hole thread to turn on spindle.

Delbert beet me to it. 🙂
 
Thank you Mr. Goff and Mr. Coates!! I have plans to make one of those and use it as dual purpose. If I put the bowl rim against it and bring the live center tailstock up would that be a good way to turn off a tenon? I wouldn't think it would scratch up the bowl rim much if any?
 
Thank you Mr. Goff and Mr. Coates!! I have plans to make one of those and use it as dual purpose. If I put the bowl rim against it and bring the live center tailstock up would that be a good way to turn off a tenon? I wouldn't think it would scratch up the bowl rim much if any?
Nope first bit of a catch or even a slip of the wood you're removing a tiny bit of wood and losing tailstock pressure, so you'd quickly sand away the rim to where the bowl wobbles or comes off tailstock entirely. Best way for turning off tenon without vacuum chuck or cole jaws (or longworth chuck) is pretty much just a jam chuck/ friction chuck where you take a scrap piece of wood , turn a tenon and flip it around and then turn the face of the scrap to match curvature of your bowl as closely as possible - a bit of clean cotton cloth or terry towel can work to pad inside of bowl to minimize any burnish marks from jam chucking. Or, rather than a tenon, do a recess and finish your foot of the bowl around that recess - then you can chuck up to the recess and finish rest of bowl and no need to turn off tenon. Just have to be more careful about planning your bowl bottoms so you don't turn them into funnels.

As others said - take your faceplate and fasten up a piece of MDF (tends to come out flatter than plywood, so less trueing up is needed on the facing before applying PSA Sandpaper, though even that isn't strictly necessary if the wood is flat enough to not wobble when spinning..) that'd make a nice sanding disk for flattening rings - Alternatively for bigger rings you could opt to get a drum sander (or you can fashion one on a lathe by spinning a round dowel and wrap a sanding belt around it along its length, then an adjustable base of MDF to bring wood up to it to make contact- however I wouldn't do that unless you can run your lathe really slowly - if it grabs your disk and spits it out the other side as a projectile, it can be harmful to lathe, shop walls, and yourself, not to mention the segmented ring!) Since I do my glue-ups on a scrap piece of MDF (lightly waxed) I don't generally worry too much about flatness as the side that faces the MDF generally comes out flat - as long as the segments were cut squarely. - takes very little sanding to ensure flatness on that side, then glue up the ring, let it dry, and true the face off on the lathe before next ring (Not so good if your design is going to require a precise thickness of the ring though...)
 
Thank you Mr. Goff and Mr. Coates!! I have plans to make one of those and use it as dual purpose. If I put the bowl rim against it and bring the live center tailstock up would that be a good way to turn off a tenon? I wouldn't think it would scratch up the bowl rim much if any?
I believe that it will depend on a couple of things. First, if a fine grit sandpaper used, there probably will not be much scratching; however, it may be difficult to flatten the rings if with fine grit paper. Secondly, if the bowl slips on the paper, it will be more likely to scratch.

I don't use tenons on my segmented bowls. When using a solid base ring, the first thing that I do is put it on the lathe and turn a recess in the bottom that will remain after the bowl is completed. Next, I turn the base around and mount it in a chuck and flatten it to prepare it for the first segmented ring. Many people will disagree on leaving the recess, but it has worked well for me.
 
Thanks Mr. Gustin and Mr. Goff. I did do a recess on this bowl but I have had a hard time with those on other projects. Between them slipping, splintering from over tightening or not lining back up true if I take the piece off the lathe. I learned my lesson on that last one after several disasters.

1000011710.jpg
 
You don't need clamps technically to assemble the rings. You can build them in stages starting by gluing them into 4 sections. Then glue to 2 quarters into halves. Then on a flat surface you can draw them across a piece of sand paper to flatten the ends on the 2 halves and glue them together. To glue the pieces together put glue on one side then rub the pieces together until they stick. Only takes 3 or 4 rubs to get a good joint. This video should start at the point where i show how to do this.
 
If you ever want to take a ride down Interstate 81 to Abingdon, I am happy to show you how I make segmented bowls. I don't consider myself an expert, but I have made several bowls that have turned out pretty good.
 
You don't need clamps technically to assemble the rings. You can build them in stages starting by gluing them into 4 sections. Then glue to 2 quarters into halves. Then on a flat surface you can draw them across a piece of sand paper to flatten the ends on the 2 halves and glue them together. To glue the pieces together put glue on one side then rub the pieces together until they stick. Only takes 3 or 4 rubs to get a good joint. This video should start at the point where i show how to do this.
Just to clarify for a beginner. There are other options to cutting segments that is much less expensive and more versatile. You can make a simple wedge sled for about 30 bucks and use a 30 degree triangle to make perfect 12 segment rings. Go to the segmented woodturners site for options.
Jerry
 
You don't need clamps technically to assemble the rings. You can build them in stages starting by gluing them into 4 sections. Then glue to 2 quarters into halves. Then on a flat surface you can draw them across a piece of sand paper to flatten the ends on the 2 halves and glue them together. To glue the pieces together put glue on one side then rub the pieces together until they stick. Only takes 3 or 4 rubs to get a good joint. This video should start at the point where i show how to do this.
I use this method. works great
 
Back
Top