• Congratulations to Isaac Litster winner of the January 2025 Turning Challenge (click here for details)
  • Conversations are now Direct Messages (click here for details)
  • Congratulations to Alan Weinberg for "Elm Burl Bowl" being selected as Turning of the Week for January 27, 2025 (click here for details)
  • Welcome new registering member. Your username must be your real First and Last name (for example: John Doe). "Screen names" and "handles" are not allowed and your registration will be deleted if you don't use your real name. Also, do not use all caps nor all lower case.

Failing miserably turning green wood cedar plate

Joined
Sep 8, 2015
Messages
28
Likes
0
Location
Cary, NC
Hope all are well and turning the same.

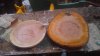
So I take a 14" diameter about 3" thick diameter slice of a just cut cedar log. Mount it on the Vega 24" bowl
lathe (which I have never used and if anyone has any ideas on the best ways to use this or how I could add a homegrown
tailstock I would love to hear) with a substantial face plate screwed in. No big deal getting it turned down
to less than 12" round so that I can then mount it on my 12" lathe. Then I flatten what will be the bottom and
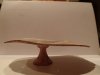
put a reverse tenon for my chuck. I turn it for a while thinking I will make an interesting plate like object.
Problems begin when I discover how hard the end grain ( I assume) on the face of my erstwhile 'plate' is. I am going to the grinder
more often than I probably should be going but it is all too often that I am slowing down the motor and/or getting really tiny
specs of wood shavings. Exactly opposite of the beautiful long shavings I am used to getting when making natural edge bowls.
After about 3/4's of an hour turning the plate starts moving and it becomes noticeably out of round especially on the outer edges.
Finally I notice 3 cracks starting at the pith. When I am doing natural edge bowls I don't care about cracks. It is part of the
naturalness of the bowl to me. But when the above mentioned plate starts moving around and all I am cutting, or more specifically trying to cut,
is rock hard and not at all fun I am beginning to wonder if what I am doing is even possible. Possible as in ending up with
a interesting albeit imperfect piece. I am aware that including the pith in anything is asking for cracks but I have never had a piece
of wood become unturnable because of it. Do turners who know what they are doing only make plates out of kiln dryed blanks?
Is making a plate with green wood a 'bridge too far'?


Thanks very much,
Jim Lee
 
Problems begin when I discover how hard the end grain ( I assume) on the face of my erstwhile 'plate' is. I am going to the grinder
more often than I probably should be going but it is all too often that I am slowing down the motor and/or getting really tiny
specs of wood shavings. Exactly opposite of the beautiful long shavings I am used to getting when making natural edge bowls.

Cedar can have quite a bit of silica (the common mineral in sand) which will dull tools. You won’t get the long shavings on end-grain but it shouldn’t be as hard as it sounds — none of the cedars are all that dense. Can you post a close-up photo of the typical cut surface in the wood?

A very good source of tree info can be found at the Wood Database:
http://www.wood-database.com/lumber-identification/softwoods/aromatic-red-cedar/
 
Last edited:
Jim, It sounds like you are turning a round log section that is 3" thick.
This is challenging to turn and rarely results in a good bowl.
The end grain is fragile and prone to cracking. With the pith in most woods are prone to cracking.
Norfolk Island pine is and exception. It has a hollow pith and is frequently turned end grain with the pith in.

I have been experimenting with some thin end grain pieces. Attached is an experiment with green live oak 4.5" diameter 1/16" thick.
Natural edge Turned end grain the bowl is really shallow almost flat.
You can see the movement and bump on the right side top where the pith is.
It pushes out as the rings close around each other. Thin can move. Larger thicker pieces crack because they cannot move.

Also being on the lathe 3/4 hour plus it is drying out. Keep it wet with a spray bottle of plant mister filled with water.
I much prefer to turn a blank cut from a half log,
with the long grain perpendicular to the lathe the wood can be cut like a crosscut and big shaving can come off.
Cedar is not my favorite wood but you can get nice pieces from cedar.

Have fun, Al
 

Attachments

  • image-2933443201.jpg
    image-2933443201.jpg
    423.9 KB · Views: 62
Last edited:
I get the same impression that Al has which is that you cut an end grain section ... in other words, the pith is in the center of your platter and the bark is around the outer edge. For cedar which loves to split that is not a good orientation although the figure might be interesting. I have not encountered mineral deposits in the local cedar that I have turned, but it has plenty of other issues like splintering and cracking. I did turn a piece of black walnut once that had such a high mineral content that it was all but impossible to cut. I finally resorted to carbide tools and then sandpaper. This was a handle for a bowl gouge so it didn't need to be show quality. :rolleyes: I think that mineral deposits in wood has more to do with the soil where the tree grew rather than the species.

Here are a couple links that show cutting bowl blanks from a log:

http://www.geigerssolutions.com/upload/130410 Preparing a Bowl Blank.pdf

http://www.edwardssmithfinewoodworking.com/blog/2011/02/15/preparing-bowl-blanks-with-a-chainsaw/
 
I thought those lathes came with a tailstock. Did you buy a used machine? Contact the factory in Decatur, IL for a replacement. They don't make a highly engineered product, but making one from scratch would not be too easy. Boring the steel for a nice fit on the adjustable section would require a metal lathe with boring bar attachment.
 
Al, is that one piece of wood? In any case was the top flat when you got it down to 1/16th inch then curled up to its current shape after you cut it. How in the world did you get it to that thinness without it exploding?
It is stunning.

Jim Lee
 
Jim

If you are doing an end grain bowl, I would use a standard tenon, that compresses, not a reverse that expands. That will help in the pith. If it does star cracking, just soak the pith with thin CA glue. Works every time.

I usually cut the backside and immediately coat the green wood in anchor seal, while I cut the opposite side.

For end grain cuts I always work from the outside in. So I'm still cutting across the grain, not constantly shaving off end grain. MUCH easier.

Keep a spray bottle handy if this takes 45 min and dampen the wood to prevent drying out.
Some woods will fling moisture out and soak me.

All that said cedar is nice and soft, so should cut well...
But if this oak...that's another story.
 
Al, is that one piece of wood? In any case was the top flat when you got it down to 1/16th inch then curled up to its current shape after you cut it. How in the world did you get it to that thinness without it exploding? It is stunning. Jim Lee

Yes one piece, it is small which makes it a lot easier.
It was even when it was on the lathe and curled afterward. On the end grain turnings I turn the opening/ top first.
Then shape the outside to match the inside. I cut the top outside in with 1/4 bowl gouge the a couple finish cuts with a Hunter from the middle to the rim ridding the bevel ( thanks john Lucas)
A little tricky getting a clean start in the middle. No sanding needed for the top. The outside was cut with a 1/4" bowl gouge with a Michelson grind.
The stem with a 3/8 spindle gouge. If it were not and experiment I would have sanded the stem.

Jimmy Clewes has an excellent video on turning green wood goblets. I would recommend it to anyone wanting to turn endgrain

Al
 
Olaf wrote:
"For end grain cuts I always work from the outside in. So I'm still cutting across the grain, not constantly shaving off end grain. MUCH easier."

Can you expand on that 'outside in' bit? That is what made the adventure not so fun cutting all end grain all the time. I will have to get Jimmy Clewes video and see what he is doing. He is one of my favorite teachers. I am very interested in making goblets so I am going to have to figure
the end grain end game out somehow. I start with a slab that is about 12" around and 3" thick of red oak that has been soaked in water and detergent to soften it up and keep it from cracking...before I make it crack by heating it up with my end grain cutting.

Thanks very much,
Jim Lee
 
Gulp.

Olaf wrote:
"For end grain cuts I always work from the outside in. So I'm still cutting across the grain, not constantly shaving off end grain. MUCH easier."

Can you expand on that 'outside in' bit? That is what made the adventure not so fun cutting all end grain all the time. I will have to get Jimmy Clewes video and see what he is doing. He is one of my favorite teachers. I am very interested in making goblets so I am going to have to figure
the end grain end game out somehow. I start with a slab that is about 12" around and 3" thick of red oak that has been soaked in water and detergent to soften it up and keep it from cracking...before I make it crack by heating it up with my end grain cutting.

Thanks very much,
Jim Lee

I'm going to stick my toe in the water here, and hope I don't drown: I'm thinking that by going from the outside in, you're cutting a curve that, increasingly as you go in, has the tool cutting face-grain, kinda like making a cove in a spindle. (i.e., the tool is going parallel with or tangent to the ways of the lathe, whereas if you're going inside-out on the end of the piece, you're directly cutting much more end-grain -- almost perpendicular to ways, sorta). If I'm wrong, I'm sure the guys will set me straight!:eek:

I've been bonking my head along these similar trains of though (but not as sophisticatedly as you!) the last few days, and have found Lyle Jamieson's online videos very helpful. Here's a link to his channel: https://www.youtube.com/channel/UC-EGwe-hMKrYtQGlwkLG-6g His videos on rough turning a bowl, and turning inside and outside, and the two on push cuts and pull cuts (and why) are brief but pertinent -- he gets directly into this question of how to hollow the inside when rough turning. Here's a link with him turning a goblet: https://www.youtube.com/watch?v=4rDgDFLWG18

I want to thank you for posting your questions, I'm learning a great deal reading the threads!:cool:
 
Last edited:
Olaf wrote:
"For end grain cuts I always work from the outside in. So I'm still cutting across the grain, not constantly shaving off end grain. MUCH easier."

Can you expand on that 'outside in' bit? That is what made the adventure not so fun cutting all end grain all the time. I will have to get Jimmy Clewes video and see what he is doing. He is one of my favorite teachers. I am very interested in making goblets so I am going to have to figure
the end grain end game out somehow. I start with a slab that is about 12" around and 3" thick of red oak that has been soaked in water and detergent to soften it up and keep it from cracking...before I make it crack by heating it up with my end grain cutting.

Thanks very much,
Jim Lee

Well, a picture is worth a 1000 words...wish I had one to show what I mean by chisel presentation.

Always use a standard tenon, so it compresses the pith. The pith is the hardest part of the log (usually), you can compress it like crazy to a really strong grip.
Big dish 3.jpg
This is 4" jaws holding a 28" piece. No problems at all. (ok, this one was pretty balanced)

For large end grain pieces like this (my arborist friend calls them cookies), I usually use a gouge and start at the bark, then move towards the middle.
For deeper vessels, I do start in the middle cut outwards, but never to the edge (pieces come flying off)

The tool rest is parallel to the face.
Big dish 5.jpg

I keep the chisel about 45d to the face, pointing towards the middle (pith).
Roll the gouge so it results in a slicing cut, then slowly work to the middle.

Start very slow at the bark, initially it will just catch bits of bark until you get to the actual wood and you get solid contact.
From there on, you can push a bit more.

You will get nice curls coming off. You can see them on the floor in the first pic.
Basically you are now cutting across the grain. Don't shave end grain...its just a real PITA.

:)
 
Before and after shots

Here is a before and after shot of what I am playing with.
On the right is a blank similar to the blank I started off with to create the tri-cracked psuedo plate on the left.
I would have turned the plate (like object) on the left to a respectable thinness but cutting that end grain was like
fighting City Hall.

I am thinking that I need to discover some end grain cutting techniques because I clearly have none at present.
I will search for some beginning goblet videos and see what I can see.

Thanks very much for your interest and attention.
 

Attachments

  • 0915151931_HDR.jpg
    0915151931_HDR.jpg
    545.6 KB · Views: 33
A cherry slab like that will take a miracle not to crack. You are trying to break all the rules of wood shrinkage during drying. It will need to be less than 1/8" thick, and turned in a hurry if there is any chance of it to live. You are attempting an extremely advanced project, without the skill set. I want to say it's doomed, but crazier things sometimes work.
 
Vega 24" sans tailstock

I thought those lathes came with a tailstock. Did you buy a used machine? Contact the factory in Decatur, IL for a replacement. They don't make a highly engineered product, but making one from scratch would not be too easy. Boring the steel for a nice fit on the adjustable section would require a metal lathe with boring bar attachment.

Richard, I did buy it used. Many years ago and I see that they still sell the same lathe without the tailstock for quite a bit more money than I spent.
I bought it because I thought it would be an inexpensive way to get beyond the 12" limitation of my current El Cheapo Harbor Freight lathe. I really appreciate my HF special but am really looking forward to getting a real lathe in the nearest future. I spaced out in deep thought for way too long in my work place trying to figure out how I could replicate a tailstock but came to the conclusion you did that it would necessitate a buy from the manufacturer which would defeat my financial purpose. I am wondering though if someone who has the same lathe, sans tailstock, could give me some ideas on what I can do with it beyond turning 14" pieces down under 12" to turn on my other lathe.

Thanks very much,
Jim Lee
 
You can turn finished pieces on it Jim. Glue on a scrap block to you stock, and screw on a faceplate. Use a chuck and cole jaws to turn bowls, use a vacuum chuck, etc. I think you need a mentor more than a tailstock!
 
A cherry slab like that will take a miracle not to crack. You are trying to break all the rules of wood shrinkage during drying. It will need to be less than 1/8" thick, and turned in a hurry if there is any chance of it to live. You are attempting an extremely advanced project, without the skill set. I want to say it's doomed, but crazier things sometimes work.

Jim,
The picture is great. You are trying to turn and end grain round with the natural edge.
That will be a challenging piece. I agree with Richard and would add you can enhance success with a curve or even cone shape to the bottom.

Each growth ring is going to shrink more than the one inside it. Two ways to do that
1. Crack
2. push the one inside out a little. Sort of like the collapsible camp cups.

This might be a project for the future. They can be fun.
I have been experimenting with these a little. If you make them thin they can move.
They also get real delicate.

Have fun
Al
 
Cherry as opposed to Red Oak

Richard,

Cherry? That is encouraging. I thought it was Red Oak. I had a tree removal guy drop off a bunch of wood and alot of it is oak so I just assumed this was Red Oak. It is VERY hard in any case. I suppose that to have a chance of turning the other blank successfully i need to take it real
slow, from the outside in, and spray often to keep it from heating up too much. That baby was hot after a few of my end grain attacks.

Thanks
 
Progressive approach....

Richard,
[Snip] That baby was hot after a few of my end grain attacks.

Thanks

Heat is an enemy also. Reflecting on what a couple responders have said, it seems you're getting a little ahead of your skills. NOTE: I'm speaking from the perspective of a teacher, and someone who's tackling turning for the second time around (see my profile for explanation). Most skills that are worth learning take a progressive approach, building skill the way you build a house, from the foundation up. Using such a progressive approach gives you more solid skills, a more complete understanding of your craft, and a safer experience. Several of the more active participants here at AAW are excellent teachers, and have a thorough understanding of how to guide their students to becoming successful, educated turners. I would encourage you to take their advice seriously. Also, understanding the techniques of putting tool to wood needs to be accompanied by an understanding of wood as a material, and how it moves and changes, and challenges those tools.

As an intelligent and high-energy student myself, I have learned the hard way that skipping ahead to the "fun stuff" (in math, in music and in turning) leaves me frustrated and disappointed down the road. In all three of those endeavors, I've had to go back to early stages and really get solid from one stage to the other. It's worth it! Talking with a professional with decades of turning behind him, I was surprised that each morning when he enters his shop, he sticks a simple piece of spindle stock (construction cast-offs) and turns beads and coves for a few minutes before going on to the custom-ordered commission piece that's on his agenda. Not for everybody, but not a bad idea either.:)
 
Beads and coves, beads and coves mate.

"Beads and coves, beads and coves mate". So said by the famous turning instructors Jimmy Clewes via Rudy Lopez. Rudy is mocking Mr. Clewes when he adds the mate. Playing scales before you can play a concerto is in Mr. Lopez's rookie pep talk. By the way Jimmy Clewes is one of the best
teacher/presenters I have seen. During my last turning obsession engagement years ago you had to actually pay for videos. No YouTubing.

I get what you are saying but the real frustration is that I have done this before without spinning so many bowls across the floor.
To your point, and in support of the mentorship idea I have had a private message from a local turner who has
indicated his willingness to keep my turnings on the lathe and off the garage floor.

Thanks,
Jim Lee
 
Jamieson goblet video

Also, I am watching the Jamieson goblet video you recommended. Spot on as I need to find a new direction and he is an excellent teacher.
My memory served me correctly in that I do have a Jamieson-esque. I was too cheap at the time, a few years ago, to buy the real McCoy so
a fellow wood turner made one for me that mimicks his. The laser I added from another vendor as I remember trying and failing, again miserably, to make the laser myself. I spent more time 'remaking' it than using it.
 
You said you drilled a hole in the center first. If you imagine cutting down into the hole at about 45 degrees you will be cutting down hill across the grain. Each cut moves further out cutting from the outside toward the middle or bottom. That's what we mean by cutting with the grain or down hill with the grain
I agree with the others. Cherry is difficult to turn without checking unless you have experience. Leaving the pith in the middle is almost impossible not to check. Wood tends to dry from the outside in. When wood dries it shrinks. So the outside is drying and those circles are trying to shrink and the inside is staying wet and the same size. Something has to give.
 
Back
Top