• It's time to cast your vote in the January 2025 Turning Challenge. (click here for details)
  • Conversations are now Direct Messages (click here for details)
  • Congratulations to Alan Weinberg for "Elm Burl Bowl" being selected as Turning of the Week for January 27, 2025 (click here for details)
  • Welcome new registering member. Your username must be your real First and Last name (for example: John Doe). "Screen names" and "handles" are not allowed and your registration will be deleted if you don't use your real name. Also, do not use all caps nor all lower case.

Faceplate questions

Joined
Mar 7, 2019
Messages
145
Likes
80
Location
Victoria, Texas
John Jordan gave me some great advice when he told me “you need a faceplate” I bought two new faceplates and haven’t looked back. Now that I have been using them, I have a few questions.

What method is used for parting off the finished piece? I’ve been using the parting tool and trying to catch the piece once it is separated from the waste wood. It seems like maybe a better way exists, or maybe a variation of this method.

Is there a trick or tip to get the bottom of the vessel to not look like it just goes flat? Should the bottom or flat part be the same size as the opening?

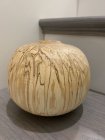
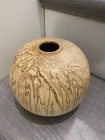
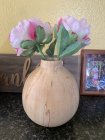
Thanks in advance, I’m including my two recent turnings that were done with a faceplate for critique.
A179343D-719D-42EB-9278-DE9BF9311663.jpeg 61CE6C6D-A21B-4D3C-B128-A53735F1566E.jpeg 4E84B5CE-01DE-4B11-BFAA-4C448D59B7AC.jpeg DD91F6BE-CA5A-450F-86DE-CCD0C427CE40.jpeg
 
I use a thin kerf parting tool in my left hand and cut at a slight (~5 degrees) angle into the bottom of the piece, holding the piece with my right hand. I take a relief cut or two and get the center down to about 1/2", stop the lathe and use a pull saw to cut it off. A little sanding gets rid of the center nub. leaving a slight concave bottom.
 
Brandon, when parting pieces, I also use a parting tool. If I'm not in the mood to catch a flying object, I leave about 1/2" or 3/8" holding the piece and then separate the turning with a Japanese saw......or small backsaw of some type. This is a little safer if you're not comfortable catching the turning.

So far as the bottom, that's an artistic design decision. Study other turnings and see what design options works for your aesthetic preferences. I prefer a bit larger base than some turners do. I want the piece to look stable......not like a balancing act on a tight rope. But that's just me. You may prefer the small bases. Of course the overall design helps make the decision for me. Develop your eye for the little details. The proportions can make or break a piece no matter how nice the wood is.
 
I use a thin kerf parting tool in my left hand and cut at a slight (~5 degrees) angle into the bottom of the piece, holding the piece with my right hand. I take a relief cut or two and get the center down to about 1/2", stop the lathe and use a pull saw to cut it off. A little sanding gets rid of the center nub. leaving a slight concave bottom.

Do you get any tear out with the parting tool? On one of my pieces, the cut was pretty rough. My parting tool came from one of those cheap 6 piece turning sets. I’ve been saving my pennies for a thin parting tool.
 
Brandon, yes you will typically get a "rough" bottom if you only use a parting too. Some people just sand the bottom but I like my bottoms to look more finished. I use a fixture like the one shown below to hold my hollow forms for finish turning the bottom. You slide the hollow form on, bring up your tail stock to hold it against the end of the fixture then adjust the cone in the opening to hold it in place securely. Now you can turn, sand and finish the bottom to make it look very professional. You will still have a very small nub in the center which you can easily hand finish.

Hope this helps. I have a couple of difference sizes of these fixtures for various sized turnings. They work well.

Hollow Form Fixture.jpg
 
Another option is to mark a center point on the surface that is mounted to the face plate, you can then use a jam chuck to reverse mount the piece on the headstock and use the tailstock to support the flat surface that was mounted to the face plate. This provides more options in the design and finish of the base of your project, you just need to plan ahead for this option. You can screw a threaded bushing into the hub of your face plate and use a center point tool to make the center after it is screwed to the face plate to get a precise center marking of the base, another method is to draw a cross marking the center of the blank and line up the screw holes on the cross lines and site the center when looking into the hub of the face plate when screwing the blank to the face plate.
 
If you started between centers u have mark for center on bottom....just jam chuck and turn down to nub.....i had a finishing saw to cut the nub then sand out .....some leave circle or other stuff on bottom before using saw....
With faceplate need more waste wood...ie the lenght of screws and extra wood to turn away with jam chuck.....when 1st doing maybe 2 or three inches depending on diameter of bottom
 
Last edited:
When I start a project like that I turn between centers and make a tenon on the tailstock end which will leave a place to remount the piece to finish off the bottom. I suppose if you would want to adapt that to a faceplate you could true up the bottom end leaving a nubbin that would fit into the hole in the face plate then when it comes time to finish the bottom the live center would have a fairly accurate point of contact. The drive end would be a piece of wood long enough and small enough to reach the inside bottom with the part in the opening sized to keep the top end true. In the past I have seen a jig that consisted of a threaded rod with a pad on the end and a taper sleeve to line up the top end but I don't have one. The method described will allow you to make a more finished base and the nubbin on the CUP CENTER can be tapered down to about a 1/8" diameter, be carved off and sanded.
 
That’s
Another option is to mark a center point on the surface that is mounted to the face plate, you can then use a jam chuck to reverse mount the piece on the headstock and use the tailstock to support the flat surface that was mounted to the face plate. This provides more options in the design and finish of the base of your project, you just need to plan ahead for this option. You can screw a threaded bushing into the hub of your face plate and use a center point tool to make the center after it is screwed to the face plate to get a precise center marking of the base, another method is to draw a cross marking the center of the blank and line up the screw holes on the cross lines and site the center when looking into the hub of the face plate when screwing the blank to the face plate.

I’ve never tried the jamb chuck approach. Do you end up with multiple jamb chucks, or do you try to keep the openings of your vessels similar to one jamb chuck?
 
the jam chuck size different for bowl from hf.....at first make jam chuck for what ever u are turning....sometimes u can reuse other times make new or reshape the 1st one

Once u get the hang of jam chucking it becomes a favorite part of turning....some consider jam chucking safer than vacuum chuck but everybody has an opinion rightly so
 
What method is used for parting off the finished piece? I’ve been using the parting tool and trying to catch the piece once it is separated from the waste wood.

I unscrew the faceplate.
I measure the thickness of the wood on the bottom with veritable calipers and transfer the thickness to vernier calipers.

Then reverse chuck the piece using a post similar to @Drew Sumrell posts.

As I turn away faceplate wood I leave a wooden pin to the tailstock center. The length of the pin compared to the light of the rod gives me the bottom thickness. I can turn any type foot or no foot and know exactly how much wood want to remove.

The last part is to cut the pin down to about an 1/8” thick. I leave a little bump to prevent fibers pulling out when I cut the pin off. Usually use the gouge rotating the piece by hand. I could saw it off but the spindle gouge is in my hand.

This is quick and I can finish turn the entire surface except for the little bump.
 
I’ve never tried the jamb chuck approach. Do you end up with multiple jamb chucks, or do you try to keep the openings of your vessels similar to one jamb chuck?

I try to match the revers chucks to opening and vessel height. After a while you will collect a few and be able to find one that fits or can be modified to fit. If I need a longer one I often just glue a 2” piece of wood on, shape it and cover the end with fun foam.

A product the a lot of turners in my club use is the rubber chucky. It’s a great system.
https://www.rubberchucky.com/store/p15/Reverse_Chucky/Mini_Reverse_Chucky.html
 
I unscrew the faceplate.
I measure the thickness of the wood on the bottom with veritable calipers and transfer the thickness to vernier calipers.

Then reverse chuck the piece using a post similar to @Drew Sumrell posts.

As I turn away faceplate wood I leave a wooden pin to the tailstock center. The length of the pin compared to the light of the rod gives me the bottom thickness. I can turn any type foot or no foot and know exactly how much wood want to remove.

The last part is to cut the pin down to about an 1/8” thick. I leave a little bump to prevent fibers pulling out when I cut the pin off. Usually use the gouge rotating the piece by hand. I could saw it off but the spindle gouge is in my hand.

This is quick and I can finish turn the entire surface except for the little bump.

How much waste wood do you usually end up with? Do you shoot for a certain amount to clear the screws or is it determined by the design of the piece?

If you start between centers, do you create the flat area for the face plate? I’ve been using logs, I chainsaw the amount needed and just attach a faceplate and start roughing. The trees don’t get very big where I’m at, so 99% of the time, I have to use the whole log. I try to remove as much of the pith as possible during hollowing. I read the article from @John Jordan about drilling a whole in the bottom and then inserting a plug after the piece has dried. I’ve been doing that. In my situation, is there any benefit to starting between centers?
 
1. Most of my forms are hollowed through the face grain. A faceplate is much better when hollowing through the face grain. A chuck and tenon will work well for small to medium sized forms hollowed through the endgrain.

2.
How much waste wood do you usually end up with? Do you shoot for a certain amount to clear the screws or is it determined by the design of the piece?
I make the faceplate mounting area a 1/2” wider than the faceplate and a 1/4” higher than the screw length coming through the faceplate

3.
If you start between centers, do you create the flat area for the face plate? I
. I create a concave. In addition to being easier to turn than a flat, a concave has other advantages.

4. I started a thread that includes a video clip from a demo showing how to mount a faceplate.it covers those questions and more. The microphone got unplugged from the recorder during the demo so I had to dub in the sound later.
http://www.aawforum.org/community/index.php?threads/mounting-a-faceplate.14749/
 
That’s


I’ve never tried the jamb chuck approach. Do you end up with multiple jamb chucks, or do you try to keep the openings of your vessels similar to one jamb chuck?

Brandon,

I have a box full of jamb chucks I have used on prior projects and you can always reshape them to fit your current project. I also use a sheet of thin foam between the jamb chuck and the work piece to prevent damaging the finish on the work piece. I have purchased packages of this thin foam sheets at the dollar store and they work just fine for this application.
 
Do you get any tear out with the parting tool? On one of my pieces, the cut was pretty rough. My parting tool came from one of those cheap 6 piece turning sets. I’ve been saving my pennies for a thin parting tool.
Tear-out hasn't been a problem ... the cut is ordinarily pretty clean. I have a Sorby thin kerf parting tool ... bought it on sale at Woodcraft a couple of years ago.
 
That’s


I’ve never tried the jamb chuck approach. Do you end up with multiple jamb chucks, or do you try to keep the openings of your vessels similar to one jamb chuck?

Look at the articles on my website. I would never part off a side grain piece but sometimes do with end grain. In either case they are reverse turned on a jam chuck to remove the waste and finish the bottom.

John
 
I unscrew the faceplate.
I measure the thickness of the wood on the bottom with veritable calipers and transfer the thickness to vernier calipers.

Then reverse chuck the piece using a post similar to @Drew Sumrell posts.

As I turn away faceplate wood I leave a wooden pin to the tailstock center. The length of the pin compared to the light of the rod gives me the bottom thickness. I can turn any type foot or no foot and know exactly how much wood want to remove.

The last part is to cut the pin down to about an 1/8” thick. I leave a little bump to prevent fibers pulling out when I cut the pin off. Usually use the gouge rotating the piece by hand. I could saw it off but the spindle gouge is in my hand.

This is quick and I can finish turn the entire surface except for the little bump.
Keyword here is "measure" Measure before you put it on the rod, and if you forgot to measure, it is worth it to take it off the rod and measure, trust me on this one...
 
Back
Top