• November Turning Challenge: Puahala Calabash! (click here for details)
  • Congratulations to Ted Pelfrey for "Forest Floor" being selected as Turning of the Week for November 4, 2024 (click here for details)
  • Welcome new registering member. Your username must be your real First and Last name (for example: John Doe). "Screen names" and "handles" are not allowed and your registration will be deleted if you don't use your real name. Also, do not use all caps nor all lower case.

epoxy question

john lucas

AAW Forum Expert
Joined
Apr 26, 2004
Messages
8,480
Likes
4,016
Location
Cookeville, TN
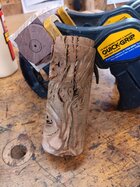
a friend gave me this piece of wood along with a lot of other great wood. I want to make an ornament out of it. I'm thinking of filling all tge voids with epoxy. I'm not an epoxy guy. I've filled a lot of cracks but usually on flat wood. I don't have a pressure pot. can I fill all these voids without one. I will be using West system 195 with their 205 clear hardener. it's pretty thin and very slow drying. all tips and suggestions welcome.
 

Attachments

  • 20241105_081315.jpg
    20241105_081315.jpg
    473.6 KB · Views: 71
Joined
Nov 19, 2007
Messages
41
Likes
34
Location
Meridian Idaho
The answer is yes you can. I use epoxy and mica quite often, not the west system epoxy though. My method for something that looks like yours would be to clean out any junk (dirt), use a hot melt flue to build up a dam around the area to be filled so the post fill area will be flat, mix up about one ounce of epoxy, SLOWLY fill the void. After the epoxy solidifies, rinse and repeat for all the voids you need filled.
 

hockenbery

Forum MVP
Beta Tester
TOTW Team
Joined
Apr 27, 2004
Messages
8,983
Likes
5,481
Location
Lakeland, Florida
Website
www.hockenberywoodturning.com
Vacuum or pressure pot are used to get the bubbles out of the resins or make them so small they can’t be seen.
If you don’t mixi in bubbles you won’t need a pressure pot.

If you are worried about bubbles you could probably rig a vacuum chamber easily from a big pot and a wooden lid.
Probably 5-10 minutes of vacuum to pull the bubbles out.

You do need to research how thick various resins can be poured.
 
Last edited:

Bill Boehme

Administrator
Staff member
Beta Tester
TOTW Team
Joined
Jan 27, 2005
Messages
13,020
Likes
5,425
Location
Dalworthington Gardens, TX
Website
pbase.com
John, if you use a dye to color the epoxy then you don’t need to worry about bubbles. I would go with a fast setting epoxy. I recommend TransFast black powder dye. You could also use TransTint liquid dye, but only a small amount. Rockler Hardware has a new product that I haven’t tried, Mixol concentrated liquid dye that they claim can be mixed with anything.
 
Joined
Nov 14, 2023
Messages
151
Likes
201
Location
Los Angeles, CA
a friend gave me this piece of wood along with a lot of other great wood. I want to make an ornament out of it. I'm thinking of filling all tge voids with epoxy. I'm not an epoxy guy. I've filled a lot of cracks but usually on flat wood. I don't have a pressure pot. can I fill all these voids without one. I will be using West system 195 with their 205 clear hardener. it's pretty thin and very slow drying. all tips and suggestions welcome.
Hi John
I do this kind of thing all day everyday. That piece is a great candidate for epoxy. Sorry to say it will be difficult to do cleanly without a pressure pot. Those cracks go very deep and probably all the way through the diameter of the piece in many spots.

If you can find a similar sized container to use as a form, that’s your best bet for getting most of the voids filled with west systems. Maybe a tennis ball can, or pringles can? Without pressure, there’s a 98% chance you’ll find unfilled voids once you turn it. These can be filled one at a time but it’s a major time suck.

Without pressure, depending on your design idea, I’d be more inclined to turn the piece to close to its final shape and then use a putty type of epoxy (milliput eg) crammed into the cracks then final turned.

If you’re looking for the piece to be hollow and allow light to go through the translucent epoxy, try to find a fellow turner with a pressure pot. If you want it to be a solid piece, epoxy putty is probably the way to go.
 
Joined
Nov 14, 2023
Messages
151
Likes
201
Location
Los Angeles, CA
John, if you use a dye to color the epoxy then you don’t need to worry about bubbles. I would go with a fast setting epoxy. I recommend TransFast black powder dye. You could also use TransTint liquid dye, but only a small amount. Rockler Hardware has a new product that I haven’t tried, Mixol concentrated liquid dye that they claim can be mixed with anything.
Hi Bill
You are correct that the visual effect of bubbles can be fairly well mitigated by dark, opaque coloring, but in this specific piece of wood, the challenge will be getting the resin into the deepest parts of the cracks. There will be large voids that the resin won’t reach that will be exposed once the turning commences.

If interested in a review, Mixol is a very good coloring agent but it isn’t particularly translucent like trans-tint brand. There’s a lot of colors available and is a worthwhile product.
 

Attachments

  • IMG_3143.jpeg
    IMG_3143.jpeg
    311 KB · Views: 25
  • IMG_3144.jpeg
    IMG_3144.jpeg
    284.5 KB · Views: 24

Bill Boehme

Administrator
Staff member
Beta Tester
TOTW Team
Joined
Jan 27, 2005
Messages
13,020
Likes
5,425
Location
Dalworthington Gardens, TX
Website
pbase.com
If interested in a review, Mixol is a very good coloring agent but it isn’t particularly translucent like trans-tint brand. There’s a lot of colors available and is a worthwhile product.

After some searching, I discovered that Mixol is a pigment, so it is best used as a stain. You also have to buy a set of 12 colors for $75.
 
Joined
Jun 13, 2020
Messages
237
Likes
317
Location
Jackson, NJ
Website
www.blacklabelwoodworks.com
I like to use the bag and duct tape method for pieces that are round. Put it in a bag and add a little resin in the bottom. Start wrapping the bag with duct tape from the bottom up and add more resin as needed. This works great for hollow vessels to just put a second bag inside and pack it with sand or marbles.
 

john lucas

AAW Forum Expert
Joined
Apr 26, 2004
Messages
8,480
Likes
4,016
Location
Cookeville, TN
Great tips, thanks. I was planning to color it with TransTint dyes. I do have Milliput epoxy putty left over from my article on making a zig-zag ornament, so I might consider that option.
 
Joined
Dec 31, 2023
Messages
19
Likes
5
Location
Jefferson, NH
A vacuum bag might help to remove the air bubbles. I've only used them for applying pressure but I think removing air bubbles is a side effect. The guy who posts the Blacktail studios videos uses a propane torch to remove air bubbles but the voids in his tables are bigger than the voids in the blank in the photo.
 
Joined
Aug 6, 2009
Messages
758
Likes
566
Location
Lummi Island, WA
I use West System epoxies a lot for pieces like these. The advice to use hot melt glue to form a dam is good - but be prepared for many leaks. It’s a long process, so plan for a couple of days - the low viscosity of West Sys allows it to penetrate fully, but it also finds any openings you may not see. I spend some time closing up anything suspicious before the pour. And top off the pour as needed until the epoxy starts to gel.

There’s always a few small voids that need attention once turning starts, but easily handled with ca or epoxy. I usually use System Three coloring additive (black)
 
Joined
Nov 15, 2020
Messages
581
Likes
450
Location
Huntington, VT
Coloring the resin won't eliminate the bubbling issue. A pressure vessel seems to be favored for small pieces, compressing and entrapping the bubbles in the cured resin. Vacuum is worth a try but you will probably use a lot of expensive resin. Maybe you could put your workpiece in a slightly oversize plastic bag inside a vacuum bag or chamber., if so experiment with a small piece first. I used to fill voids in turnings with marine epoxy and ambient air pressure but gave up due to bubbling and leaking. I have used epoxy extensively for filling voids in flatwork and found that with sufficient overfilling the bubbles would migrate upwards and could be planed off above the wood surface. With turnings that would require multiple filling sessions. If you do wind up with small voids in the epoxy fill it is tedious and almost impossible to get rid of them, at least in my experience. Secondary CA fills don't quite blend in and trowelling on more epoxy never quite works for me. Maybe it will for you. Now I just accept the natural voids as they are, but I am not really into working with plastic.
 
Joined
Dec 31, 2023
Messages
19
Likes
5
Location
Jefferson, NH
a friend gave me this piece of wood along with a lot of other great wood. I want to make an ornament out of it. I'm thinking of filling all tge voids with epoxy. I'm not an epoxy guy. I've filled a lot of cracks but usually on flat wood. I don't have a pressure pot. can I fill all these voids without one. I will be using West system 195 with their 205 clear hardener. it's pretty thin and very slow drying. all tips and suggestions welcome.
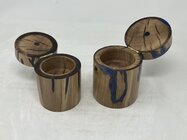
John, off-topic, did you rebuild some of the dog holes in your bench? I see a dog hole in the photo that looks like it has been enlarged and fitted with an insert. There are a few dog holes in my bench that don't like to grab holdfasts anymore so I wonder if you have any tips about the repair.
 
Back
Top