• November Turning Challenge: Puahala Calabash! (click here for details)
  • Sign up for the AAW Forum Pre-Holiday Swap by Monday, November 4th (click here for details)
  • Congratulations to Ted Pelfrey for "Forest Floor" being selected as Turning of the Week for November 4, 2024 (click here for details)
  • Welcome new registering member. Your username must be your real First and Last name (for example: John Doe). "Screen names" and "handles" are not allowed and your registration will be deleted if you don't use your real name. Also, do not use all caps nor all lower case.

Epoxy Question

Joined
May 13, 2020
Messages
188
Likes
1,159
Location
Ontario, CA
I have been using epoxy to fill in minor cracks in bowls and platters. But I have some blanks that have larger holes and voids. If you have a rough turned bowl with a 1 inch hole in it, what do you use to seal one side so the epoxy does not leak out while curing? I have tried tape, silicone sealing a small sheet of plastic, but I frequently get small leaks and an ensuing mess.

I would appreciate any help you can offer. (I did a search on previous posts but didn’t find anything. My apologies if I missed a post on this subject.) Thanks!
 
Joined
Feb 2, 2020
Messages
76
Likes
59
Location
Germantown, NC
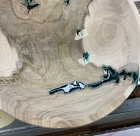
I’ve been experimenting with that recently and decided it’s best to turn away some of the excess wood before applying any epoxy. It provides a smooth surface for masking tape to bond well and reduces the amount of epoxy required. (Yes I’m that stingy) I also use hot melt glue to create a dam to keep the epoxy from running down hill. It keeps the excess epoxy higher than than the surface of the wood so when bubbles come to the surface there’s enough excess to fill that hole.
On this one I used masking tap to create a little pocket to hold epoxy on the steep part of the bowl trying to speed up the process.

FE5BCA89-F479-4A3D-860D-DCC560CBEB25.jpeg
 
Joined
Feb 8, 2014
Messages
1,198
Likes
639
Location
Evanston, IL USA
I have been using epoxy to fill in minor cracks in bowls and platters. But I have some blanks that have larger holes and voids. If you have a rough turned bowl with a 1 inch hole in it, what do you use to seal one side so the epoxy does not leak out while curing? I have tried tape, silicone sealing a small sheet of plastic, but I frequently get small leaks and an ensuing mess.

I would appreciate any help you can offer. (I did a search on previous posts but didn’t find anything. My apologies if I missed a post on this subject.) Thanks!

I'm not sure I understand the problem correctly... if you are using the epoxy while the piece is still in the "rough turned" state, wouldn't the ensuing mess be cleaned up as you finish the turning?
 
Joined
May 13, 2020
Messages
188
Likes
1,159
Location
Ontario, CA
Hi Tom. Imagine drilling a hole through the rough turned bowl and we need to plug it. Before we pour the epoxy, we need to ensure it doesn’t run right through the hole. So I’ve been trying tape, silicone, etc so the liquid epoxy doesn’t leak through on the outside of the bowl. No matter what I use, there always seems to be a small leak. I’m using 24 hour cure epoxy.
 
Joined
May 13, 2020
Messages
188
Likes
1,159
Location
Ontario, CA
I’ve been experimenting with that recently and decided it’s best to turn away some of the excess wood before applying any epoxy. It provides a smooth surface for masking tape to bond well and reduces the amount of epoxy required. (Yes I’m that stingy) I also use hot melt glue to create a dam to keep the epoxy from running down hill. It keeps the excess epoxy higher than than the surface of the wood so when bubbles come to the surface there’s enough excess to fill that hole.
On this one I used masking tap to create a little pocket to hold epoxy on the steep part of the bowl trying to speed up the process.

View attachment 34268
Hi Greg. Do those holes run right through the bowl? Pouring epoxy in a blind hole is not the problem.. it’s when the hole goes right through the wall of the bowl. That’s what I’m struggling with.
 
Joined
Feb 2, 2020
Messages
76
Likes
59
Location
Germantown, NC
Hi Greg. Do those holes run right through the bowl? Pouring epoxy in a blind hole is not the problem.. it’s when the hole goes right through the wall of the bowl. That’s what I’m struggling with.

Yes most of them do go all the way through. I did have trouble with the tape sealing up good on the first try. That’s one of the reasons I turned it down a bit. It also made it easier to see some of smaller checks. With a new clean surface the tape worked great and I had no leaks. I just removed the tape and lightly sanded this spot.

Edit: I should mention this is my first attempt doing this on a bowl. I normally throw any cracked ones in the firewood pile. This is a commission piece and the wood has sentimental value to the client so I’m trying to make this work.

2BB3DA3A-2D77-409C-A878-126A661B49E7.jpeg
 
Last edited:
Joined
Feb 2, 2020
Messages
76
Likes
59
Location
Germantown, NC
I'm not sure I understand the problem correctly... if you are using the epoxy while the piece is still in the "rough turned" state, wouldn't the ensuing mess be cleaned up as you finish the turning?
The problem I had was when the epoxy that made the mess leaked out the void was no longer full, a few were almost empty.
 
Joined
Feb 6, 2010
Messages
3,127
Likes
2,234
Location
Brandon, MS
I did something in pecan last year. Had a commission for 16 offering plates in pecan. When I found the pecan the tree was gigantic and I started with too small blanks to get it done. Upon going back 4 times there were sufficient blanks of the proper size. Now for those who have turned pecan you know it is kinda like Forrest Gump's box of chocolates "you never know" what is in the middle of a great looking blank. So I had voids and through holes. I used blue masking tape and yes sometimes would leak. The epoxy I use was G Flex because I wanted it to move with the wood.

The problem was some holes so large that they must be staged. Start with a medium amount with the intent to create a plug on one side. Then you can build on it and like Greg sometimes it would disappear because it ran into a deep cavity, not through the tape. If you start early and check back frequently you can catch leaks and fix them. Sometime the location of the hole will demand inventive ideas to keep the flow from running back out the entry or application hole. Not a great idea as far as removal but Duct tape should hold.

Now as to the surface matching the turned surface you are asking for a miracle. I always strive for a slight bubble over the hole to allow sanding to match the curves or returning to get that curve.
 
Joined
Jul 19, 2018
Messages
1,813
Likes
2,454
Location
Ponsford, MN
I use epoxy putty to fill large voids proud of the surface then when set turn it off on both sides. Of course the putty ain't pretty so I undercut with a Dremel tool then refill with powered stone such as turquoise and CA. Note in the second bowl an entire edge was rebuilt try that with normal epoxy.
B5185_88.JPG
 
Joined
Nov 13, 2019
Messages
121
Likes
110
Location
IL.
I've tried several types of tape including masking, aluminum duct tape and Gorilla brand duct tape. The only success I've had, with no leaks, was a 3" wide Gorilla clear packing tape. I ordered it from Amazon because the big box stores I visited only had 2" wide. I overlapped the tape st the seems since I was filling a wide void and used a putty knife to squeegee all the air out as I placed the tape. The challenge is getting a smooth enough surface for thevtape to stick to and getting the air out from under the tape. This is a common way to fill voids on flatwork, but can be tough on curved surfaces.

Good luck!
 
Joined
Oct 15, 2015
Messages
207
Likes
473
Location
Smithville, MO
Silver foil tape will generally seal really well. You can mix a small dab of 5 min epoxy and seal around the edge of the tape and any seams using a q-tip. That is usually pretty bullet proof. On an irregular surface I've used 5 min epoxy and fiberglass cloth. Cut a piece of cloth to size, lay it on a piece of plastic like a ziplock bag or piece of waxed paper. Mix up some 5 min epoxy and trowel it into the cloth using a popsicle stick etc to wet the cloth all the way thru. Use the remaining epoxy to brush around the opening and then drape the cloth over the opening and work it until it is tight. Wait 5 min and brush on a thin layer of 5 min over the whole thing. In 15 min you are ready to pour your epoxy. Since most people don't have fiberglass cloth laying around I'm guessing a piece of an old t shirt would work just fine..
 
Joined
May 13, 2020
Messages
188
Likes
1,159
Location
Ontario, CA
Silver foil tape will generally seal really well. You can mix a small dab of 5 min epoxy and seal around the edge of the tape and any seams using a q-tip. That is usually pretty bullet proof. On an irregular surface I've used 5 min epoxy and fiberglass cloth. Cut a piece of cloth to size, lay it on a piece of plastic like a ziplock bag or piece of waxed paper. Mix up some 5 min epoxy and trowel it into the cloth using a popsicle stick etc to wet the cloth all the way thru. Use the remaining epoxy to brush around the opening and then drape the cloth over the opening and work it until it is tight. Wait 5 min and brush on a thin layer of 5 min over the whole thing. In 15 min you are ready to pour your epoxy. Since most people don't have fiberglass cloth laying around I'm guessing a piece of an old t shirt would work just fine..
I have some of that tape Don, will definitely try that. Thanks!
 
Joined
Apr 11, 2014
Messages
459
Likes
456
Location
Dallas, TX
Try WEST 655 GFlex - you can tint with System-3 pigment - both the GFlex and System-3 products are cycloaliphatic. If a larger pith-crack or worm-hole that goes through, back with blue 3M masking tape. You will not be able to pour - too thick. Dab it in with a flux-brush. It's too thick to run - somewhere between Skippy's and Peter Pan, smooth of course.
Forget sanding it off - it must be turned off with light cuts and a sharp edge.
Two QT cans are about what an excessive sushi dinner for two, with excess beer, costs. Judging from your avatar you do serious work - you'll find this epoxy compatible.
One additional item: forget putting dabs or resin and hardner on a surface and mixing - you'll need a jewelers scale. One with .1-gram resolution - Ohaus and some others have reasonable ($100ish).
 
Joined
May 13, 2020
Messages
188
Likes
1,159
Location
Ontario, CA
I tried the aluminum tape and used silicone to seal around the edges. First try worked fine. The epoxy adventures continue.
 
Joined
Jan 22, 2018
Messages
276
Likes
345
Location
Cameron, Illinois
Good to hear Kevin. Just a cautionary note on silicone. It can be the worst enemy to wood finishes. Causes fisheye and other adherence problems with many finishes.

May not be a problem as it will be turned away, but i don't let silicone anywhere in my shop as it can be easy to contaminate tools and machinery without knowing it, then cross contaminate projects.

When I've used the aluminum tape, never had any problems with it coming loose, nor found the need for any other adhesive. If I need to create a dam around uneven areas, I use hot glue.
 
Joined
Jul 17, 2010
Messages
108
Likes
40
Location
Waco, TX
Kevin, use 3M metal tape but first put Tom sanding sealer on the surface you want to put the tape on. Then sand is lightly and clean with DNA then put your tape in and use a stick to push it down good. Burnish it so to speak
 
Joined
May 13, 2020
Messages
188
Likes
1,159
Location
Ontario, CA
Good to hear Kevin. Just a cautionary note on silicone. It can be the worst enemy to wood finishes. Causes fisheye and other adherence problems with many finishes.

May not be a problem as it will be turned away, but i don't let silicone anywhere in my shop as it can be easy to contaminate tools and machinery without knowing it, then cross contaminate projects.

When I've used the aluminum tape, never had any problems with it coming loose, nor found the need for any other adhesive. If I need to create a dam around uneven areas, I use hot glue.
Hi Tim. Good advice. I recall the silicone issue from my early days as a chemist at SC Johnson. All of the silicone will be turned off on these rough turned bowls. So not likely to encounter an issue, but we will see. Will post some pics when complete. Thanks.
 
Joined
May 13, 2020
Messages
188
Likes
1,159
Location
Ontario, CA
Kevin, use 3M metal tape but first put Tom sanding sealer on the surface you want to put the tape on. Then sand is lightly and clean with DNA then put your tape in and use a stick to push it down good. Burnish it so to speak
Hi Dean. Will give that a try. Judging from that fish in your avatar, I guess everything is indeed bigger in Texas!
 

Randy Anderson

Beta Tester
Beta Tester
Joined
May 25, 2019
Messages
909
Likes
1,394
Location
Eads, TN
Website
www.etsy.com
So a lot of this is out of my experience realm with epoxy but interested in learning more. I want to start adding some dyes to some of my work but haven't yet. I've always just used J-B Weld 5 minute epoxy on filling large holes. If they go through I put blue painters tape on the outside and make sure I have a good seam around the taped hole. Never had one leak. I put the epoxy in proud of the surface on the inside and then use my NR scraper to clean it up and sand. If daylight can come through I stuff the holes with fine shavings or dust from the same piece of wood and leave room for an epoxy layer. Crude I know but that's where I'm at in my epoxy adventure. I almost never patch them on the outside. Those I consider character marks most of the time. Never had one leak so maybe because I'm using the wrong epoxy for what I'm doing? Some of mine would look much better with some colored epoxy in large areas instead of a clear patch so interested in learning the best way to start.
 
Joined
Jan 22, 2018
Messages
276
Likes
345
Location
Cameron, Illinois
Randy, all 5 minute epoxies are much thicker than others. I use a cheap "bar top" epoxy you can get for relatively cheap at the big box stores. It will run, drip, etc and takes 24 hrs to cure. It is also crystal clear, and is easy to add color to. There are much more expensive products out there, but I've been happy with the cheap ones.
 
Joined
Jul 17, 2010
Messages
108
Likes
40
Location
Waco, TX
Haha Kevin, fish are big but it appears you have the big walnut trees! Walnut is a pricy wood in Texas not to many of them at least hear in central Texas.
Randy, I really don’t care for using epoxy to much but in Texas the bug holes in mesquite and elm are nearly guaranteed, so you really have no choice. Clean wood is my choice.
 

Randy Anderson

Beta Tester
Beta Tester
Joined
May 25, 2019
Messages
909
Likes
1,394
Location
Eads, TN
Website
www.etsy.com
Dean, born and raised in south TX and was lucky enough to get a truckload of mesquite last year while visiting my family. My nephew has a barn full of it. Makes mantles and uses colored epoxy to fill all the cracks and holes. Looks great. It's one of my favorite woods to work with but you're right, cracks, knots and holes are part of it. I still have a lot of it left and have used it for bowls, small boxes, cutting boards, cup holders, whatever I can think of. I'm not throwing any of it out. But I digress - I agree and unless the epoxy fill will "blend in" or is needed for structural support I avoid it. Mostly use it on knots where it can fill in the radial cracks or voids and hard to even know it's filled. Even then I try not to. That's why I was considering coloring it. My nephew colors his epoxy in the mantles he makes and they look fine. Might try.
 
Joined
Jan 8, 2020
Messages
189
Likes
53
Location
Bloomfield, New Jersey
@Randy Anderson, consider hitting the dollar store for loose eye shadow which are usually mica powder and colorant. You can find a wide range of colors and sparkly stuff to add to the epoxy. The dollar store makeup section is very inexpensive source of additives.
 
Back
Top