• November Turning Challenge: Puahala Calabash! (click here for details)
  • Congratulations to Paul May for "Staircase Study #1" being selected as Turning of the Week for November 11, 2024 (click here for details)
  • Welcome new registering member. Your username must be your real First and Last name (for example: John Doe). "Screen names" and "handles" are not allowed and your registration will be deleted if you don't use your real name. Also, do not use all caps nor all lower case.

Epoxy Finish for Shaving Bowls?

Joined
Jan 3, 2021
Messages
465
Likes
618
Location
Spartanburg, SC
Website
www.turning4home.com
So as I've been making and posting a few of my shaving brushes, I'm starting to get some interest in complete shaving sets. In fact, I got an order this morning for a full set in walnut with brush, straight razor and bowl from one of my coworkers as we were getting ready to announce the names together at graduation. She wants it as a wedding gift for her soon-to-be husband. I've already got the razor and brush, and a small bowl blank ready to go for the shaving bowl. But whereas I've often finished my razors and brushes in my beloved TruOil, I think a shaving bowl will do better with an epoxy finish for it to be waterproof.

Someone who does epoxy finishes, what do you use? FWIW, my PM 3520 will spin as slow as 39 rpm on the readout. Is that slow enough to even out thin coats of epoxy? Any technical advice with your recommendation? I've done some CA finishes, and I've used about every other kind of epoxy except a real thin kind for finishes.

I already have some MirrorCoat, but isn't that too viscous? TIA for any help! Aaron
 
Last edited:
Joined
Aug 10, 2021
Messages
186
Likes
123
Location
Benton, AR
So as I've been making and posting a few of my shaving brushes, I'm starting to get some interest in complete shaving sets. In fact, I got an order this morning for a full set in walnut with brush, straight razor and bowl from one of my coworkers as we were getting ready to announce the names together at graduation. She wants it as a wedding gift for her soon-to-be husband. I've already got the razor and brush, and a small bowl blank ready to go for the shaving bowl. But whereas I've often finished my razors and brushes in my beloved TruOil, I think a shaving bowl will do better with an epoxy finish for it to be waterproof.

Someone who does epoxy finishes, what do you use? FWIW, my PM 3520 will spin as slow as 39 rpm on the readout. Is that slow enough to even out thin coats of epoxy? Any technical advice with your recommendation? I've done some CA finishes, and I've used about every other kind of epoxy except a real thin kind for finishes.

I already have some MirrorCoat, but isn't that too viscous? TIA for any help! Aaron
I have used MirrowCoat on the sides and bottom of a straight sided bowl that is about 5 inches tall and 4 inches in diameter. I too use a 3520C. I applies the MirrowCoat with the lathe at 50 rpm. It adhered evenly to the sides and bottom.
 
Joined
Jan 3, 2021
Messages
465
Likes
618
Location
Spartanburg, SC
Website
www.turning4home.com
Thanks, Daniel-Did you thin it? Is DNA a good solvent for epoxy? How many coats did you use?

edit: I just did some googling, and apparently solvent-thinning is not recommended. I may try heating both parts gently while separated, and then mix. Hopefully, that will work and maybe let it penetrate a little. I could always get the System Three Clear-Coat especially formulated just for coating, I suppose (though it's pretty pricey unless I use it a lot, which I just might).
 
Last edited:
Joined
Aug 10, 2021
Messages
186
Likes
123
Location
Benton, AR
Thanks, Daniel-Did you thin it? Is DNA a good solvent for epoxy? How many coats did you use?

edit: I just did some googling, and apparently solvent-thinning is not recommended. I may try heating both parts gently while separated, and then mix. Hopefully, that will work and maybe let it penetrate a little. I could always get the System Three Clear-Coat especially formulated just for coating, I suppose (though it's pretty pricey unless I use it a lot, which I just might).
Correct, thinning is not recommended. And I found it unnecessary. When I use any of the System Three products, unless it is summer time, I warm them in hot water from the kitchen faucet. I only used one coat. As the bowl was turning on the lathe I used a small foam brush to apply the material to the sides of the bowl. I dared myself and took a chance that the material might somehow adhere to the bottom due to some law of nature or physics. I used the foam brush and pushed the material up the now vertical bottom (while spinning) and it stayed.
One mistake, initially I applied an excessive amount. Apply it slow and easy.
Good luck
 
Joined
Jan 3, 2021
Messages
465
Likes
618
Location
Spartanburg, SC
Website
www.turning4home.com
Thank you, Daniel-I'm almost done sanding, so I went ahead and put both bottles in a hot water bath. I've got 4 grooves cut into the bottom for working up a lather-as I said, this is a shaving bowl, so I definitely want to get a light, thin coat all in those grooves, and then spin it slow to cure. As I need 100% waterproof, I may do more, we'll see.

I guess I'll see what it looks like before thinking whether I need to sand the finish. I would think it would be smart to start with a higher grit, maybe 400 if necessary, to avoid burn-through. CA finishes will teach that lesson. I'll post results and clarify the process when I'm done to make the thread more useful for anyone with the same question.
 
Joined
Dec 28, 2019
Messages
527
Likes
625
Location
Tallahassee, FL
On the inside of the bowl you can just swirl the epoxy around or use an applicator. I've done this with alumilite epoxy on my steins and it works well. On the outside you'll need to apply it very thin and watch for bubbles. I haven't had good luck with alumilite on the outside, it runs and makes streaks so I brush on polyurethane which has worked well.
 
Joined
Jan 3, 2021
Messages
465
Likes
618
Location
Spartanburg, SC
Website
www.turning4home.com
Thanks, Charles-I used one of those cheap foam craft brushes, and yeah, on the prowl for bubbles. The real epoxy pros all seem to use MAPP torches or similar to clear out bubbles for big pours, maybe not necessary for thin coats.
 
Joined
May 4, 2010
Messages
2,576
Likes
2,018
Location
Bozeman, MT
I have made a few wooden shaving mugs, and have used shaving soap and a brush for decades. Traditionally, they were used with a round bar of soap (Williams is the brand most common in our area.) With the current trend for guys to get really into shaving products, there are many more options, but I don't believe you need any ridges in the bottom of the mug. I've always used 'oily' tropical woods for the mug and as far as I know, there have been no problems using them uncoated.

I have also built many fly rods, with epoxy as the thread coating, and have helped some students turn goblets with epoxy coatings. The usual speed for fishing rods is 6-20 rpm for curing thread finish. A microwave motor works, and you can buy fairly inexpensive DC motors ($20 range), or even use a rotisserie motor. 39 rpm, with the epoxy on the inside and at no risk of being thrown off by turning too fast will probably work, but it's too fast for the outside of things. It's also possible to do it by hand, if you have time and are patient. You rotate 1/4 turn every 15 minutes until it's cured.

Many different epoxy products can be used. If you want to use epoxy that you think is is too thick, you can heat the bottles/jars in a water bath for a few minutes or nuke in the microwave for 10-20 SECONDS. The warmer it is, the thinner it will be. You want it faintly to slightly warm, not hot, as hot = watery. Don't mix until it's warm, use a shallow solo cup which you can poach from any Mexican restaurant with a salsa bar. Use a coffee stirrer from McDonalds to mix. In order to avoid bubbles, mix S L O W L Y. 20 stirs clockwise, 20 stirs counterclockwise, 20 clockwise, 20 counter clockwise. If you have bubbles, use the coffee stirrer as a blow pipe to blow on the surface of the epoxy and the bubbles will rise and break. Be aware that the warmed and thinner epoxy will run rapidly out of the tip of the jar, so tip carefully, counting drops to get the right amount of each component. You can also draw up with a pair of inexpensive syringes from the hobby shop or more expensive ones from a pharmacy. Warmed epoxy may set up a little bit faster than room temp epoxy, but not enough to be an issue.

Alcohol is an absolute requirement for cleaning up epoxy messes, but the general consensus among rod builders is not to thin the epoxy with it, even DNA. It's not paint.
 
Joined
Jan 3, 2021
Messages
465
Likes
618
Location
Spartanburg, SC
Website
www.turning4home.com
Thanks for the tips, Dean-I did warm both parts of the epoxy in a hot water bath, and got it on pretty evenly. I've coated it twice to even it out, and had good results at about 40-50 rpm on my 3520c, which is about the slowest it will actually turn. So far, so good. I'll probably sand it gently to even it out some.

I've had a couple of pucks of good old Williams, and love the old classics like Mitchell's Wool Fat, Proraso, Tabac, etc. There are some really awesome "artisan" soaps out nowadays, so I'm always trying different ones. Try Martin de Candre once, and you will be spoiled for anything else. A super-slick lather makes all the difference for a straight razor shave.
 
Last edited:
Joined
Dec 18, 2020
Messages
40
Likes
84
Location
Encinitas, CA
I coat most of my bowls, wood or epoxy, with a coat of slow cure clear marine resin. I made a slow rotation device (~6 rpm) that I can vary the angle to get the resin to flow where I want or don't want it, with threads that match my lathe so I can use a chuck to hold the piece. I have used a wood bowl for the dog's water dish for months with no problem - here is a recent bowl with the resin curing...
1684861196861.png
 
Joined
Jan 3, 2021
Messages
465
Likes
618
Location
Spartanburg, SC
Website
www.turning4home.com
A skew is the only scary sharp piece of steel I can handle safely. A straight razor within 3 miles of my carotid arteries is out of the question.
Dean, there's definitely a learning curve to it. But if you do it right, there is no smoother shave, and I get cut more with my safety razors, honestly.
 
Joined
Feb 28, 2021
Messages
1,377
Likes
1,211
Location
Roulette, PA
Website
www.reallyruralwoodworks.com
But if you do it right, there is no smoother shave,
That is assuming you have the steady hands of a surgeon... but if you are prone to little tics, tremors and other unsteadiness of the hands, I'd imagine you'd think twice about shaving with a straight razor. Same reason I know I will never achieve a perfect cut over several inches of wood on the lathe - I have nerve damage that causes my limbs to jerk involuntarily every so often without warning (usually just a tiny twitch, but can sometimes yank my head back like I was slapped in the face) So I am with Dean, you wouldn't catch me dead using a straight razor to shave with. (or on the other hand, you might FIND me dead from trying!)
 
Joined
Jan 3, 2021
Messages
465
Likes
618
Location
Spartanburg, SC
Website
www.turning4home.com
I hear you both-it's not for everyone. Interestingly, though, a lot of guys who collect and use old straights also get into vintage safety razors like Gillette SuperSpeeds, which also give a great shave (and also provide an excuse to use the fancy creams).
 
Joined
Dec 27, 2014
Messages
24
Likes
11
Location
Durham, N.C.
Richard Findley, is a professional turner who has articles in the magazine "Woodturning." In issue 373 he tells about a hard wax oil that he has been coating shaving bowls with for over 7 years with no returns or complaints. I've not been using them long enough to vouch for their durability but, they are very easy to use.
 
Joined
Jan 3, 2021
Messages
465
Likes
618
Location
Spartanburg, SC
Website
www.turning4home.com
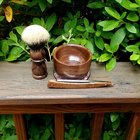
So here's the finished bowl with the whole set (not matching, but all walnut). The 2 coats of warmed epoxy sanded easily starting at 320, and going to 600. It was exactly like sanding a CA finish, really-just look for the low spots and sand gently and evenly until they are gone.
 

Attachments

  • Walnut Shave Set.jpeg
    Walnut Shave Set.jpeg
    528.3 KB · Views: 28
Joined
Jul 26, 2016
Messages
2,326
Likes
1,110
Location
Nebraska
Aaron,
Your shaving set turned out nice. I like the larger handle on the brush, most of the commercial brushes have too small of handles.
Is that a badger hair knot on the brush? Burl wood also makes nice looking shaving kits when you get the chance.
 
Back
Top