• We just finished moving the forums to a new hosting server. It looks like everything is functioning correctly but if you find a problem please report it in the Forum Technical Support Forum (click here) or email us at forum_moderator AT aawforum.org. Thanks!
  • Beware of Counterfeit Woodturning Tools (click here for details)
  • Johnathan Silwones is starting a new AAW chapter, Southern Alleghenies Woodturners, in Johnstown, PA. (click here for details)
  • Congratulations to Dave Roberts for "2 Hats" being selected as Turning of the Week for April 22, 2024 (click here for details)
  • Welcome new registering member. Your username must be your real First and Last name (for example: John Doe). "Screen names" and "handles" are not allowed and your registration will be deleted if you don't use your real name. Also, do not use all caps nor all lower case.

Critique please?

Joined
Dec 29, 2022
Messages
835
Likes
814
Location
West Central, IL
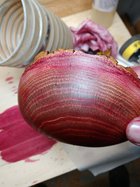
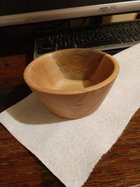
Still just starting with small stuff. This is my latest and I know what I feel is wrong with it but I'd like opinions from others. You won't hurt my feelings and how else am I going to improve?

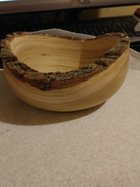
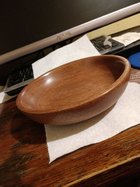
This was a small cherry burl turned wet and went out of round pretty good. I was trying out a new to me finish (tried and true traditional).

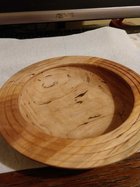
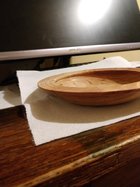
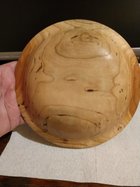
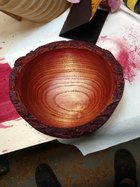
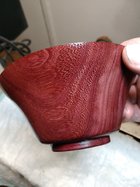
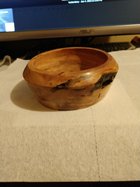
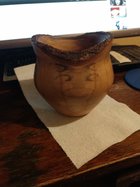
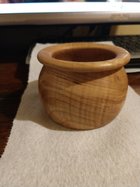
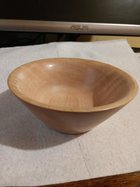
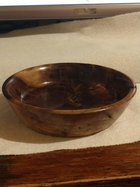
I don't know whether to consider it a dog dish disguised bowl or a really wide mouth hollow form. And the other pics are others I have done. Size is deceptive in these pictures.
 

Attachments

  • cherry.jpg
    cherry.jpg
    274.1 KB · Views: 72
  • IMG_20221207_161824759.jpg
    IMG_20221207_161824759.jpg
    295.9 KB · Views: 71
  • IMG_20221120_233541056 (1).jpg
    IMG_20221120_233541056 (1).jpg
    250 KB · Views: 68
  • IMG_20221118_170003111_MP.jpg
    IMG_20221118_170003111_MP.jpg
    257.3 KB · Views: 72
Joined
Aug 19, 2021
Messages
75
Likes
54
Location
Ashland, WI
I like the general shapes of the #2 and #4 bowls. The rim on #4 helps to balance the proportion of the body. #1 and #3 seem to have a problem in how the tops and bottom halves of the bowl interact. I think #3 would look better if the bottom was more round and the neck pinched inwards before flaring out. #1 looks too angular--it might work better if the bottom had more curve to it. Something you might try (which helps me) is to draw the profile of one of these bowls and then systematically change one thing about them in the next drawing. I make repeated sketches like this in columns on a sheet of paper so I can see how to change the shapes into something I like better. If you haven't read it yet, Rafan's book on bowl design is really helpful in learning how to think/talk about the shape of a bowl or how to "see" a bowl. On a more philosophical note there is the conundrum of beauty being completely subjective ("beauty in the eye of the beholder" sort of thing), but at the same time, the notion that there are essential elements of beauty (classical architecture and design). Perhaps that is part of what makes turning interesting.
 
Joined
Dec 29, 2022
Messages
835
Likes
814
Location
West Central, IL
I too think that 2 and 4 probably look the best. 2 is my dog dish bowl I guess but it did turn out alright. 4 I call my honey pot. Only problem with it is it's so small that it doesn't have a lot of use. The paper towel they are setting on are the half sheet variety if that helps perspective.

3 has a lot of issues. First time I'd tried something that deep. Think I was going for a bird mouth bowl look and ended up with a large mouth bass!

1 has the best finish! As you can see it has worm damage and it was supposed to be taller but alas it wasn't meant to be.

2 and 3 came out of a guys firewood pile, 1 was a small burl I cut off a dead tree and 4 was out of a selection of random blanks that I bought when I originally got my lathe.

Those are my excuses and I'm sticking with them! LOL

Golden Ratio, is that what you were going for in your elements of beauty?
 
Last edited:
Joined
Jan 8, 2021
Messages
322
Likes
421
Location
Wrentham, MA
Good on you for putting yourself out there.

The two things that jump out at me - the forms are all 'angular' and somewhat 'chunky'. As an example, #3. Both the angle coming up from the base, and the angle from wide spot into cove at neck are too straight. Both would benefit from more of a curve, IMO.

Natural edge vessels are tough when the rim is at different elevations, and compounded when you cut a flared opening. Here my suggestion would be to go thinner, as the dip in the rim looks much heavier than the rest of the vessel. That said, the angle of the picture might make this look like a larger difference than it would in person.

While I generally like the 'rule of thirds' and the base on this vessel meets that rule pretty well - meaning the base is approximately 1/3 of the width, IMO, it is out of balance with the top opening. Suggestion is to make those elements closer in scale - either close the opening up, or widen the base. I'd lean towards the former.

I do like the grain on the side of this vessel - like scrunched eyebrows and eyes over a mouth.

I'll second the recommendation on Raffans' book on bowl design. The difference between an ok bowl and a great bowl can be minimal, and that book does a great job of explaining a lot of the nuances of bowl design and form.
 

Dave Landers

Beta Tester
Joined
Dec 1, 2014
Messages
811
Likes
2,506
Location
Estes Park, CO
Website
dlwoodturning.com
A couple ideas re bowl design:
One thing I did years ago was I pulled a bunch of different bowls out of our kitchen cabinets and looked at them. Some were china, some plastic, metal, etc. But it gave me an opportunity to look at a bunch of stuff (by itself, next to each other, next to some of my work) and compare shapes, form, utility, etc. Figure out what elements of various bowls I liked and didn't.
Another good resource is pottery shops / galleries - especially for bowls and hollow forms. Potters have been making this stuff for may centuries (as a group, not individually!) and most have the forms down pretty well. They have the advantage of working directly with their hands (whereas we need a tool between us and the wood) so they get a more direct feed-back as they're making.
 
Joined
Dec 19, 2018
Messages
139
Likes
82
Location
Urbandale, Iowa
Sam, I think you are starting off well. You have shown us 4 different shapes. One idea that I think works with all shapes, "Avoid straight lines". A credit card could be useful to check your profile. On the first 2, do you think a concave shape would work better?
 
Joined
Dec 29, 2022
Messages
835
Likes
814
Location
West Central, IL
These were made the same time as the others except number 1 of the other thread which is the newest. These three here, the common denominator they were gotten as blanks to start.

Number three of these pictures I'm not sure what kind of wood it is. It has an odor to it. Not unpleasant like catalpa though.
 

Attachments

  • IMG_20221111_171020118.jpg
    IMG_20221111_171020118.jpg
    175.7 KB · Views: 19
  • IMG_20221109_114706909 (1).jpg
    IMG_20221109_114706909 (1).jpg
    249.4 KB · Views: 19
  • IMG_20221112_201750651.jpg
    IMG_20221112_201750651.jpg
    440.2 KB · Views: 19
Joined
Nov 18, 2012
Messages
660
Likes
1,867
Location
Torrance, CA
Welcome to the world of ”chasing the form”. Our site has a gallery full of beautifully formed vessels; take a tour and see what you like. Good form is not new, it’s been around for thousands of years. You know it when you see it! Copying it is challenge two; it’s why Woodturning drives us all. Pretty soon it will become natural to your process. Have fun getting there!
 
Joined
Dec 29, 2022
Messages
835
Likes
814
Location
West Central, IL
Sam, I think you are starting off well. You have shown us 4 different shapes. One idea that I think works with all shapes, "Avoid straight lines". A credit card could be useful to check your profile. On the first 2, do you think a concave shape would work better?

A concave shape might have been more aesthetic but I think with all of these I'm still working on tool technique and how to cut without scaring myself! The form hasn't come yet. I'm hoping it will because I've looked through the gallery and I think a lot of the stuff belongs in museums. Mine so far is a "it is what it is" or turns out to be and hope it resembles something like whatever I thought it might be. (if that makes any sense)
 
Joined
May 4, 2010
Messages
2,449
Likes
1,877
Location
Bozeman, MT
WOW! Sam, you're a bowl producing machine, right up there with Mike Mahoney and Glenn Lucas. You've got some sweet curves going. I'm very impressed.

You've gotten good feedback, so I'm going to shut up for a change. Keep it up!
 

hockenbery

Forum MVP
Beta Tester
TOTW Team
Joined
Apr 27, 2004
Messages
8,642
Likes
4,983
Location
Lakeland, Florida
Website
www.hockenberywoodturning.com
I'm still working on tool technique and how to cut without scaring myself! The form hasn't come yet.

We have a similar philosophy. When I teach beginning bowl turning, i want to get all the students to a level of turning a smooth surface with repeatable techniques. If my students can turn a smooth surface, form will follow.
I talk about form and encourage nice curve but not with as much stress as surface.

In turning a bowl, I teach the students to turn the edge of the rim, turn a notion of the bottom or foot, then connect the foot to the rim with a pleasing curve.
 
Joined
Aug 19, 2021
Messages
75
Likes
54
Location
Ashland, WI
Golden Ratio, is that what you were going for in your elements of beauty?
That is one, but there are others. The golden rule is simply something that is defined, but I'm sure there are other ratios that people find pleasing. I think people who are really good at design don't just follow 'rules'. They are able to start with a rule but then bend it into something interesting and perhaps unexpected. Those are the items that catch our attention because they don't fit into the normal spectrum of things we see, but they are said to 'work' in our eyes. The catch here is good design takes a lot of work/practice. The fact you are actively 'chasing the form' as Russ put it means that you are working on it. I really like Dave's suggestion to look at bowls you have in the house, and keep looking at museums and other galleries. And not just at bowls, but other forms as well. The more you look, the better to get at seeing.
 
Joined
Feb 6, 2010
Messages
2,980
Likes
1,955
Location
Brandon, MS
Beauty IS in the eye of the beholder but those eyes are different for everyone so look for what is pleasing in your eyes. To take Dave's suggestion a step farther and look at ancient Greek pottery for basic forms then expand on it.
 
Joined
Dec 29, 2022
Messages
835
Likes
814
Location
West Central, IL
Here's this afternoons project. Rescued from a wood pile again only this one has been around awhile and was dry. I like wet wood better. Doesn't burn your finger.
Anyway I think I have figured out my problem. My mom used to save the plastic margarine bowls when I was a kid and that's what she used for cereal bowls.
They resembled that shape! LOL
 

Attachments

  • walnut small.jpg
    walnut small.jpg
    277.5 KB · Views: 31
Joined
May 4, 2010
Messages
2,449
Likes
1,877
Location
Bozeman, MT
Curves are made by the turner moving his body in a curved motion. Your gouge is anchored to the tool rest and anchored to your side/hip/rib cage. To create a curve, you rotate your trunk. Dance Move #3. It's not done with fingers, wrists, elbows, or even shoulders. If you are getting a flat instead of a curve, you are not rotating your trunk.

The rate of rotation in relation to the rate of advancement of the tool edge determines the curve. (the rate of advancement should be 'letting the wood come to the tool', rather than forcefully shoving the tool forward.)

Turning the inside shape is trickier than this, since the lathe bed gets in the way, but the principle is the same.

EVERYONE makes a dog bowl for their first bowl. You just waited until your 5th bowl to get it done.

Next time, put our feet shoulder width or so apart, roughly parallel to the lathe axis, relax your knees, and rotate your trunk. Experienced turners watch the curve develop by looking at the horizon of the bowl, rather than looking at the tool. It's really hard to do this when you're new, as you need to see what you're doing by watching the tool tip. Eventually, you'll be able to turn without looking at the tip.
 
Joined
Jun 6, 2018
Messages
1,958
Likes
1,004
Location
La Grange, IL
A couple ideas re bowl design:
One thing I did years ago was I pulled a bunch of different bowls out of our kitchen cabinets and looked at them. Some were china, some plastic, metal, etc. But it gave me an opportunity to look at a bunch of stuff (by itself, next to each other, next to some of my work) and compare shapes, form, utility, etc. Figure out what elements of various bowls I liked and didn't.
Another good resource is pottery shops / galleries - especially for bowls and hollow forms. Potters have been making this stuff for may centuries (as a group, not individually!) and most have the forms down pretty well. They have the advantage of working directly with their hands (whereas we need a tool between us and the wood) so they get a more direct feed-back as they're making.
THIS :) (museums are another resource)

Something you might try (which helps me) is to draw the profile of one of these bowls and then systematically change one thing about them in the next drawing. I make repeated sketches like this in columns on a sheet of paper so I can see how to change the shapes into something I like better.
Then THIS :D Get some graph paper, make full size drawings in pencil, and make good use of the eraser.
 
Joined
Dec 29, 2022
Messages
835
Likes
814
Location
West Central, IL
Well, I am the Keeper of the Dog! Guess I'm destined to keep him supplied!

I'm not sure what wood this is, started out really yellow and ended up like this when I was done. Thought it looked like mulberry but not sure,

If it survives the night I'll be happy. Water was flying out of it while turning. Shade under 6 inches across and 3 inches on the high side. I need to find some bigger firewood.

You guys have me trying out the technics I need and if you knew me you'd get a good laugh! lol (not a small person)
 

Attachments

  • anotherdogbowl.jpg
    anotherdogbowl.jpg
    274.8 KB · Views: 25

hockenbery

Forum MVP
Beta Tester
TOTW Team
Joined
Apr 27, 2004
Messages
8,642
Likes
4,983
Location
Lakeland, Florida
Website
www.hockenberywoodturning.com
started out really yellow and ended up like this when I was done. Thought it looked like mulberry but not sure,
. Looks like mulberry. It is yelowish then turns brown


If it survives the night I'll be happy.

the curve I can see in the photo looks good - it should be able to move.

Can’t see the bottom and can’t judge the even wall thickness
( the lower rim looks a bit thicker than the top rim thickness - could just be the curvature of the rim )
If it has even walls it likely will survive the night.

A smallish bowl can dry successfully with more often than a larger one when it does have uneven walls
On a 6” NE bowl I usually go for a wall thickness of 3/16 - 1/8”.

Keep going
 
Joined
Dec 29, 2022
Messages
835
Likes
814
Location
West Central, IL
Mulberry kind of smell like barbecue sauce? The wood site said no odor, this is faint but there.

Walls are about 3/8, pretty even. Going to have to be because I took the tenon off and figured I'd hand sand to finish after it dries some more.

I don't want to use bandwidth taking a bunch of pictures of the same thing. Thought I read somewhere it was recommended one picture with the outside and showing a little of the inside?
 
Joined
Jan 20, 2011
Messages
397
Likes
476
Location
Traverse City, MI
I agree with the other comments. It looks like you are making good cuts with the right technique, but the shapes need some work. Don't sweat it, I've been at it for about 20 years and I still make duds occasionally. I've learned what I like and don't like in previous pieces, and it helps with what I create going forward. (most of the time)

Sweeping curves are not only pleasing to the eyes, but also to hold. Because we start with the limitations of the blank size, it's easy to fall into a rut of feeling like we need to maximize the size or shape contained within. I made a bowl earlier this year that I instantly really liked. After really looking at it, (and feeling it) I realized it was strikingly similar size and shape of a plastic bowl from my childhood.

The outside seems like it should be easy, but it requires some planning. To make the inside follow the outside shape, and not change thickness or have a transition line, flat bottom, etc., gets tricky. The height and diameter of the foot can totally change the balance, perception, or usefulness of a bowl. When you see a bowl that you like, photograph it. If possible, measure and draw it. Whatever you can do to recall its proportions, angles, features, will help you see them differently. Training your brain to draw what you see in your mind might also help you to cut it.

I've only done one art fair/craft show event 3 times, but I have found it fascinating to see what people look at. The last was just a few months ago and I was shocked that almost 100% of people that stopped and looked, they all picked up at least one of 2 bowls(sometimes both) on my table. One of them was a different style of bowl for me; a very rounded (slightly closed) shape. Nobody bought it, but they all wanted to pick it up and hold it. I didn't think it was anything special, and definitely not a favorite. About a month later, Eric Lofstrom did a Namaste Bowl IRD for our club and the shape was pretty similar.
You are off to an awesome start and I applaud you asking for input. Keep up the good work and have fun with it!
 
Joined
Dec 29, 2022
Messages
835
Likes
814
Location
West Central, IL
I've come to the conclusion that none of these will ever be a bowl with liquid in it or even have a use really. I call them M&M bowls or change bowls. I seem to like the ones that feel right when you reach in them like you were going to scoop some change out.
 

hockenbery

Forum MVP
Beta Tester
TOTW Team
Joined
Apr 27, 2004
Messages
8,642
Likes
4,983
Location
Lakeland, Florida
Website
www.hockenberywoodturning.com
One thing I usually do for NE bowls is to cut the blank a couple inches longer than it is wide
With a long curve end to end the ovalness is emphasized. I like that look

With a 6” diameter 1/2 log I cut my blank 8” long. One way to stretch a bigger bowl out of a small log.
 
Joined
Dec 29, 2022
Messages
835
Likes
814
Location
West Central, IL
This was a log out of a wood pile yesterday and when I cut it in half I went to one side of the pith but I got a little carried away with the chainsaw trying to make it a little more round so it is what it is. Practice.

The other smaller half will probably be a shallow dog dish like the walnut one up above. lol
 
Joined
Feb 28, 2021
Messages
1,226
Likes
1,076
Location
Roulette, PA
Website
www.reallyruralwoodworks.com
I've come to the conclusion that none of these will ever be a bowl with liquid in it or even have a use really. I call them M&M bowls or change bowls. I seem to like the ones that feel right when you reach in them like you were going to scoop some change out.
Gentlemen's Valet dishes can be fairly popular in some areas (Valet dish = bowl you throw your keys, change, wallet, watch, etc into so it doesn't go sliding around and falling off dresser or some such) If you add a nice center nub and a finial in the center inside of the bowl, you also get a decent usable Ring dish (I.E. a dish to hold your rings & watch at the kitchen sink while you do dishes, wash hands, or some such) - I sold quite a few at local farmer's markets (both N.E. and twice turned)

But yeah like others mention, shape and form comes to you with experience, really - once you get a shape or form that in the end "feels good" in your hands, it'll also often be pleasing to the eye - when you've figured that out, you can start to focus on grain patterns in the wood and sort of "eyeball" where to ccut your logs to get grain figure where you want it to be in the finished bowl... But, that can take a few years of practice to get good at it... Looks like many of my first Natural Edge bowls , took some practice before I could dare to get them down to 3/16" to 1/4" thicknesses... So, Nicely done!
 
Joined
May 4, 2010
Messages
2,449
Likes
1,877
Location
Bozeman, MT
Sam,
The desired shape of natural edge bowls isn't necessarily the same as for conventional bowls. In order to get a consistent wall thickness where there is air-wood when spinning, the curve needs to be different than the porcelain/plastic bowls in your kitchen. That's not a bad thing, it's just the way it is. That's a nicely shaped bowl, from what I can see.
 
Joined
May 4, 2010
Messages
2,449
Likes
1,877
Location
Bozeman, MT
PS Since you're determined to do hard things as soon as possible, here's one idea that will give you instant complications to work through.

For an M&M or change or nut bowl, when the user goes to scoop out the small items, having an interior curve that bends back on itself encourages the small items to fall into the hand. This is known as an undercut rim. Odie's bowls often have them, though his are works of art rather than functional nut bowls. It's really, really hard to get a smooth surface without tear out at the widest part of the curve. Sic 'em, Sam.

PPS It's not required that the wall thickness near the rim on an undercut bowl be uniform. I can't recall the well known turner who features it, but there's one who advocates having a wider top rim surface, with an undercut on the inside and a more conventional curve on the outside. Hard to describe, but clear when you see/feel it. The cross section would be sort of a "y" shape, with a flat or rounded top on the "y".
 
Joined
Dec 29, 2022
Messages
835
Likes
814
Location
West Central, IL
PS Since you're determined to do hard things as soon as possible, here's one idea that will give you instant complications to work through.

For an M&M or change or nut bowl, when the user goes to scoop out the small items, having an interior curve that bends back on itself encourages the small items to fall into the hand. This is known as an undercut rim. Odie's bowls often have them, though his are works of art rather than functional nut bowls. It's really, really hard to get a smooth surface without tear out at the widest part of the curve. Sic 'em, Sam.

PPS It's not required that the wall thickness near the rim on an undercut bowl be uniform. I can't recall the well known turner who features it, but there's one who advocates having a wider top rim surface, with an undercut on the inside and a more conventional curve on the outside. Hard to describe, but clear when you see/feel it. The cross section would be sort of a "y" shape, with a flat or rounded top on the "y".
OK, One slightly overdecorated undercut rim in the wrong way cherry dog dish. 8 3/8 x 1 3/8 I used to have an ashtray that looked similar when I was younger and smoked.

I don't start out with a plan I just try to take away everything that doesn't look like a bowl or dog dish to me.

Is there a rule of thumb? Should I not be posting a lot of pictures?
 

Attachments

  • IMG_20230109_124653455.jpg
    IMG_20230109_124653455.jpg
    274.4 KB · Views: 36
  • IMG_20230109_124732945.jpg
    IMG_20230109_124732945.jpg
    299.6 KB · Views: 36
  • IMG_20230109_124717166.jpg
    IMG_20230109_124717166.jpg
    247.7 KB · Views: 36

hockenbery

Forum MVP
Beta Tester
TOTW Team
Joined
Apr 27, 2004
Messages
8,642
Likes
4,983
Location
Lakeland, Florida
Website
www.hockenberywoodturning.com
That is a nice shallow bow/key caddy…

Is there a rule of thumb? Should I not be posting a lot of pictures?
It’s your choice
I think the limit is 4 photos per post. No limit on posts
People will choose to look/read or not

I don't start out with a plan I just try to take away everything that doesn't look like a bowl
You will likely get more deliberate with more experience but it isn’t required to have fun.

I have a fairly well developed mental image of the piece I’m trying for when I cut the blank.
I have drawn pictures on the blank for myself and often do in classes to show my thought process.
When I do a natural edge piece I drill a hole in the center of the opening before it goes on the lathe I base this on the bark contour the will give me a corresponding rim contour.
 
Last edited:
Joined
Feb 7, 2020
Messages
234
Likes
172
Location
Sykesville, Maryland
OK, One slightly overdecorated undercut rim in the wrong way cherry dog dish. 8 3/8 x 1 3/8 I used to have an ashtray that looked similar when I was younger and smoked.

I don't start out with a plan I just try to take away everything that doesn't look like a bowl or dog dish to me.

Is there a rule of thumb? Should I not be posting a lot of pictures?
Making rapid progress. Admire your enthusiasm and industriousness. On this one, which has a much nicer inside curve to it, does it sit stable without wobbling. The easiest way to get stable pieces is to concave the bottom ever so slightly near the center. This gives it a heal to rest on without detracting from the form. Easy to check with a straight edge across the bottom.
 
Joined
Dec 29, 2022
Messages
835
Likes
814
Location
West Central, IL
Noo, it was wet when I turned it. Since it's been drying it went wonky. I think it's Phil from shady acres woodshop? He is always stressing the bottom concave so I have picked that up but this one is a rocking chair now. Which is ok. It's just more practice. If I find myself with nothing to do I might explore returning the bottom (if thick enough) since I watched M. Saban Smith do friction drive turning and used a little block with neoprene on the tailstock. I see axminster makes a small faceplate w/screw for the tailstock. I wonder if they make just a flat surface that you could stick some neoprene on.
 
Joined
Feb 25, 2023
Messages
97
Likes
413
Location
Louisville, KY
Noo, it was wet when I turned it. Since it's been drying it went wonky. I think it's Phil from shady acres woodshop? He is always stressing the bottom concave so I have picked that up but this one is a rocking chair now. Which is ok. It's just more practice. If I find myself with nothing to do I might explore returning the bottom (if thick enough) since I watched M. Saban Smith do friction drive turning and used a little block with neoprene on the tailstock. I see axminster makes a small faceplate w/screw for the tailstock. I wonder if they make just a flat surface that you could stick some neoprene on.
Nice start! I echo what others have said on straight lines and wall thickness. My suggestion would be to focus first on the concept of continuous curve. For the exterior, that means a single, uninterrupted curve that is only interrupted for the foot. For the interior, that means a surface that perfectly mirrors the exterior, except for the foot, of course. IMO, if you get that concept down, you can play around with more complex forms. I would also suggest working on getting thinner walls--open bowls are probably the easiest for practice. Keep it coming!
 
Joined
Dec 29, 2022
Messages
835
Likes
814
Location
West Central, IL
A lot of my problem up to this point I think was the fact that it was stressed early on to have uniform thickness of the walls and bottom. Now I'm getting away from that and they are looking better plus I've also realized that if I mess one up in some way there are more trees to try again. So don't be afraid to experiment.

The purple heart I haven't removed the tenon yet in this pic. The other is an experiment with Bordeaux dye.
 

Attachments

  • IMG_20230215_221137961.jpg
    IMG_20230215_221137961.jpg
    434.8 KB · Views: 21
  • IMG_20230215_221127174.jpg
    IMG_20230215_221127174.jpg
    433.7 KB · Views: 21
  • IMG_20230220_175942460.jpg
    IMG_20230220_175942460.jpg
    320.1 KB · Views: 21
  • IMG_20230220_180031392.jpg
    IMG_20230220_180031392.jpg
    379.4 KB · Views: 21
Back
Top