• April 2025 Turning Challenge: Turn an Egg! (click here for details)
  • Congratulations to Kelly Shaw winner of the March 2025 Turning Challenge (click here for details)
  • Congratulations to Ellen Starr for "Lotus Temple" being selected as Turning of the Week for 21 April, 2025 (click here for details)
  • Welcome new registering member. Your username must be your real First and Last name (for example: John Doe). "Screen names" and "handles" are not allowed and your registration will be deleted if you don't use your real name. Also, do not use all caps nor all lower case.

Coring a large cylinder?

Joined
Mar 22, 2023
Messages
174
Likes
498
Location
Strasburg, VA
Hi folks,
I know there are coring systems for bowl blanks.

However I have a kind of odd need. I’m making a cylinder for a kitchen utensil canister. I’m gluing several square blocks of cherry together and turning it round on the lathe to about 6 1/2 inches.

I don’t want to waste the cherry wood on the inside of the canister by hollowing it out in the normal fashion.

Is there a way to core a cylinder from the inside of this block to use for other projects?

I’m thinking of pushing a sharp diamond shaped carbide tool straight into the block at 3” from the center line to core out the center cylinder. Then I’ll glue a base on the utensil canister.

Would this work? Is there a better tool available for this, or can I make one from an HSS shaft?

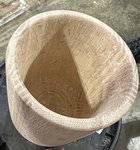
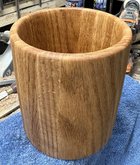
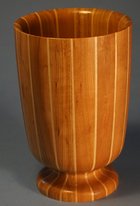
The images below are of the first utensil canister I made by laminating multiple oak boards then hollowing the block out in the usual fashion, but it wasted a tremendous amount of good wood.

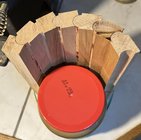
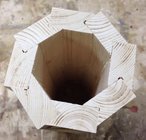
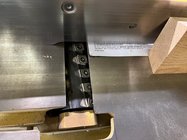
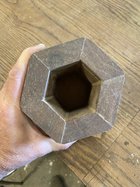
(I’m developing a way to use parallel staves to make the cylinder with canoe joints made on my router to join them but I haven’t gotten that completely figured out yet. See last photo. But I need to complete a utensil canister soon for a friend.)44DE2880-5CE7-4C30-A22A-524A6A7DA623.jpeg
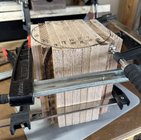
AA3DA406-DB05-4DB0-8011-1649A41B13F5.jpeg
088AB659-6A23-4B1A-B82C-C4A076A96419.jpeg8B7E8D15-0406-4C17-A799-7848C1B8749F.jpeg
 
IMHO, I wouldn't even dare to try coring that depth freehand. Probably a hollowing system with a 1 inch or so bar (and 5 feet or so of handle length) might be able to handle it, but I wouldn't even dream of trying to core that more than a couple to 3 inches depth with ordinary hand held turning tools. Hollowing OTOH I might go to 6 inch depth with my old fashioned ellsworth hollowers, but coring? no thank you.

Staved cylinders are quite easy to cut on table saw, just a matter of knowing your angles.
 
Never tried it, but I don't think plunging a diamond carbide scraper to that kind of depth will be successful. The tool needs clearance, in other words it won't like having both left & right cutting edges engaged simultaneously, particularly as the wood to the left will be traveling past the cutter faster than wood on the right.

If you wiggle the cutter you may make enough clearance, but lets say the total kerf is 3/4". You'd loose 1 1/2" from your 6 1/2" starting diameter, so 5" left. Then figure the wall thickness at 3/4" means another 1 1/2" off. So the most you are going to core out is a ragged 3 1/2" cylinder. As they say, that juice is not worth the squeeze.

Stave construction, on the other hand, would lend itself to this project quite nicely.
 
I’m gluing several square blocks of cherry together and turning it round on the lathe to about 6 1/2 inches.
If you are gluing use staves. A lot less waste and a lot less turning.
Added bonus is showing face grain all around.
You can leave the inside unturned. Or turn the inside with it with a hollowing rig.
A terming would do that job too.

I join staves with biscuits. This lines them all up with web clamps
A slime would do the same.
That’s about the size I do for bird houses I use 9 staves about 2” wide.

For bird houses I glue up a height for 2 or 3 with the slimness then cut them to length on the bandsaw.

Another technique with log sections is to cut the inside out on the bandsaw and glue the saw kerf together.
 
Last edited:
I have made canisters as shrink boxes from solid green birch as in this photo. The process is to mount a fresh cut live length of birch, turn it round, hollow out to a cylinder with about 1/2 to 3/4" walls, cut a rounded groove neat the open end, make a bottom out of dry birch at a slightly smaller diameter then the opening, slip the bottom in, part off the cylinder and leave it to dry. The cylinder will shrink as it drys such that the bottom will be tightly held without any glue. The draw back is you need a source of birch and oak or ash don't work as well.

DSC00631.JPG
Staves work also but of course the bottoms must be sized exactly and installed at the same time as you glue up the sides or you could make wider or thicker staves then fill a smaller hole in the bottom.
22022Utensil2.JPG
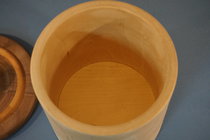
This is a staved utensil cup made in cherry and birch.
 
I have hollowed endgrain to 6"+ with regular turning tools, but it was seriously not fun and I wouldn't want to try it again. If memory serves, I did the farthest reaches with some round end scrapers. A Hunter tool with the 5/8" shaft would be useful, if I had to do it again. As mentioned, though, a good, stout hollowing rig would help tame the task.
 
Thanks. I found this photo.
That'd be birdsmouth done on a table saw, it looks like. that would be one way.

However, what I do is simple rip cuts - square up your board , and then set the bevel angle of your saw blade (angle gauge helps a lot) , first rip cut will set the first angle, then adjust fence over for the width of the stave you need, flip board end for end so the second rip cut leaves you with a V-shaped stave like this: \__/ then just flip board end for end for each subsequent rip cut to get your staves (I would cut a couple extra staves in case you find defects in one during glue-up, etc)

I glued up my staves in halves (masking tape on edge of 2 mating staves at end of each half which can be used to add or subtract tape to make the other staves glue up with no gaps) then separated the 2 halves and squared them up so the mating edges would fit up cleanly and you have a round cylinder with little if any gaps inside or outside - clamped with hose clamps til glue dries.
 
Well, coring end grain is a pain. Only cutter I know that is designed for that would be the straight coring blade from McNaughton. If I was going to core some thing deep, like not more than about 6 to 8 inches, I would plan to have a blank that was 7 to 9 inches deep, core down to the 6 or 8 inches and then come in from the side and part off the cylinder. I have seen lamp shades done this way, and I think a drum blank. Other than that, I would probably go with stave construction. You would still need to make a bottom for the form, and you would want the grain to match. If you used the bottom 1 inch where you parted off the cylinder, you could make the grain line up fairly simply, but would probably have to use a waste block rather than a face plate for mounting the blank. I would most likely opt for the bead and cove method of stave construction.

robo hippy
 
That'd be birdsmouth done on a table saw, it looks like. that would be one way.

However, what I do is simple rip cuts - square up your board , and then set the bevel angle of your saw blade (angle gauge helps a lot) , first rip cut will set the first angle, then adjust fence over for the width of the stave you need, flip board end for end so the second rip cut leaves you with a V-shaped stave like this: \__/ then just flip board end for end for each subsequent rip cut to get your staves (I would cut a couple extra staves in case you find defects in one during glue-up, etc)

I glued up my staves in halves (masking tape on edge of 2 mating staves at end of each half which can be used to add or subtract tape to make the other staves glue up with no gaps) then separated the 2 halves and squared them up so the mating edges would fit up cleanly and you have a round cylinder with little if any gaps inside or outside - clamped with hose clamps til glue dries.
stavetrimangle.jpg
This is a method of correcting the angle on a stave to eliminate the need for a the 2 halves glue up
 
The coring process is known as trepanning in the metal working industry. In a project we needed titanium tubing in sizes which are not available so solid bar was trepanned to create the tube. We used shop made tools to trepan expensive plastics to salvage the cores.

If the project is ongoing in quantity coring would be preferable to gluing staves.
I can turn outboard on my Nova DVR XP so my mind was wandering last night. My subconscious just doesn’t want to give up this idea of coring. The tool rest for outboard turning is quite stout and could be used to mount a captured very long handled shop made chisel to do the coring. It would only need to be able to advance in a straight line so capturing it would not be too difficult.

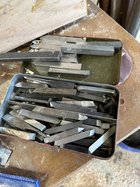
I have multiple metal lathe inserts, some of which are already pointed, that could be mounted (brazed?) on a long metal bar for this purpose:
961F9CA8-4B9F-4069-9802-1030E4583A83.jpeg
I’ve seen how the Oneway coring tips are shaped and would be able to use one of these metal lathe tips to create a similar shape. I’ve already used one to make a bedan style lathe chisel.

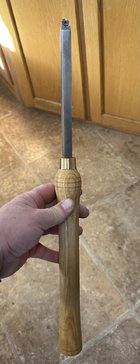
And I’ve made a cupped carbide tool from scratch similar to a Hunter Hercules #4 using 1/2” square metal stock. I turned the handle from a piece of ash firewood:
5C63397E-371A-4AB5-8A8B-09AFAE2257D2.jpeg
I’m no metal worker but I love to tinker and “invent.” Mainly just for the challenge of designing, building and successfully using it, without hurting myself or breaking things in the process lol!

How thick, wide and long a piece of stock mild steel would be needed for this kind of wood coring?

So … talk my unruly brain out of thinking about this further if I’m just going to hurt myself or break things!
 
Last edited:
The dimensions of the tool will depend on how much edge engages the wood, at what angle, at what speed, and how far from support.

Wild donkey guess, 1/8" of thickness per inch of overhang, with the amount of edge decreasing as you go deeper. Probably no more than 3/32" of edge past 4" of overhang (another wild donkey guess), assuming it is sharp. The edge, whether scraper style or cutting style, should be moving from center outward to avoid driving into endgrain. To accomplish that, to me it means you drill a hold to ultimate depth, so you have a space to start your cut or scrape. A hook tool or Hunter tool can have the cutting edge oriented to cut across the end grain fibers. A hollowing tool would typically be a small scraper, and your metal bits mounted on a boring bar could be such a tool. Lastly, you can move the tool rest toward the bottom of the cylinder and shorten the overhang with a special "box tool rest". I forget who makes them.

Ultimately, you're choosing to make this task harder than it needs to be, and that's your prerogative. Be such to wear your kevlar nose guard and catcher's cup. ;)
Yeah, at some point my brain will give in to the old adage, “Prudence is the better part of valor” and get this idea outta my head.
 
When we made a coring tool for plastics it was basically a deep hole saw. Using thin wall tube we brazed a couple parting tool carbide inserts as cutters. The cutters were wider than the tube wall thickness. A deep gullet allowed shavings to pile up between tool withdrawals to clear shavings.

We used a metal lathe with the coring tool mounted on the tool post making chip clearing easy by cranking the lathe carriage back.
 
If you don’t have a lot of experience with end grain hollowing try something small.
That will give you some insight.

These are fun and you’ll have a set to go with the canisters

View: https://www.youtube.com/watch?v=FQAR7SgnBgo
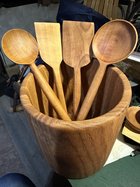
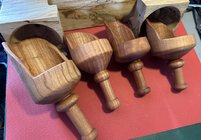
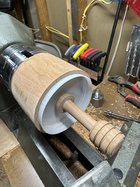
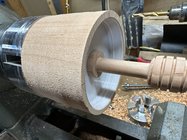
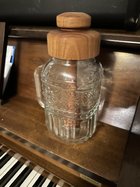
I’ve done some end grain hollowing. Single and double axis dry goods scoops, 6.5” wide, 7.5” tall laminated oak utensil canister, inserting metal Masson jar lids into honey dipper lids and such.
41396116-0CCF-48D2-A110-3A086F88C379.jpegAA677597-25B8-428D-90ED-E8B0FCE0D9E9.jpeg
57572DAE-5D18-4A4F-B733-26E6890122B7.jpeg
91214739-F61F-4DA5-9B91-4D46F363C6AD.jpeg
 
Last edited:
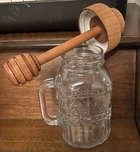
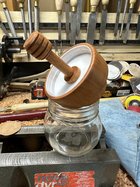
Some friends wanted honey dippers but they’re having trouble with tiny black ants in their old farmhouses and needed a honey dipper jar with a lid which would screw on tightly and securely, so these are what I came up with after staring at some jars with lids for a bit.

These honey dipper lids required some fairly decent end grain hollowing:
08B658F8-D008-4787-892E-E5BE40DCE6B7.jpeg
4C6D75BC-0B2A-48F6-88D0-E016D7CC226E.jpeg
FA9584C9-20D8-4997-99BE-BDA7605F4D75.jpeg
EF43EAA3-9E2D-44B0-AC1A-256D59F46C00.jpeg
 
Last edited:
I can turn outboard on my Nova DVR XP so my mind was wandering last night. My subconscious just doesn’t want to give up this idea of coring. The tool rest for outboard turning is quite stout and could be used to mount a captured very long handled shop made chisel to do the coring. It would only need to be able to advance in a straight line so capturing it would not be too difficult.

I have multiple metal lathe inserts, some of which are already pointed, that could be mounted (brazed?) on a long metal bar for this purpose:
View attachment 54438
I’ve seen how the Oneway coring tips are shaped and would be able to use one of these metal lathe tips to create a similar shape. I’ve already used one to make a bedan style lathe chisel.

And I’ve made a cupped carbide tool from scratch similar to a Hunter Hercules #4 using 1/2” square metal stock. I turned the handle from a piece of ash firewood:
View attachment 54439
I’m no metal worker but I love to tinker and “invent.” Mainly just for the challenge of designing, building and successfully using it, without hurting myself or breaking things in the process lol!

How thick, wide and long a piece of stock mild steel would be needed for this kind of wood coring?

So … talk my unruly brain out of thinking about this further if I’m just going to hurt myself or break things!
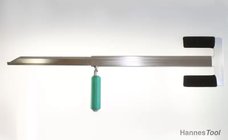
I know of 2 sources for mfd straight coring tools, McNaughton (which I have in the shop, but havent tried for a cylinder), and Hannes Michelsen. Hannes uses his in making wooden brimmed hats. You could use those designs to get an idea of dimensions etc to make a tool.

Both of these tools use a tip of very hard tool steel soldered on the bar. Another option would be the Oneway tips for their coring blades which mount with a screw, there are carbide and tool steel versions.

Thinking about the process, I think I would plan to enter from both ends, to limit depth of cut. Use whatever drive method selected attached to both ends, figure a way to support the TS end with drive method attached, shape the cylinder, core ~1/2 way, flip around, core as needed. Might be good reasons not to do it this way, but that is my initial thought.

A downside to doing a cored cylinder is what to do for the bottom, different grain joint expansionsion/contraction etc
 
Last edited:
Brian, look up Big Ugly tool on You Tube. I have maybe 3 videos about it. A piece of tantung is silver soldered onto bar stock. With brazing, you don't get solid attachment across a bigger piece of metal. The standard solder will not wick in all the way across. One guy used a couple of strips of regular solder and pounded them down flatter so they would spread. The silver solder ribbon is expensive. As for what size you need, remember leverage! The farther out you are off of the tool rest you are cutting, the smaller the tip needs to be. I don't think any of the coring tips are more than 1/2 inch wide. The deep hollowing bits are even smaller, some down to 1/8 inch.

robo hippy
 
One thing I havent seen mentioned is a support bar like the Oneway system uses. It would need to be stout enough to take the stresses and slim enough to follow the tool path. You might have noticed in the Japanese drum video the boring bar was really massive. Im not sure that kind of work would translate well to handheld tools on a standard lathe.
 
One thing I havent seen mentioned is a support bar like the Oneway system uses. It would need to be stout enough to take the stresses and slim enough to follow the tool path. You might have noticed in the Japanese drum video the boring bar was really massive. Im not sure that kind of work would translate well to handheld tools on a standard lathe.
The coring tool by JoHannes Michelsen was mentioned above. It’s a big heavy tool!
097E51A3-50F2-400F-AE95-710FB7DE2931.jpeg
Watch how he uses it. He tucks it under his armpit like a crutch and grasps the green handle like the front handle on a tactical rifle:

This is something I could actually make.
 
@Brian Kopp using Hannes and McNaughton straight bar design, and either their soldered cutter design or Oneway’s screw on tip (hss or carbide), the overall tool would not be that difficult to design and make. Interested to see what you come up with and how it works for you.
 
I have made a few Kitchen canisters over the years and here's what i have found in regard to hollowing.
As I do mainly hollow vessels many with small openings. I have found if you're going this way you need to spend some time looking for specialized hollowing tools and your lathe set-up. I use the shielded cup cutters types such as Rolly Munro and Woodcut Proforme, plus a couple of my own design, all the cutters are tungsten carbide which gives considerable edge longevity. I only buy the heads and prefer to make my own handles and shafts. The shafts and handles are heavier and longer than most of the propriety brands available. Whilst I have a couple of captured systems I prefer to do all my hollowing free hand and do so to a depth of around 400mm or 16" although its more likely around 300mm or 12" and to help with this I have set my lathe up higher than most, at around 100mm or 4" high than the recommended height, this allows me to tuck the handle under my arm for greater control.
 
Found the answer to my question at 14:12 in this video Ellsworth coring cylinder. Fascinating and scary to see him hollowing with one of his hand-held harpoons on a 30" deep piece. The blank is held on a faceplate and supported by the tailstock as he augers in beside the tailstock center. I have never seen any suggestion of a steady rest in his book or in photos of him working.
 
Back
Top