The current issue of WOOD magazine (May 2007) has an interesting article on cutting up logs for turning blanks and lumber. I didn't write the article, but the pictures were taken at my place. It shows how I do it and some of the jigs I use for doing it safely.

-
We just finished moving the forums to a new hosting server. It looks like everything is functioning correctly but if you find a problem please report it in the Forum Technical Support Forum (click here) or email us at forum_moderator AT aawforum.org. Thanks! -
Beware of Counterfeit Woodturning Tools (click here for details) -
Johnathan Silwones is starting a new AAW chapter, Southern Alleghenies Woodturners, in Johnstown, PA. (click here for details) -
Congratulations to Dave Roberts for "2 Hats" being selected as Turning of the Week for April 22, 2024 (click here for details) -
Welcome new registering member. Your username must be your real First and Last name (for example: John Doe). "Screen names" and "handles" are not allowed and your registration will be deleted if you don't use your real name. Also, do not use all caps nor all lower case.
You are using an out of date browser. It may not display this or other websites correctly.
You should upgrade or use an alternative browser.
You should upgrade or use an alternative browser.
Converting logs into turning blanks
- Thread starter Brian Hahn
- Start date
Max Taylor
In Memoriam
logs to blanks
Hi Brian,
So, how do we view the jigs and fixtures if we dont have the magazine? I am really interested, Max
Hi Brian,
So, how do we view the jigs and fixtures if we dont have the magazine? I am really interested, Max
Max,Dustpan said:So, how do we view the jigs and fixtures if we dont have the magazine? I am really interested, Max
You can download the modified jig article from the WOOD Magazine site, http://www.woodmagazine.com/ , but they charge almost as much for the download as the magazine costs at the newstand.

A picture is worth a thousand words....
If someone could photograph Brian's jig (or another person's jig made from the Wood plans) and post them, any person with some basic woodworking skills could build the bandsaw sled from an image or two without the fancy dimensions and step-by step instructions that Wood magazine is asking you to pay for.
In my opinion, I think that the majority of bowl blanks are roughed out with a chainsaw and only taken to the band saw to refine the shape a bit, and most importantly to try to balance the blank as much as possible before putting it on the lathe. Not really rocket science.
Rob Wallace
Okay, Okay
I'll post some pictures of the jigs, etc. later today.
A reminder: the WOOD magazine photos and article are copyrighted. Let's honor that.
I'll post some pictures of the jigs, etc. later today.
A reminder: the WOOD magazine photos and article are copyrighted. Let's honor that.
Last edited:
Pictures - Chainsawing aids
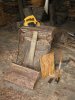
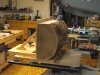
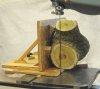
The first one is an old shipping pallet. I use it to support logs while I'm cutting them into shorter lengths. It is a lot easier to roll a 200-300 pound log onto a pallet than to lift it onto a sawhorse. The pallet slats keep the log from shifting and it keeps the chainsaw from hitting the ground at the end of the cut. Just watch out for the nails in the pallet. The pallet with a cut off section of log and my chainsaw are just visible in the background on the right side of one of the pictures.
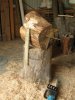
The most one is my cutting block. It's a white oak log section, about 27" tall by 18" diameter, with a scrap of wood screwed to the side. The log being cut is screwed to this upright to hold it securely in place as shown in the picture.
I usually flatten the sawn face with a power planer and the wood upright also keeps the log section in place while I'm doing that, as shown in the other picture.
The first one is an old shipping pallet. I use it to support logs while I'm cutting them into shorter lengths. It is a lot easier to roll a 200-300 pound log onto a pallet than to lift it onto a sawhorse. The pallet slats keep the log from shifting and it keeps the chainsaw from hitting the ground at the end of the cut. Just watch out for the nails in the pallet. The pallet with a cut off section of log and my chainsaw are just visible in the background on the right side of one of the pictures.
The most one is my cutting block. It's a white oak log section, about 27" tall by 18" diameter, with a scrap of wood screwed to the side. The log being cut is screwed to this upright to hold it securely in place as shown in the picture.
I usually flatten the sawn face with a power planer and the wood upright also keeps the log section in place while I'm doing that, as shown in the other picture.
Attachments
Pictures - Trimming Sled
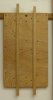
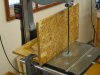
Often times the log section is destined to be made into slabs or turning squares. I do this work on the bandsaw and the first step is to get a straight flat edge on the half-log. The pictures show the trimming sled that I use. Plywood or solid wood is best. Particle board doesn't like being dropped on the floor with a heavy hunk of wood screwed to it.
This particular sled is 12" wide by 20" long. The two runners let me trim both sides of a log to the maximum width (height) that will fit under the bandsaw guides in a single mounting. The screw hole positions aren't critical, but be sure to countersink them. I also have a sled that is 5' long for making boards. (Shelves are nice for displaying turnings.)
Notice the cardboard shims between the log and the jig. It is important to have the log very stable, unless you like pinched or kinked bandsaw blades.
Attachments
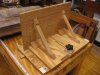
Pictures - Slicing Jig
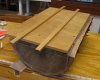
This is a versatile jig. The base portion is about 12" wide by 20" long. I used 1/2" OSB because I had it on hand and strength isn't an issue except at the back where the 1/4" bolt head is buried. That area is reinforced with a slice of oak, about 5/16" thick. It just barely clears the saw's fence rails. The top portion's base is about 10" wide by 16" long and is 3/4" plywood. The face is 11" high by 16" long and 3/4" plywood would be a good choice for that as well. The face piece has 3/16" holes on a 1" x 2" grid, plus a few extras. The block of wood under the knob is important to spread the clamping force over a wider area. The bolt is 1/4" hex head.
This jig can be used several ways as shown in the smaller photographs. I use shims along with the screws to keep the piece firmly in place. It is bad news to have the piece suddenly shift in the middle of a cut.
I also use the top part of the jig as a saw fence when I'm sawing slabs or lumber.
Attachments
Brian:
I really like that bandsaw jig!! Obviously makes slabbing much more efficient than by using a simple sled. This alone hould have people going out to buy riser blocks! Thanks for posting the pictures. I already get Wood magazine, but actually these are more helpful!
What blade do you use? I have had very good sucess with Highland Hardware's "Woodturners Bandsaw Blade" and would recommend it highly.
Rob Wallace
Rob,
I'm glad the pictures helped.
I use an Olson All-Pro 5/8" blade that I get from Woodcraft. I remove every other tooth so it is a 1.5 tpi blade. I found it works a whole lot better when I'm cutting the full 12" of depth. I described my re-saw blade modification in a thread in the How-To forum: Sharpening Band Saw Blades
bowl blank preps
All this effort seems like a waste to me since I just saw the log section in half, being careful with the saw and keeping one smooth kerf, cut off the corners with the saw, and screw on a face plate with lag bolts. On smaller blanks, I don't even bother with a faceplate and use a spur drive inside a shallow 1in hole and the tailstock to hold it long enough to get a good tendon cut. Works for me! Phil
All this effort seems like a waste to me since I just saw the log section in half, being careful with the saw and keeping one smooth kerf, cut off the corners with the saw, and screw on a face plate with lag bolts. On smaller blanks, I don't even bother with a faceplate and use a spur drive inside a shallow 1in hole and the tailstock to hold it long enough to get a good tendon cut. Works for me! Phil
Phil,
I do the same as you for green turning of simple bowl blanks. But I prefer to slab the wood for crotch sections.
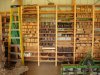
I also like to do spindle turning, and dry blanks work a whole lot better. This is a view of part of my dry wood stash. That's an 8' step ladder and the racks cover the entire 30' wall.
I do the same as you for green turning of simple bowl blanks. But I prefer to slab the wood for crotch sections.
I also like to do spindle turning, and dry blanks work a whole lot better. This is a view of part of my dry wood stash. That's an 8' step ladder and the racks cover the entire 30' wall.
Attachments
Oh, duh . . .
I've been doing things a bit differently, but never thought to use my power planer (I think it's even the same brand and model you've got!) to smooth off chain saw divots. I've got a used Stihl with a 25" blade that halves most logs quite nicely, but never figured out the power planer trick. Thanks, Brian!
I've been doing things a bit differently, but never thought to use my power planer (I think it's even the same brand and model you've got!) to smooth off chain saw divots. I've got a used Stihl with a 25" blade that halves most logs quite nicely, but never figured out the power planer trick. Thanks, Brian!
- Joined
- May 16, 2005
- Messages
- 3,540
- Likes
- 15
If you're looking for a human-power answer, consider a scrub and Jack plane. Works great for me. Doesn't hurt the flab much after a while.
I do what will become the bottom, since I draw my circle up top. Usually less wood there, and it also provides a firm platform for use of a circle jig and for trimming the ends at an angle for weight and balance, as well as making sure that I'm getting the best diameter I can out of a piece with a tool a bit more capable of making a fair circle than my chainsaw. What's up top isn't too important before roughing, and I can also cheat a bit and gouge out heart checks so they won't grow, knowing that the sides will retract anyway.
I do what will become the bottom, since I draw my circle up top. Usually less wood there, and it also provides a firm platform for use of a circle jig and for trimming the ends at an angle for weight and balance, as well as making sure that I'm getting the best diameter I can out of a piece with a tool a bit more capable of making a fair circle than my chainsaw. What's up top isn't too important before roughing, and I can also cheat a bit and gouge out heart checks so they won't grow, knowing that the sides will retract anyway.
Human-power? Who, me work???
Never let it be said that this 63 year old will drop a bead of sweat that he can avoid by the use of electricity, hydraulics or even leverage! (And I also was in SAC - about ten years out of twenty.)
Never let it be said that this 63 year old will drop a bead of sweat that he can avoid by the use of electricity, hydraulics or even leverage! (And I also was in SAC - about ten years out of twenty.)
FROM ROUND - TO SQUARE - TO ROUND AGAIN !?!? US WOODTURNERS ARE AN INTERESTING BUNCH :cool2:
US WOODTURNERS ARE AN INTERESTING BUNCH :cool2: