• Beware of Counterfeit Woodturning Tools (click here for details)
  • Johnathan Silwones is starting a new AAW chapter, Southern Alleghenies Woodturners, in Johnstown, PA. (click here for details)
  • Congratulations to Peter Jacobson for "Red Winged Burl Bowl" being selected as Turning of the Week for April 29, 2024 (click here for details)
  • Welcome new registering member. Your username must be your real First and Last name (for example: John Doe). "Screen names" and "handles" are not allowed and your registration will be deleted if you don't use your real name. Also, do not use all caps nor all lower case.

burls: how to...

Joined
Jan 20, 2006
Messages
2,051
Likes
356
Location
Martinsville, VA
does anyone have any advice on

burls: how to position on chuck
how to finish
how to choose a shape
:confused:

i am sure there are many other aspects to turning burls that i have not thought of yet
 
Joined
May 16, 2005
Messages
3,540
Likes
15
Position as desired to get the outcome you had in mind. Up, down, sideways, where there's burl the figure's about the same. Pay attention to where straight-grained wood will be in the final product.

Fill cracks, not pits, when finishing. Matter of fact, turn with no outside noise and listen as you're turning for the first "click" that could mean a revealed fault. Stop, find, glue, or be prepared to eat your project.


Safest way to choose a shape is to find what it will give you, then ask your wife her opinion.
 

Bill Grumbine

In Memorium
Joined
Feb 1, 2005
Messages
419
Likes
0
Location
Kutztown, PA
Website
www.wonderfulwood.com
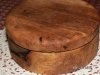
I posted a pictorial on a particular burl last year on Woodnet. Just a few days ago I posted pics of a huge cherry burl, or what I thought was a burl, on a couple of other forums, and one respondent asked if I would post about how I cut it up. I am in the process of that right now, and in fact am trying to make it a general article for my own website. I've since turned a piece, and while I am still not sure it is burl, I am sure it is some of the most highly figured cherry I have ever seen.

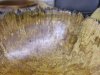
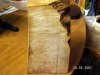
But while it might seem complicated, the process is not always. For most burls, I like to let them set while I study them. I look for inclusions and other divisions on the surface that give natural boundaries for cutting a blank. Once the blank is sawn out, then I think about the best piece to make from it. Small bark inclusions can be ignored, but larger ones need to be taken into account for planning the overall shape and orientation of the piece. Large inclusions can make for a very pretty piece, but if they run through the base, you are pretty much done for. Placement of large inclusions also affect the overall appearance and balance of the piece, both visually and aesthetically.

After looking over the "flaws", then shape comes into play. Is it going to be a bowl or a hollow form? Will it be short and fat, tall and thin, natural edged or finished rim? Do I want to emphasize the eyes or the rays? Eyes and rays are the same figure viewed in two different orientations. These considerations will affect how it goes on the lathe for initial shaping. Sometimes it can start on a faceplate, but most often I will start a burl between centers. This offers a huge advantage in that the piece can be reoriented as it is turned if certain characteristics need to be addressed. Voids and inclusions are the chief culprits in causing a shift in the piece, and you will never know until you get into it.

After all that, I sand as much of it on the lathe as I can like I would a regular bowl or hollow form. Often burled pieces require some off the lathe work in the sanding dept. I will oil them or varnish them, although I am starting to think about trying spraying some lacquer. Buffing a burl on a wheel is almost never a good idea, unless you like picking millions of bits of lint out of your piece after the buffing is done. I usually end up waxing them by hand with Butchers, Mylands, or whatever I have in the can at the time, and then blowing out any wax accumulation in the voids with compressed air.

I hope this helps, and when I get my pictorial done, I will at least post a link here, as long as that is okay with the moderators.

Bill
 
Last edited:
Joined
Jan 20, 2006
Messages
2,051
Likes
356
Location
Martinsville, VA
attempt

i am trying a small box in burl from mytle

Do I want to emphasize the eyes or the rays? Eyes and rays are the same figure viewed in two different orientations.

the eyes seem to run up the sides of this box and the rays across the top, if this correct it seems to make a big difference which way you chuck the blank
:D :confused:
 

Attachments

  • burlboxmytle.JPG
    burlboxmytle.JPG
    69.3 KB · Views: 28
Joined
May 29, 2004
Messages
995
Likes
2
Location
billerica, ma
Charlie, I think that piece would be best positioned on my lathe in Billerica, MA. I can send you my address.

Beyond that, you could turn a nice, shallow vase with it and cap it with the piece on top. This would let you emphasize rays across the piece moving to eyes on the side. Best of both worlds.

mounting it with the bottom pictured as the bottom, you could do a shallow curve from center out, reverse the curve for a slight cove for about 1/2" at center line, then shallow curve to center of base. Hard to describe but, with the top, you'd have about 1 1/2" of rim, a flat/concave vertical on the side, then about 2-3" base before you reached your ring/pedestal. Cap with a continuation of the top curve made with the second piece and throw in a nice, dark wood finnial.

Does that make any sense?

Dietrich
 

Bill Grumbine

In Memorium
Joined
Feb 1, 2005
Messages
419
Likes
0
Location
Kutztown, PA
Website
www.wonderfulwood.com
it seems to make a big difference which way you chuck the blank

It does. On burls where eyes and rays are prominent, like maple, some cherry, and a lot of exotics, you need to decide what you want to see where. I personally like to see rays on the sides and eyes on the top and bottom, but that is personal preference. I am attaching two pictures to show you what I am talking about to make sure we are on the same page here. In the first picture (which is not really the best, but is what I have) you can see the eyes in the bottom of the bowl. In the second picture of the same bowl, you can see how those eyes are actually rays running through the burl, and which terminate in spikes. So, when you are looking at the eyes, what you are seeing are the cross sections of the rays.

Bill
 

Attachments

  • burleyes.jpg
    burleyes.jpg
    76.5 KB · Views: 34
  • burlrays.jpg
    burlrays.jpg
    70.8 KB · Views: 35
Joined
Jan 20, 2006
Messages
2,051
Likes
356
Location
Martinsville, VA
unknown burl

I personally like to see rays on the sides and eyes on the top and bottom

i have another piece of burl of unknow wood dimensions 3x4 1/4x 8

i think i like the eyes on the sides and top and bottom

if i can find a smaller face plate (less than 3") i will try another couple of boxes

boxes seem to me to be the easiest way to experiment with burls

i may try the rays on the side and the eys on top/bottom also, i think i would have like it better that way than the way i did myrtle :D

For most burls, I like to let them set while I study them. i am starting to understand that statement, there are several possibilities!

dietrich even though it was sunday i still checked the mail for that yew :cool2:
 

Attachments

  • unknownburl.JPG
    unknownburl.JPG
    62.6 KB · Views: 31
Last edited:
Joined
May 29, 2004
Messages
995
Likes
2
Location
billerica, ma
It should get there today or tomorrow. Sent it on Thurs.

Gotta say, the maple I sent isn't as nice as what you got there. Call me old fashion but I'd end up making one large bowl or vase out of it. Very simple form to show off the grain. Many coats of urathane oil/danish oil. Buff the crap out of it, then laquer it. Lots of effort but, with really figured wood, well worth it.

Dietrich
 
Back
Top