• It's time to cast your vote in the January 2025 Turning Challenge. (click here for details)
  • Conversations are now Direct Messages (click here for details)
  • Congratulations to Alan Weinberg for "Elm Burl Bowl" being selected as Turning of the Week for January 27, 2025 (click here for details)
  • Welcome new registering member. Your username must be your real First and Last name (for example: John Doe). "Screen names" and "handles" are not allowed and your registration will be deleted if you don't use your real name. Also, do not use all caps nor all lower case.

Beading basket illusion inside a short cylinder?

Joined
Dec 4, 2018
Messages
80
Likes
123
Location
Milon La Chapelle France
Website
www.youtube.com
Bitten by the basket illusion bug, I have been thinking for some time about trying to turn a Yokut Indian rattlesnake basket as a not too distant future project. These were used in ceremonies where the snake was introduced via a cylindrical opening. The problem is how can I bead the interior of the wide mouth cylinder, since it's visible? I’m using a midi-lathe so the diameter of the basket must not exceed 10” to 11”; that makes the snake entry about 5 1/2 “ wide at most and 2” deep. It’s obvious to me that one can cheat (improvise :rolleyes:) a bit by making the top of the basket as a lid, but that still leaves the visible part of the cylinder to bead. I would guess that I need to make a bent tool. Any ideas from the experienced basket illusion makers? I believe Jim Adkins made one (or more ?) of these. As a help I’ve made a rough sketch of such a design below.
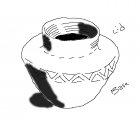
Yokut rattelsnake basket sketch.jpg
 
I don't know, but I have been contemplating the same thing myself. I suppose that you could cut a beading tool in half since there isn't much leverage needed. You would just need to be careful about making a good bead. I've been told that Jim also modified some burning tools to work in close quarters, but I haven't asked him what tools he uses. When I talked to him at SWAT last year he said that he made the hollowform type baskets in two halves that are glued together. I have experimented with different types of glue and found epoxy to be the best for this purpose because it is the only one that doesn't bleed through thin walls. Polyurethane was the worst by far because it expands and foams.
 
I don't know, but I have been contemplating the same thing myself. I suppose that you could cut a beading tool in half since there isn't much leverage needed. You would just need to be careful about making a good bead. I've been told that Jim also modified some burning tools to work in close quarters, but I haven't asked him what tools he uses. When I talked to him at SWAT last year he said that he made the hollowform type baskets in two halves that are glued together. I have experimented with different types of glue and found epoxy to be the best for this purpose because it is the only one that doesn't bleed through thin walls. Polyurethane was the worst by far because it expands and foams.
Bill, thanks I'll keep epoxy in mind! I suspected the need to work on separate halves (lid & base). A short beading tool on a right-angle arm (used like hollowing tool is what I was thinking). Some experimenting is needed there. A bent/short pyrography pen tip should be doable... as long as I don't need a periscope to see what I'm doing in there.:D
 
Bill, golly I just came across a two year old post of yours about Lincoln Seitzman and his #193 Yokut Snake Basket Illusion at the Smithsonian American Art Museum. It's a beautiful piece done on this theme. Is there any info around about his tools for that?
If I'm not mistaken I think Lincoln's work was all done with inks/pens, etc. No bead cutting involved. I know that was true for his early works....but, I could be wrong.
 
Bill, golly I just came across a two year old post of yours about Lincoln Seitzman and his #193 Yokut Snake Basket Illusion at the Smithsonian American Art Museum. It's a beautiful piece done on this theme. Is there any info around about his tools for that?

He may have made his own tool to do the beading. I have tried using the old Sorby beading scrapers and wasn't impressed. The design tends to pull the tool into the cut which leads to tear out and difficulty in maintaining tracking in face grain orientation. The D-Way beading tools were a great design improvement and now I see copycats of Dave's design.

If I'm not mistaken I think Lincoln's work was all done with inks/pens, etc. No bead cutting involved. I know that was true for his early works....but, I could be wrong.

If you look at the full size images (use the magnifying glass tool) you can see that beading (warp) was used to create the illusion of a coiled basket, but the weaving (weft) illusion was created with a pen and ink rather than pyrography. The introduction of pyrography (by David Nittmann?) to create texture in the weft was a major advancement in the state of the art.
 
I am currently doing a Washoe Degikup basket illusion from Louisa Keyser with burning inside and outside. I didn't want to write something about it until I was done, but because you asked John I would like to share what I am doing. Please see the PDFs attached.
When I am done I will write the complete history of the make-up of that one. I had a blow-up on the top part in 4 pieces when I was 1 1/4" inside. I glued it back with epoxy because I didn't want to lose that piece of wood coming from Jim Adkins.
 

Attachments

You could use an Hex key to do a beading tool for the neck of the basket. If you want to do the inside the easy way is to do it in two parts where your split will be at the tangent of your curve (the larger diameter) and then glue the two parts when the inside is done.
upload_2019-4-18_16-42-42.png
 
He may have made his own tool to do the beading. I have tried using the old Sorby beading scrapers and wasn't impressed. The design tends to pull the tool into the cut which leads to tear out and difficulty in maintaining tracking in face grain orientation. The D-Way beading tools were a great design improvement and now I see copycats of Dave's design.


If you look at the full size images (use the magnifying glass tool) you can see that beading (warp) was used to create the illusion of a coiled basket, but the weaving (weft) illusion was created with a pen and ink rather than pyrography. The introduction of pyrography (by David Nittmann?) to create texture in the weft was a major advancement in the state of the art.
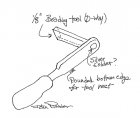
Thanks Bill for the information. I really wasn't aware of the history behind the basket illusion art. As for the tool I was thinking about to do the inside of the cylindrical mouth (perhaps from each side if I split off the lid as I expect) here's a rough sketch of the idea. As a D-Way beading tool user I'm convinced about the efficiency of Dave's tool, so that would be the best choice. Any suggestions?
Inner wall beading tool.jpg
 
I am currently doing a Washoe Degikup basket illusion from Louisa Keyser with burning inside and outside. I didn't want to write something about it until I was done, but because you asked John I would like to share what I am doing. Please see the PDFs attached.
When I am done I will write the complete history of the make-up of that one. I had a blow-up on the top part in 4 pieces when I was 1 1/4" inside. I glued it back with epoxy because I didn't want to lose that piece of wood coming from Jim Adkins.
Jean-Louis that's great! I was thinking about heading that direction for the lid of a Yokut basket and your PDF's are very clear. I'm excited to see your finished piece. Your joined sections are quite impressive; did you have trouble getting the pieces together, the joints seem very thin?

I'll experiment with the hex key idea inside a cylindrical opening just to get a feel about how such a tool should work.
 
If a D-Way tool could be heated and bent about 30° that might be enough to have sufficient clearance. We might need a right hand and left hand beading tool. I have an extra ⅛" beading tool that has an asymmetric shape that I don't use, but it would be useful to see if I could modify it to work in tight quarters.
 
I don't understand the rounded bottom edge for tool rest. Is there a second tool rest involved?
I was thinking of using this tool like a hollowing gouge, with the tool rest outside of the cylinder and perpendicular to the lathe axis (a 5 1/2" wide mouth doesn't leave a lot of room for the tool rest inside). The rectangular tool bar's rounded bottom would be the pivot point for the beading tool. A rotation of the handle would make the cut.This would allow some control on the position of the tool bar axis which should be parallel to the cylinder's inner wall and horizontal, and this would present the beading tool end itself at the correct angle (vertical plane) to the wall. If that's not clear I'll make another sketch.
 
I think that I understand, but that sounds like a very long overhang where you need very precise control of the tool's position.
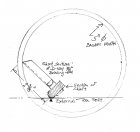
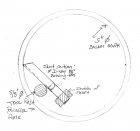
I've made two sketches to show how it might work. I 'm using a typical angle of attack for the D-Way tool which clearly limits things in both cases. In version A let's assume the tool rest is outside (but close to) the cylinder to be beaded. The overhang is 2 3/8" in this view, but one needs to take care that the shaft remains horizontal. In version B let's assume a small diameter (5/8") steel rod is used as a tool rest placed inside the cylinder parallel to its axis. The overhang is clearly improved and the tool can be a bit longer , but there's not much space and the shaft is coming out parallel to the tool rest which may be a problem. Fun, but needs more thought...

Tool use version A.jpg Tool use version B.jpg
 
I've made two sketches to show how it might work. I 'm using a typical angle of attack for the D-Way tool which clearly limits things in both cases. In version A let's assume the tool rest is outside (but close to) the cylinder to be beaded. The overhang is 2 3/8" in this view, but one needs to take care that the shaft remains horizontal. In version B let's assume a small diameter (5/8") steel rod is used as a tool rest placed inside the cylinder parallel to its axis. The overhang is clearly improved and the tool can be a bit longer , but there's not much space and the shaft is coming out parallel to the tool rest which may be a problem. Fun, but needs more thought...

View attachment 28894 View attachment 28893


A couple of comments John. First, with an concave surface of that small radius, I suspect that a peeling cut as shown would be self-feeding and potentially disastrous. A downward-angled scraping cut would be safer. In any case, you certainly would want to get a bit of experience with scrap wood before risking it on your project. Second, if you are able to do a bit of tooling to adapt your beading tool to fit, a captured boring bar would be my preference. With the tool rest just outside the neck of the workpiece, the overhang would be well within the capability of even the smallest captured system.
 
A couple of comments John. First, with an concave surface of that small radius, I suspect that a peeling cut as shown would be self-feeding and potentially disastrous. A downward-angled scraping cut would be safer. In any case, you certainly would want to get a bit of experience with scrap wood before risking it on your project. Second, if you are able to do a bit of tooling to adapt your beading tool to fit, a captured boring bar would be my preference. With the tool rest just outside the neck of the workpiece, the overhang would be well within the capability of even the smallest captured system.
Dennis, thanks for the warning and for joining in this brainstorming. Basing the idea on the D-Way design may be the problem (but it works so well otherwise). As I use the tool always stem/handle down, I'm fairly sure that the bead won't be round if I use the stem higher (scraping as you suggest). Some experimenting is in order there. I'm sure you're correct about capturing being a safer solution, but the detail is that we rock the beading tool very slightly to make the round. If I capture the tool this would be difficult to do. Otherwise... yes scrap wood will be necessary.
 
How about using a thread cutting jig modified to provide a consistent depth of cut 360 degrees inside the work piece. Back the work piece off of the cutter blade and move the work piece in several millimeters and bring the cutter blade back into the work piece. Instead of using the thread pitch on the thread cutting jig to control the rotation of the work piece you could mount a live center that would allow the work piece to be turned by hand. The threaded shaft of the threading jig would control the distance the cutting blade is moved for each bead of the basket.
 
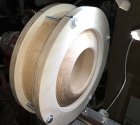
I just did this few minutes ago to show what you could do with an Hex key. You can adjust the beading shape to match your beading tool. I modified mine. I will use a 5/8" round tool rest parallel to the lathe bed close to the work piece. You could hold your piece with a donut chuck for example if you have a top and bottom parts.
upload_2019-4-19_12-11-53.jpegupload_2019-4-19_12-12-20.jpegupload_2019-4-19_12-15-21.jpeg
 
I just did this few minutes ago to show what you could do with an Hex key. You can adjust the beading shape to match your beading tool. I modified mine. I will use a 5/8" round tool rest parallel to the lathe bed close to the work piece. You could hold your piece with a donut chuck for example if you have a top and bottom parts.
View attachment 28899View attachment 28900View attachment 28901
Jean-Louis, thanks again, you're great! The beading angle of your ground hex key seems much better (and simpler) than the modified D-Way tool for this case. The 5/8" rest parallel to the bed looks like the right solution (Bill, with good reason, didn't like the overhang on my scheme). Taking some care this should be fine for the inner wraps. Best of all, your idea will work on even smaller diameter basket mouths (I have a small midi-lathe). Sincerely, many thanks for the speedy test!
 
Whatever method you use I think it would be a good idea to use the tool a little above center when doing the interior to reduce the tendency to self feed.
I'll keep that in mind when I begin some trials on scrap wood. If I understand correctly this should also show up when beading the inside of a steep walled bowl.
 
Little late to the party here but I have seen Jim's beaded inside pieces. He uses tenons on the top and bottom to do the inside beading, then colored and burned before putting them back together. He makes a joint like Jean-Louis shows in his second reply to put the two pieces back together. I made a beading tool out of a piece of hard steel that is about 1.5" long that I use in a hollowing rig to do inside the neck. Otherwise I only use a D-way 1/8" beading tool. The D-way beading tool does not self feed, used like a negative rake scraper. I sell quite a few of the Indian Style baskets and doubt that I can justify the time to do the inside in the price that I get for a piece.
 
Little late to the party here but I have seen Jim's beaded inside pieces. He uses tenons on the top and bottom to do the inside beading, then colored and burned before putting them back together. He makes a joint like Jean-Louis shows in his second reply to put the two pieces back together. I made a beading tool out of a piece of hard steel that is about 1.5" long that I use in a hollowing rig to do inside the neck. Otherwise I only use a D-way 1/8" beading tool. The D-way beading tool does not self feed, used like a negative rake scraper. I sell quite a few of the Indian Style baskets and doubt that I can justify the time to do the inside in the price that I get for a piece.
Steve, thanks for the information. The DIY hard steel beading tool for the neck interior, as you and Jean-Louis pointed out looks good to me. As for beading the inside... no chance I'll be selling any pieces here in France... so its only a question of fun (pr passion?). Up to now the exterior is enough of a challenge for me. :D
I enjoyed the pieces you posted some time ago.
 
... difficult to give "obsolescence" as an argument to my finance minister :rolleyes:).

You are an emerging artist. Tell your finance minister that I said so .... :D

..... I sell quite a few of the Indian Style baskets and doubt that I can justify the time to do the inside in the price that I get for a piece.

I justify the time because I claim that my basket illusions are "priceless" (sounds more impressive than "free"). :rolleyes: :D
 
Way off topic John, but are you near Versailles? I had the good fortune to spend a couple of weeks last September touring the greater Normandy/Loire Valley region, including a visit to Versailles.
 
Way off topic John, but are you near Versailles? I had the good fortune to spend a couple of weeks last September touring the greater Normandy/Loire Valley region, including a visit to Versailles.
Glad that you enjoyed your visit here. In fact you weren't far from our home (we could have gotten together). I’m about 6 miles (9.6 km), as the crow flies, southwest of the Versailles chateau. Our small village is in the Chevreuse valley region (Yvette River) not far from the ruins of the Port-Royal-des-Champs abbey. In fact our village has a small connection with the American Revolution. Johann De Kalb, known in the U.S. as a major general of the Continental Army, was the owner of the Milon la Chapelle chateau below us in the valley (still occupied today). De Kalb came during the Revolution along with another very famous Frenchman, Lafayette.He never returned to Milon because he died after being seriously wounded in the Battle of Camden.
 
Back
Top