-
April 2025 Turning Challenge: Turn an Egg! (click here for details) -
Congratulations to Kelly Shaw winner of the March 2025 Turning Challenge (click here for details) -
Welcome new registering member. Your username must be your real First and Last name (for example: John Doe). "Screen names" and "handles" are not allowed and your registration will be deleted if you don't use your real name. Also, do not use all caps nor all lower case.
You are using an out of date browser. It may not display this or other websites correctly.
You should upgrade or use an alternative browser.
You should upgrade or use an alternative browser.
4 legged crotch
- Thread starter Mike Selser
- Start date
I can't wait to hear what folks say and to see what it looks like on the inside!
R
R
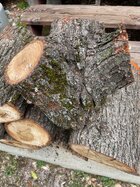
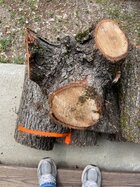
Mike, this is going to be a very interesting thread. I have two crotches on the drying shelf waiting to be processed. I have been too embarrassed to post. I'm glad you did.The power company cut down some trees in my neighborhood and I picked up some pieces. Any idea on how to process this?
View attachment 74007View attachment 74008
I think this is the last place you should feel embarrassed to ask anything. People are always willing to help anyone here.
I am seeing a main trunk and three side branches. Since all of the side branches are at roughly the same height, I would try for a single turned, thin wall, end grain bowl and let it warp during drying. I would let the edge be live edge (no bark) and if the chain saw cuts are still there when you have finished shaping either leave them or embellish after drying. All of the different piths are going to be challenging to avoid splitting and cracking.
Good luck and safe turning.
Good luck and safe turning.
Consider getting this book. I don’t remember if it covers 3-way crotches but if not, it’s still incredibly useful.
A visitor used it today when I was cutting log sections into blanks for him.
JKJ
A visitor used it today when I was cutting log sections into blanks for him.
JKJ
Thanks. I was afraid I might hear something like this. I’ve never done end grain hollowing (except pepper mills and salt shakers and they’re hollowed with a forstner bit!) and I’m not about to learn on this piece. If that’s the way to go I’ll just set it aside and practice on something else.I am seeing a main trunk and three side branches. Since all of the side branches are at roughly the same height, I would try for a single turned, thin wall, end grain bowl and let it warp during drying. I would let the edge be live edge (no bark) and if the chain saw cuts are still there when you have finished shaping either leave them or embellish after drying. All of the different piths are going to be challenging to avoid splitting and cracking.
Good luck and safe turning.
I just looked at a bucket of books I picked up at an estate sale and that book was in there! I’ll have to do some studying.Consider getting this book. I don’t remember if it covers 3-way crotches but if not, it’s still incredibly useful.
A visitor used it today when I was cutting log sections into blanks for him.
JKJ
Edit: Nothing on 3-way crotches but a very interesting book nonetheless.
Last edited:
The latest edition of Michael O'Donnell's Turning Green Wood book has three chapters on turning end grain, two bowls and a goblet. Since you already have long grain / spindle turning skills from your pepper mills this isn't a long reach. From your photo it appears that you have stock to practice on. You are the only judge that matters on your comfort level taking on such a project. I suspect if you kick this can too far down the road / too often you'll have a lot of splitting / checking to work around.Edit: Nothing on 3-way crotches but a very interesting book nonetheless.
I find turning green wood very enjoyable. The wood is much easier to cut when it is wet.
Last edited:
I just looked at a bucket of books I picked up at an estate sale and that book was in there! I’ll have to do some studying.
Edit: Nothing on 3-way crotches but a very interesting book nonetheless.
Yes, I checked a little while ago after I fed the horses. It has several good diagrams and option for “normal” 2-way crotches. I copied all their diagrams to keep them handy in the shop.
- Joined
- Apr 27, 2004
- Messages
- 9,139
- Likes
- 5,745
- Location
- Lakeland, Florida
- Website
- www.hockenberywoodturning.com
Do be on the look out for bark inclusions. The bark stiching on the left is often a predictor of a bark inclusionAny idea on how to process this?
If you try a bowl I show with 3 high rims and there is a bark inclusion that left side might break off when you cut away the connecting wood and start relying on the bark inclusion to hold the wood together. It won’t
Hope I’m wrong about the bark inclusion. Could a fun turn and yield a nice 3 tall rim NE bowl.
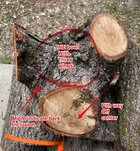
Doesn’t look like the power company left much of the crotch figure in your piece.
You need to look for structural integrity. If you don’t have it for a bowl then cut it into small pieces.
If I’m not ready to turn it yet should I go ahead and cut the blank to size now or just wait until I can devote a whole day to turning it?
Don’t wait long. It will start splitting from all directions. Just cutting out a solid blank likely won’t keep it from splitting-you’ll have to rough it down to a reasonable shape and thickness, or go ahead and finish turn while it’s still green.If I’m not ready to turn it yet should I go ahead and cut the blank to size now or just wait until I can devote a whole day to turning it?
ne
Sealing the end grain can slow cracking but won’t stop it. And it won’t prevent fungus growth in warm weather. One sure way to preserve the wood for a long time is submerge it in water, called “ponding”. (Query Google with “ponding to preserve green wood”.)
Some benefits:
If it will fit, you can put it in a tub or 55 gal drum, change the water when it gets stale. Weight it down somehow to keep it submerged. A nearby creek will work.
Wood can be kept “fresh” indefinitely by keeping it wet. (timber and logs have been recovered in good condition from the bottom of lakes, rivers, and creeks after many years of submersion. A friend near me has a timberframe house with the support beams dredged from the bottom of the St Lawrence river.
Another way that works well is to freeze it but few people have a big enough freezer! (I did an experiment once on a small piece wrapped in plastic - it was still in good shape after years in the freezer.)
JKJ
If I’m not ready to turn it yet should I go ahead and cut the blank to size now or just wait until I can devote a whole day to turning it?
Sealing the end grain can slow cracking but won’t stop it. And it won’t prevent fungus growth in warm weather. One sure way to preserve the wood for a long time is submerge it in water, called “ponding”. (Query Google with “ponding to preserve green wood”.)
Some benefits:
- Prevents drying and cracking: The water prevents the wood from losing moisture, which is crucial for maintaining its shape and preventing cracks.
- Reduces fungal and insect activity: The water environment reduces oxygen and temperature, making it less hospitable for fungi and insects that can damage wood.
- Easy storage: Ponding is a relatively simple method for storing green wood, especially for larger pieces or logs.
If it will fit, you can put it in a tub or 55 gal drum, change the water when it gets stale. Weight it down somehow to keep it submerged. A nearby creek will work.
Wood can be kept “fresh” indefinitely by keeping it wet. (timber and logs have been recovered in good condition from the bottom of lakes, rivers, and creeks after many years of submersion. A friend near me has a timberframe house with the support beams dredged from the bottom of the St Lawrence river.
Another way that works well is to freeze it but few people have a big enough freezer! (I did an experiment once on a small piece wrapped in plastic - it was still in good shape after years in the freezer.)
JKJ
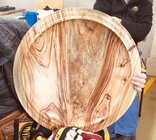
Sliced in two or three with the grain would make some nice plattersThe power company cut down some trees in my neighborhood and I picked up some pieces. Any idea on how to process this?
View attachment 74007View attachment 74008
- Joined
- Apr 27, 2004
- Messages
- 9,139
- Likes
- 5,745
- Location
- Lakeland, Florida
- Website
- www.hockenberywoodturning.com
If I’m not ready to turn it yet should I go ahead and cut the blank to size now or just wait until I can devote a whole day to turning it?
You need to keep it from loosing moisture until you turn it.
Under water, or in a freezer wrapped in plastic will keep it from drying out for years.
Wrapped in plastic bags can keep it for a week or so maybe more but mold and decay get speeded up
Longer than a week in a plastic bag in warm climates is risky.
Could be nice spalt in a 3 months or too soft to turn punky in 2months..
I thought about that but it seems too easy! May have to get some platters if there is bark inclusion like hockenbery mentioned.Sliced in two or three with the grain would make some nice platters
It’s in a plastic trash can with a concrete block on top keeping it submerged in water until I can get to it.You need to keep it from loosing moisture until you turn it.
Under water, or in a freezer wrapped in plastic will keep it from drying out for years.
Wrapped in plastic bags can keep it for a week or so maybe more but mold and decay get speeded up
Longer than a week in a plastic bag in warm climates is risky.
Could be nice spalt in a 3 months or too soft to turn punky in 2months..
Wow, a creek?! Huh, who knew? I have a creek at the end of my backyard. I might have to try this, as the recent super-dry and windy conditions that have caused massive fires all over have also wrought havoc on my wood-pile. Just throw 'em in the creek.ne
Sealing the end grain can slow cracking but won’t stop it. And it won’t prevent fungus growth in warm weather. One sure way to preserve the wood for a long time is submerge it in water, called “ponding”. (Query Google with “ponding to preserve green wood”.)
Some benefits:
You can store the wood indefinitely this way, either by submersion or by spraying it will water. Even a continuous fine mist will work. I’d keep it in the shade.
- Prevents drying and cracking: The water prevents the wood from losing moisture, which is crucial for maintaining its shape and preventing cracks.
- Reduces fungal and insect activity: The water environment reduces oxygen and temperature, making it less hospitable for fungi and insects that can damage wood.
- Easy storage: Ponding is a relatively simple method for storing green wood, especially for larger pieces or logs.
If it will fit, you can put it in a tub or 55 gal drum, change the water when it gets stale. Weight it down somehow to keep it submerged. A nearby creek will work.
Wood can be kept “fresh” indefinitely by keeping it wet. (timber and logs have been recovered in good condition from the bottom of lakes, rivers, and creeks after many years of submersion. A friend near me has a timberframe house with the support beams dredged from the bottom of the St Lawrence river.
Another way that works well is to freeze it but few people have a big enough freezer! (I did an experiment once on a small piece wrapped in plastic - it was still in good shape after years in the freezer.)
JKJ
Wow, a creek?! Huh, who knew? … Just throw 'em in the creek.
Well, throw ‘em in the creek after tying them so they won’t float down stream in the current and add weight so they will be completely submerged!
I used to spray logs in my sawmill yard with a water hose. If the end grain is wet the it can’t dry out and can’t crack.
We have family and friends in SC and some had to evacuate because of the fires - they were given 45 minutes to vacate their property.
There is a long history of logs being submerged and lasting without decay for many years.Sealing the end grain can slow cracking but won’t stop it. And it won’t prevent fungus growth in warm weather. One sure way to preserve the wood for a long time is submerge it in water, called “ponding”. (Query Google with “ponding to preserve green wood”
I my neck of the woods there is the example of logs sinking along the south shore of Lake Superior and being retrieved a hundred or more years later.
The area that I live in the lakes area of Minnesota there are many lakes that were used to float log booms to the mills that still contain sunken logs. My dentist likes to dive and attach cables to some of the logs and tow them with his pontoon boat and eventually drag them up on shore.
Isn’t old growth swamp kauri retrieved from bogs after 40,000 years or more and still in fine shape?There is a long history of logs being submerged and lasting without decay for many years.
I my neck of the woods there is the example of logs sinking along the south shore of Lake Superior and being retrieved a hundred or more years later.
I understand shipwrecks are well preserved in Superior. Hundreds of them, probably.

