• November Turning Challenge: Puahala Calabash! (click here for details)
  • Sign up for the AAW Forum Pre-Holiday Swap by Monday, November 4th (click here for details)
  • Congratulations to Ted Pelfrey for "Forest Floor" being selected as Turning of the Week for November 4, 2024 (click here for details)
  • Welcome new registering member. Your username must be your real First and Last name (for example: John Doe). "Screen names" and "handles" are not allowed and your registration will be deleted if you don't use your real name. Also, do not use all caps nor all lower case.
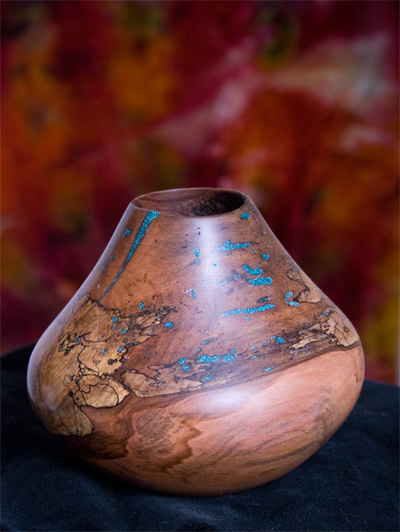
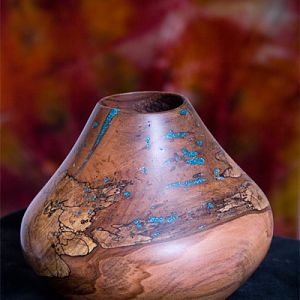
Spalted Dogwood hollow form
Truffuls

Spalted Dogwood hollow form

From the same wood as my Bow Wow ornament and my Dogwood Bowl.

Called "On the Brink" because the wood was almost too far gone to use. I was determined as it was too pretty to give back to Mother Nature.

Turned wet down to final thickness between 1/16 - 1/8". Nooks & crannies filled with holographic turquoise powder.

I plan on displaying this at the Instant Gallery in Richmond. I'm nervous as this is my first time. A Instant Gallery Virgin.... be kind!
Looks to me like it's nicely done, and I like the turquoise in it. I'm curious how hard that is to do. Maybe you could PM me about it.
 
Filling a void is quite simple actually. There are two things to consider at the start: The size ratio of the void to the filler and, second, the ability to use your turning tools to level off the fill without damaging the piece or the tool.

If you want to try your hand at it, grab a piece with voids and chuck it up. Give the surface a quick coat of sanding sealer or other finish. Doing so keeps the CA or filler from staining the surrounding areas and also makes it a bit easier to clean up.

Grab your coffee grinder and some coffee beans. Pulse grind the coffee until you think it is fine enough to fill the void.

If the void is smallish, rather than a gaping hole, just put some of the grind in the void trying to pack it in firmly and flood the area with Super Thin CA. If it is a gaping hole, first use a small wad of toilet or tissue paper to plug one side, then add the filler and then the CA.

Don't try to fill the entire void in one go, do it in stages until it is proud of the surface. Let it sit for a while and then use your tool of choice, fresh from the grinder, to clean up the surface.

In the case of the gaping void, after one side has set, use a dental pick or straight pin to get the paper out of your way, it doesn't all need to be removed. Then repeat the fill/CA process till that side is full and then clean the surface.

I mostly use Mica mineral powders, but you can use Interlace or ground Turquoise and other minerals. The one thing to consider is the easy of leveling the fill off without destroying your tools (don't use granite as a fill!).

You can also visit your local hardware store and ask for the key filings. Brass & copper filings make fabulous filler.
 
This piece is so much of what I enjoy doing. To take a weathered hunk and create a beautiful vase or plate. It may take a lot of skill and operate at low speeds to prevent disintegration.

I have had to tape it during turning to hold it to prevent a crack opening and shatter. that optimal conditons. These peices are startling and very beautiful with the forces of nature doing the design. That is the exciting low cost facet: acquire in the rough peices that were destined to stay in the wood stove stack. Many folks will toss these and go for the solid and predictible woods for predetermined designs. But these present opportunities for unique color, design, and structure. Keep on digging for treasures.

Thank you for posting this!
Moses
WWT in Waxhaw NC
 

Media information

Category
Member Galleries
Added by
Truffuls
Date added
View count
3,952
Comment count
3
Rating
0.00 star(s) 0 ratings

Image metadata

Filename
Brink.jpg
File size
74.7 KB
Dimensions
400px x 532px

Share this media

Back
Top