• We just finished moving the forums to a new hosting server. It looks like everything is functioning correctly but if you find a problem please report it in the Forum Technical Support Forum (click here) or email us at forum_moderator AT aawforum.org. Thanks!
  • Beware of Counterfeit Woodturning Tools (click here for details)
  • Johnathan Silwones is starting a new AAW chapter, Southern Alleghenies Woodturners, in Johnstown, PA. (click here for details)
  • Congratulations to Dave Roberts for "2 Hats" being selected as Turning of the Week for April 22, 2024 (click here for details)
  • Welcome new registering member. Your username must be your real First and Last name (for example: John Doe). "Screen names" and "handles" are not allowed and your registration will be deleted if you don't use your real name. Also, do not use all caps nor all lower case.

Using the butterfly spines for a bowl crack

Joined
Nov 1, 2013
Messages
325
Likes
733
Location
Gulfport, MS
Website
www.woodtreasuresbybreck.com
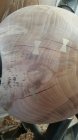
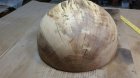
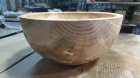
I have seen a few bowls that had cracks that were fixed using a butterfly spline or bowtie spline. What I am interested in is hearing from those of you who have actually used them for a bowl any tips or advice to using that technique. I have made these type of splines on regular boards back when I did flat work, but never on a curved surface like a large bowl. I figure any successful experienced advice might save me a lot of time and wasted effort. Thanks
 

john lucas

AAW Forum Expert
Joined
Apr 26, 2004
Messages
8,337
Likes
3,595
Location
Cookeville, TN
I've only done a few. The trick is getting the routing jig stuck securely to the vessel so it doesn't move when routing. Mine was on large bowl so the radius wasn't as small. I simply used some fat double stick tape I had. I would have to rig up something else for a smaller bowl or vessel with a tighter radius.
 

Bill Boehme

Administrator
Staff member
Beta Tester
TOTW Team
Joined
Jan 27, 2005
Messages
12,898
Likes
5,188
Location
Dalworthington Gardens, TX
Website
pbase.com
This is probably obvious, but patch the turning before doing the finish turning. If I were doing it, I would use a flat clear plastic surface for the router so that it wouldn't rock while routing the cut out.
 
Joined
Aug 6, 2009
Messages
707
Likes
506
Location
Lummi Island, WA
Breck - Interesting since I just began doing a couple of crack repairs using bowties. I've only done a few, the first were with a router inlay kit (comes with a router base plate bushing that has a removable collar and an 1/8th inch downcut straight bit) that allows you to make both the inlay and the mortise it sits in with the same template. I used a template with many different sizes of inlays (mistake). I wound up cutting this down into smaller more manageable pieces with just the two templates I thought I needed.
I used hot glue to mount the template on the bowl - worked fine as long as you let it cool before use it is really solid. I used a laminate trimmer router - smaller is better.
Everything worked fine so far, but...I'd recommend going to stebbinsstudio.com and buying the template you need along with the pre-cut splines that go along with the template. Much easier than cutting your own - less waste, time and effort.
They've got good information there as well.
It's not too difficult if you've got a little experience with a router.
 

Emiliano Achaval

Administrator
Staff member
Beta Tester
TOTW Team
Joined
Dec 14, 2015
Messages
3,316
Likes
4,267
Location
Maui, Hawaii
Website
hawaiiankoaturner.com
Disappointed to see nobody here has read my 5 page article on Woodturning Magazine UK LOL It's about Hawaiian bowl repairs, included in the article is how to apply pewa patches. Bill, you first finish the turning, then start sanding, once you are around 120 grit, stop and do the repairs... Breck, if you have any questions let me know, I'll be glad to help.
 

Emiliano Achaval

Administrator
Staff member
Beta Tester
TOTW Team
Joined
Dec 14, 2015
Messages
3,316
Likes
4,267
Location
Maui, Hawaii
Website
hawaiiankoaturner.com
I read your article, but my memory retention isn't too good anymore. You might even say that it is terrible. If I lay a tool down, five seconds later I can't find it. I would buy a bunch of Post-It notes, but I would lose them too.
Today I was walking back to the lathe with the Thin CA, I keep it in the refrigerator in the shop. Then the phone rings... After talking a while, I forgot what I was doing, then I remembered but I could not find the CA for another 30 minutes... One of my live remote demos is the Hawaiian bowl repairs, just in case someone is looking for a demo.... Aloha
 
Joined
Jan 20, 2006
Messages
2,051
Likes
355
Location
Martinsville, VA
pox on me......I had always assumed that you did it with chisel and carving knife, then finished outside turning.....then hollowed.......I thought Hawaii an was done by hand as the bowls cracked

A little disappointed
 

Emiliano Achaval

Administrator
Staff member
Beta Tester
TOTW Team
Joined
Dec 14, 2015
Messages
3,316
Likes
4,267
Location
Maui, Hawaii
Website
hawaiiankoaturner.com
pox on me......I had always assumed that you did it with chisel and carving knife, then finished outside turning.....then hollowed.......I thought Hawaii an was done by hand as the bowls cracked

A little disappointed
I do mine with the basalt stone adzes that you can see in the article. I then go fishing for sharks so I can use the skin for sand paper.
 

Emiliano Achaval

Administrator
Staff member
Beta Tester
TOTW Team
Joined
Dec 14, 2015
Messages
3,316
Likes
4,267
Location
Maui, Hawaii
Website
hawaiiankoaturner.com
I thought pewas grew in Hawaiian trees :)
Hawaiian language has no plural. One pewa. Two pewa. I interviewed a Kumu Hula about calabash uses, got to know her well and she proof reads my articles when I have Hawaiian words in it.
 

hockenbery

Forum MVP
Beta Tester
TOTW Team
Joined
Apr 27, 2004
Messages
8,638
Likes
4,977
Location
Lakeland, Florida
Website
www.hockenberywoodturning.com
Hawaiian language has no plural. One pewa. Two pewa. I interviewed a Kumu Hula about calabash uses, got to know her well and she proof reads my articles when I have Hawaiian words in it.
Thanks. I did not expect to learn any thing today!

I really appreciate the historical perspective you share with us.
 
Joined
Oct 25, 2005
Messages
935
Likes
241
Location
Newberg, OR: 20mi SW of Portland: AAW #21058
The trick is getting the routing jig stuck securely to the vessel so it doesn't move when routing. Mine was on large bowl so the radius wasn't as small. I simply used some fat double stick tape I had. I would have to rig up something else for a smaller bowl or vessel with a tighter radius.

I use shims (have 2 diameters of shish kabob sticks) between the template and bowl to keep the rocking to a minimum and then hot glue the whole shebang in at least 4 places. Once cooled, the glue holds very firmly but will release with some outward pressure. Any glue on the bowl comes off pretty easily by picking, scraping and sanding.
 

Emiliano Achaval

Administrator
Staff member
Beta Tester
TOTW Team
Joined
Dec 14, 2015
Messages
3,316
Likes
4,267
Location
Maui, Hawaii
Website
hawaiiankoaturner.com
I use shims (have 2 diameters of shish kabob sticks) between the template and bowl to keep the rocking to a minimum and then hot glue the whole shebang in at least 4 places. Once cooled, the glue holds very firmly but will release with some outward pressure. Any glue on the bowl comes off pretty easily by picking, scraping and sanding.
Since you don't mention it, I'm guessing that you don't first apply painters tape to the surface around where you marked the pewa. It is much easier, no clean up, the hot melt glue comes off with the tape. I also use shims, not always, I look for them around the bandsaw, somehow I always find the perfect size in the scraps pile. It's worth mentioning that DeWalt has a new ceramic tip glue gun. Heats up within seconds. It's about $20 at Lowe's or Home depot, I forgot which one, only one carries it, worth the investment, it's how hot glue gun are meant to be...
 

Emiliano Achaval

Administrator
Staff member
Beta Tester
TOTW Team
Joined
Dec 14, 2015
Messages
3,316
Likes
4,267
Location
Maui, Hawaii
Website
hawaiiankoaturner.com
Thanks. I did not expect to learn any thing today!

I really appreciate the historical perspective you share with us.
I'm a history buff, I enjoy reading history books. Also, when I write my articles, if I make a historical reference, rest assured that I have double checked it. Lots of things are speculation and or educated guesses when it comes to the ancient Hawaiian craft maker. There is nothing documented or anything about them. The only reference is one craft man name Kiana, he made items for King Kamehaha , one item given to the Bishop museum had his name on it. The only ancient Hawaiian artifact with the maker's name. Moral of the story: sign your work! LOL
 
Joined
Jan 24, 2010
Messages
3,058
Likes
901
Location
Cleveland, Tennessee
Kamehameha? Or is Kamehaha another Hawaiian king? Not familiar with the local history, obviously.
Emiliano, I enjoy your posts here. I have studied four languages and find the Hawaiian language to be most interesting. Aloha!
 

Emiliano Achaval

Administrator
Staff member
Beta Tester
TOTW Team
Joined
Dec 14, 2015
Messages
3,316
Likes
4,267
Location
Maui, Hawaii
Website
hawaiiankoaturner.com
Kamehameha? Or is Kamehaha another Hawaiian king? Not familiar with the local history, obviously.
Emiliano, I enjoy your posts here. I have studied four languages and find the Hawaiian language to be most interesting. Aloha!
There was a long line of Kamehameha Kings. The most famous was King Kamehameha the V. With help from the western world, mainly canons for his ships, he conquered all the islands. That brought many years were the Hawaiians finally could live in peace and prosper.
 
Joined
Jan 24, 2010
Messages
3,058
Likes
901
Location
Cleveland, Tennessee
Was looking at the spelling as many times names are spelled differently within the same family. I ran into this in several places. Even though people were directly related, the last name was spelled differently, e. g., Simms and Sims.
 
Joined
Jan 20, 2006
Messages
2,051
Likes
355
Location
Martinsville, VA
With no short term memory, I'll have to wait a year before I can remember what I learned today. :D
I use your post today Bill......when I 1st read it I said self.....gotta find a place to use that. Tks
 
Joined
Nov 1, 2013
Messages
325
Likes
733
Location
Gulfport, MS
Website
www.woodtreasuresbybreck.com
Breck - Interesting since I just began doing a couple of crack repairs using bowties. I've only done a few, the first were with a router inlay kit (comes with a router base plate bushing that has a removable collar and an 1/8th inch downcut straight bit) that allows you to make both the inlay and the mortise it sits in with the same template. I used a template with many different sizes of inlays (mistake). I wound up cutting this down into smaller more manageable pieces with just the two templates I thought I needed.
I used hot glue to mount the template on the bowl - worked fine as long as you let it cool before use it is really solid. I used a laminate trimmer router - smaller is better.
Everything worked fine so far, but...I'd recommend going to stebbinsstudio.com and buying the template you need along with the pre-cut splines that go along with the template. Much easier than cutting your own - less waste, time and effort.
They've got good information there as well.
It's not too difficult if you've got a little experience with a router.
Jeff thanks for your advice, I got everything I will need to put butterfly spines into bowls that I need to save now. I agree buying the templet made sense to me as well as buying the spines also. If you don't mind me asking what are the two sizes of templates you bought? I got the next to the largest because I was thinking (which is dangerous) I only plan on using these on large bowls. Thanks again Jeff you saved me a great deal of time and no doubt effort.
 
Joined
Aug 6, 2009
Messages
707
Likes
506
Location
Lummi Island, WA
Breck - I got two templates - the .7 and the .9. I’ve got templates for larger sizes covered, but found them a little too large even for larger bowls. I used the larger size on the first three I did to get the process down, but they’re just marginal on the 12” bowl and way too large for the two smaller test pieces. I like to have options...and most of the pieces I do are 14” or larger.
Now that I’ve got the basic process down, I’m trying to figure out a couple of ‘better ways’ for the areas I felt were slightly troublesome - like how difficult it is to get the router bit cleanly into the template without being able to see where its going to hit the wood (and hopefully not the template) since the router bushing cuts off the view.
I’m also going to reread Emilliano’s article - when in doubt long enough, grab the manual...(I am aware that I’ve got the process inverted, but then I am left-handed, too).
 
Last edited:

Emiliano Achaval

Administrator
Staff member
Beta Tester
TOTW Team
Joined
Dec 14, 2015
Messages
3,316
Likes
4,267
Location
Maui, Hawaii
Website
hawaiiankoaturner.com
Breck - I got two templates - the .7 and the .9. I’ve got templates for larger sizes covered, but found them a little too large even for larger bowls. I used the larger size on the first three I did to get the process down, but they’re just marginal on the 12” bowl and way too large for the two smaller test pieces. I like to have options...and most of the pieces I do are 14” or larger.
Now that I’ve got the basic process down, I’m trying to figure out a couple of ‘better ways’ for the areas I felt were slightly troublesome - like how difficult it is to get the router bit cleanly into the template without being able to see where its going to hit the wood (and hopefully not the template) since the router bushing cuts off the view.
I’m also going to reread Emilliano’s article - when in doubt long enough, grab the manual...(I am aware that I’ve got the process inverted, but then I am left-handed, too).
Jeff, what I do is, Place the router inside the template, hold it firmly, then turn it on. You will never have a problem this way. You will have a problem if you turn on the router first and then go into the template... I also recommend to turn off the router before removing it from the template. It's very tempting to just lift it and then turn it off, but you will damage some templates, trust me on this one, lol What are you using to cut the corners? A sidebar called "The evolution of the cutters" didnt make it into the article. I can take a picture of the one we have been using and recommending. I start the cut from the bottom up, very easy. It's an Exacto cutter with a fat red handle.
 
Joined
Apr 26, 2004
Messages
178
Likes
10
Location
Mercer, WI
Disappointed to see nobody here has read my 5 page article on Woodturning Magazine UK LOL It's about Hawaiian bowl repairs, included in the article is how to apply pewa patches. Bill, you first finish the turning, then start sanding, once you are around 120 grit, stop and do the repairs... Breck, if you have any questions let me know, I'll be glad to help.

What issue was your pewa article in?
 
Joined
Aug 6, 2009
Messages
707
Likes
506
Location
Lummi Island, WA
Jeff, what I do is, Place the router inside the template, hold it firmly, then turn it on.
Emiliano - I do the same - just find it inconvenient to contort around to be able to see where the cutter is actually sitting. I did have success with my first attempts with a more generic template system. I found the excercise of cutting the dutchmen inlays with the same template (rather than buying them precut) was good practice in using the template correctly - after tearing up the template in a few places.
Just got the pewas and template from Stebbins Studio in the mail yesterday; this should greatly simplify the process.
 
Joined
Jan 4, 2012
Messages
185
Likes
26
Location
Ladner British Columbia
Website
woodbowlsandthings.wordpress.com
I've been following this thread with interest. Up to now if a bowl or platter cracked as it dried I just tossed it in the fishing "Fire Pile". How does having these installed affect sales? Or are you just being practical and saving the wood? I also wonder if fancy 'turtle' ones are more sales friendly than the usual square corner or rounded cornered ones are?
 
Joined
Jul 26, 2016
Messages
2,326
Likes
1,105
Location
Nebraska
A person could move beyond the butterfly and carve shapes across the crack and use an epoxy with fibers embedded in the patch to provide the strength for the "patch". This would free up the artistic expression of the craftsman and allow an easy application of the materials to the piece which could then be turned round on the lathe or sanded smooth if you are working a flat piece. You could use wire inlays in the patch and apply a clear epoxy to the patch, kind of like rebar in concrete.
 

Emiliano Achaval

Administrator
Staff member
Beta Tester
TOTW Team
Joined
Dec 14, 2015
Messages
3,316
Likes
4,267
Location
Maui, Hawaii
Website
hawaiiankoaturner.com
Emiliano - I do the same - just find it inconvenient to contort around to be able to see where the cutter is actually sitting. I did have success with my first attempts with a more generic template system. I found the excercise of cutting the dutchmen inlays with the same template (rather than buying them precut) was good practice in using the template correctly - after tearing up the template in a few places.
Just got the pewas and template from Stebbins Studio in the mail yesterday; this should greatly simplify the process.
Here in Hawaii, the turtle patch actually sells the piece well. One of the galleries that sells my stuff is minutes away from Ho’ookipa, where lots of turtles bask in the sun and sleep at night on the beach, it’s like a souvenir of the area...
 

Emiliano Achaval

Administrator
Staff member
Beta Tester
TOTW Team
Joined
Dec 14, 2015
Messages
3,316
Likes
4,267
Location
Maui, Hawaii
Website
hawaiiankoaturner.com
What issue was your pewa article in?
For a while I was able to keep up what article was where. I have had so many now that I can't remember.. I have all the magazines out in my studio, I will check it out for you tomorrow...
 

Emiliano Achaval

Administrator
Staff member
Beta Tester
TOTW Team
Joined
Dec 14, 2015
Messages
3,316
Likes
4,267
Location
Maui, Hawaii
Website
hawaiiankoaturner.com
Emiliano, do you have a plunge router. If not how do you put your router cutter in the template, then turn it on? I'd love to see how you clean up the corners. Thank you.
I do not use my plunge router, I use the smallest possible laminate router. It's very easy to control when you turn it on, place it in the center, firmly hold it, turn it on, route the recess... Sorry, I forgot to take a picture of the exacto cutter knife...
 
Joined
Jan 4, 2012
Messages
185
Likes
26
Location
Ladner British Columbia
Website
woodbowlsandthings.wordpress.com
I do not use my plunge router, I use the smallest possible laminate router. It's very easy to control when you turn it on, place it in the center, firmly hold it, turn it on, route the recess... Sorry, I forgot to take a picture of the exacto cutter knife...
Emiliano, I think the question was more related to "How can you put the router in the template when the bit is extending past the template and then turn it on?" Does it not touch the wood before you turn it on? Seems to me that it would be cutting the moment you start the router.
 
Joined
Feb 6, 2010
Messages
2,979
Likes
1,955
Location
Brandon, MS
Emiliano, I think the question was more related to "How can you put the router in the template when the bit is extending past the template and then turn it on?" Does it not touch the wood before you turn it on? Seems to me that it would be cutting the moment you start the router.
In flat work using a fixed router you would tilt the router and touch the base to the workpiece then slowly tilt the bit into the work while maintaining the initial contact with the base. I do not have a pic , looked at youtube but no luck.
 

Emiliano Achaval

Administrator
Staff member
Beta Tester
TOTW Team
Joined
Dec 14, 2015
Messages
3,316
Likes
4,267
Location
Maui, Hawaii
Website
hawaiiankoaturner.com
In flat work using a fixed router you would tilt the router and touch the base to the workpiece then slowly tilt the bit into the work while maintaining the initial contact with the base. I do not have a pic , looked at youtube but no luck.
That sounds right, how I do it...
 

Emiliano Achaval

Administrator
Staff member
Beta Tester
TOTW Team
Joined
Dec 14, 2015
Messages
3,316
Likes
4,267
Location
Maui, Hawaii
Website
hawaiiankoaturner.com
I did a bunch of pewa today. I realized I failed to mention here a very important part of the process, or parts... I do the recess in a series of steps. Minimum of 3. So you start with just a little bit of the spiral cut bit out, and every step you increase the depth. By just doing a little bit at the time makes controlling the router much easier. It hardly moves when you turn it on inside of the template. I finally remembered to take a picture of the. cutter that Mark Stebbins and I have been using. It's by far the best in a long line of different cutters we have been using thru out the years. Start the cut from the bottom up. I would not be surprised if someone finds an even better way and or easier solution. IMG_4322.JPG
 
Joined
Nov 1, 2013
Messages
325
Likes
733
Location
Gulfport, MS
Website
www.woodtreasuresbybreck.com
Well I now have the equipment and the know how to put bow tie splines into bowls. I used an old spalted pecan that I had thrown into what I call my planter pile. The ladies around love them for planters whenever one gets what I call fatal cracks. I Used one of them as test subject for the bow tie splines and after a little learning session I was able to save the bowl to sell one day. Thanks for all the help guys, Jeff thanks especially for the web site and your advice.
 

Attachments

  • pecan bow tie (2).jpg
    pecan bow tie (2).jpg
    252.6 KB · Views: 85
  • pecan bow tie splines.jpg
    pecan bow tie splines.jpg
    230.9 KB · Views: 81
  • pecan bow tie (1).jpg
    pecan bow tie (1).jpg
    215.7 KB · Views: 82
Back
Top