• We just finished moving the forums to a new hosting server. It looks like everything is functioning correctly but if you find a problem please report it in the Forum Technical Support Forum (click here) or email us at forum_moderator AT aawforum.org. Thanks!
  • Beware of Counterfeit Woodturning Tools (click here for details)
  • Johnathan Silwones is starting a new AAW chapter, Southern Alleghenies Woodturners, in Johnstown, PA. (click here for details)
  • Congratulations to Dave Roberts for "2 Hats" being selected as Turning of the Week for April 22, 2024 (click here for details)
  • Welcome new registering member. Your username must be your real First and Last name (for example: John Doe). "Screen names" and "handles" are not allowed and your registration will be deleted if you don't use your real name. Also, do not use all caps nor all lower case.

Stabilizing voids

Joined
Apr 27, 2020
Messages
2
Likes
0
Location
Tucson, AZ
Newbie disclaimer - I've been turning for less than a year, so I apologize if this is a stupid question / obvious answer.

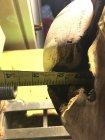
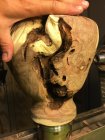
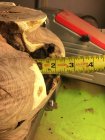
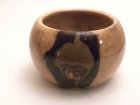
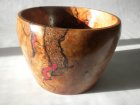
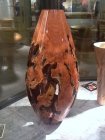
I've got a gorgeous mesquite burl with several deep voids in it, the most concerning is at the base (see pics). Ordinarily I'd fill it with resin, but my otherwise quite reasonable and intelligent wife has decided she hates resin and since this is a present for her, my hands are tied.

Turning the exterior was fine, but I'm worried that without somehow stabilizing the voids, once I start hollowing the middle the piece will loose structural integrity and break apart (not to brag or anything, but I've managed to become quite proficient at taking beautiful pieces of mesquite and mangling them into unrecognizable fragments and shavings...)

Two thoughts I had -
1) 'Painting' the inside of the voids with CA glue with +/- heavy coating of shellac
2) Wrapping the outside with nylon strap and ratchet to mitigate centripetal forces (this makes sense in my head, I can also see it catastrophically failing in my head)

Any advice? Thanks

IMG-1919.jpg IMG-1920.jpg
 

Attachments

  • IMG-1921.jpg
    IMG-1921.jpg
    310.5 KB · Views: 59
  • IMG-1922.JPG
    IMG-1922.JPG
    443 KB · Views: 63
  • IMG-1923.JPG
    IMG-1923.JPG
    367.2 KB · Views: 55
Joined
Oct 11, 2018
Messages
64
Likes
70
Location
Auburn, Alabama
I deal with large voids with a mixture of sawdust and epoxy. When it polymerizes it looks like a bark inclusion. Make dams with masking tape. It may take several applications of the mixture over several days before it's turnable.
 

Attachments

  • 1863.JPG
    1863.JPG
    249.6 KB · Views: 48
  • 1936.JPG
    1936.JPG
    287.9 KB · Views: 43
Joined
Jun 6, 2018
Messages
1,958
Likes
1,004
Location
La Grange, IL
Wrapping the outside with nylon strap and ratchet to mitigate centripetal forces (this makes sense in my head, I can also see it catastrophically failing in my head)

I don't know the overall solution to your problem, but ratcheting a band of nylon webbing around your piece seems like a bad idea to me. I think that would be dangerously unblanced with the metal ratchet and the nylon webbing wouldn't stay in place due to the conical shape of the piece.

Monofilament straping tape would be a better solution for such an application. But while "banding" your blank would tend to keep fragments from flying apart I don't know that it would be very effective at keeping the piece from fragmenting.
 

Dave Landers

Beta Tester
Joined
Dec 1, 2014
Messages
811
Likes
2,487
Location
Estes Park, CO
Website
dlwoodturning.com
The October 2018 American Woodturner had a feature about turning crappy wood. On p28 at the bottom, is a brief insert from Michael Alguire about a technique he calls "Scrap Latching". That just might work for you. I haven't seen any other articles from him about this, but he is scheduled to demo the technique at the Rocky Mountain symposium in September.
 

hockenbery

Forum MVP
Beta Tester
TOTW Team
Joined
Apr 27, 2004
Messages
8,637
Likes
4,976
Location
Lakeland, Florida
Website
www.hockenberywoodturning.com
The big issue i see is the opening near the base where you have air instead of supporting wood. Keeping the form from blowing up depends on your skill level and the strength or the connecting wood around the void. Light cuts will help. Any hollowing catch will likely end in disaster for the form and possible injury from flying wood.

On the plus side this is an easy form to get an even wall thickness as you can see it in the void.
Note even non Woodturner’s will see the wall thickness and appreciate its evenness.

This opening near the bottom will cause a vibration as you hollow. Leave as much mass in the bottom as long as you can.

Nylon strapping tape will reduce the vibration. Where it crosses the void it will be flat. Depending on the wall you may be cutting the tape as you hollow. A soft wire can be bent around the form to create an arched bridge for the tape over the voids.
Nylon threaded tape will reduce the vibration movement of the void sides.
 
Last edited:
Joined
Jul 19, 2018
Messages
1,713
Likes
2,246
Location
Ponsford, MN
The big issue i see is the opening near the base where you have air instead of supporting wood. Keeping the form from blowing up depends on your skill level and the strength or the connecting wood around the void. Light cuts will help. Any hollowing catch will likely end in disaster for the form and possible injury from flying wood.
In my opinion that void is beyond just about any turners abilities to successfully hollow as it stands. I like to fill voids with epoxy putty, however that void would take way to much therefore epoxy or resin is needed. The problem of appearance with resin or putty can be solved by undercutting about 1/16" deep then refilling with finely crushed stone-reconstituted using thin CA. The best choice in my opinion is turquoise which you should be able to find easily in your area.
As an aside that flared base ruins the form so after the piece is hollowed turn away that flare by continuing the curve down to just short of the tenon.
 
Joined
Nov 18, 2012
Messages
659
Likes
1,864
Location
Torrance, CA
How about add the hated resin, turn the vessel and then grind the resin out bringing it back to more of the original look!
 
Joined
Aug 14, 2009
Messages
2,054
Likes
1,145
Location
Peoria, Illinois
Way back before folks started adding plastic to their work, some turners would freeze a piece with voids into a block of ice. Turn it, then let it thaw out. I'm certain it added no strength to the wood except to reduce vibration.
 

hockenbery

Forum MVP
Beta Tester
TOTW Team
Joined
Apr 27, 2004
Messages
8,637
Likes
4,976
Location
Lakeland, Florida
Website
www.hockenberywoodturning.com
Way back before folks started adding plastic to their work, some turners would freeze a piece with voids into a block of ice. Turn it, then let it thaw out. I'm certain it added no strength to the wood except to reduce vibration.
I know a couple of people who tried frozen water ONCE!
Way too messy for indoors.
 
Joined
Mar 27, 2019
Messages
110
Likes
71
Location
Evergreen Park, IlL
Another potential alternative in the "strengthen the outside" category is to turn plywood ring(s) and hot melt glue the ring(s) to the form. After hollowing, the ring(s) should be relatively easy to remove. Good luck.
 
Joined
Apr 11, 2014
Messages
426
Likes
424
Location
Dallas, TX
While I 'm not sure what is meant by "Stabilizing voids", if the issue is keeping the log together during hollowing, wrapping with filament tape is a great approach - I do it all the time. And plywood rings are even better, though a bit more cumbersome.
Over the past five years I've focused primarily on mistletoe-burl mesquite - each log is challenging. You might consider the following:
  • Most mistletoe-burl logs are fairly large - it's hard to do a small piece from a log with large "features" (bark inclusions, negative space)
  • While maybe a personal judgement, most mesquite burl lends itself to "axial" rather than "radial" (never like using bowl and spindle to describe hollow-forms)
  • Use a hollowing system where you are not in the line of fire. I've had one piece blow - my ears rang for a few days. I was doing something stupid and not using any filament tape.
  • Learn to see the results before you start. And be ready to reposition the drive and/or live-center as you go. I had to reposition over 1.5" on the live center end and 3/4" on the drive end on the current piece. That means 3" and 1.5" out of round on, in this case, a 200-lb log - not fun.
  • I agree with your wife: large resin fills are to be avoided. If it's an opening, leave it open - if a smaller bark inclusion, fill with black or dark brown epoxy and turn it smooth
  • Finishing is a whole nuther subject - finishing out a hollow form with openings and epoxy fills is, to my thinking, not a place for oils and MinWax.
This is difficult stuff to work - happy to discuss further if you send your contact info to the inbox above.
John
 

Attachments

  • Miseltoemesquite burl(1).jpg
    Miseltoemesquite burl(1).jpg
    172.2 KB · Views: 64
  • Mesquite vert w wine bottle.jpg
    Mesquite vert w wine bottle.jpg
    425.4 KB · Views: 61
Joined
Mar 19, 2016
Messages
1,185
Likes
1,281
Location
Haubstadt, Indiana
I am not any expert by far. I happen to also have my first burl on my lathe that I just finished hollowing. Significant voids, but not like yours. I wrapped my burl in stretch wrap before hollowing and hollowed at a slower speed than normal. I also used my steady rest. Good luck.

2F914D0D-0964-4743-99DA-D82BA46D5D5D_1_201_a.jpeg
 
Last edited:
Joined
Jul 26, 2016
Messages
2,326
Likes
1,105
Location
Nebraska
I have a quantity of heavy rubber bands in different diameters that I use for segmented rounds that I have used on several pieces that had some weak spots while turning.
 
Joined
Apr 11, 2014
Messages
426
Likes
424
Location
Dallas, TX
I am not any expert by far. I happen to also have my first burl on my lathe that I just finished hollowing. Significant voids, but not like yours. I wrapped my burl in stretch wrap before hollowing and hollowed at a slower speed than normal. I also used my steady rest. Good luck.

William,
That is a great looking piece - the opening and cracks are all enhancements
After it is down to "finishing MC" you might consider shooting (as in needle/syringe) dark tinted epoxy into all cracks in the 1/8" neighborhood and then filling with GFlex from WEST. The large opening would, of course, be the central focus of the finished piece. A 20-ga needle has no problem shooting Aero-Marine #300 - as it appears to be an easily stained species, applying a barrier first would make sense. But forget about sanding the epoxy - you'll have to turn it off as part of final shaping. Any anomalies in the epoxy or areas that need help can be corrected with any filler like TimberMate - you can apply that inbetween coats, again avoiding any bleeding.
And you might want do a rubbed finish - the problem with oil or non-rubbed is that the texture between wood and epoxy can be objectionable - the hand rubbed will give it a soft luster or high finish, which ever looks best to you.
Not sure about the size but it appears to be big enough to carry a "big finish".
The piece deserves the time needed to do a serious finish - it can easily be a piece you'll be showing to prospective galleries if that's the direction you're headed.
 
Back
Top