At every market event I do I get asked over and over to describe how I turn a natural edge bowl. I try to hold up a bowl and show how the tree grain runs, how I spin it and turn it, etc. It's a hard thing to visualize until you've actually seen it done. I can tell by the look on most faces that they still don't understand. I'm thinking of making a small model to show the stages. Some small pieces - first one a simple blank of a log cut in half, the next with the bottom of the bowl rounded off and a tenon on the bottom, the next with the inside hollowed out. Put them in line on maybe a spinning rod so they can see how they turn, etc. Anyone ever seen or done something like this?

-
We just finished moving the forums to a new hosting server. It looks like everything is functioning correctly but if you find a problem please report it in the Forum Technical Support Forum (click here) or email us at forum_moderator AT aawforum.org. Thanks! -
Beware of Counterfeit Woodturning Tools (click here for details) -
Johnathan Silwones is starting a new AAW chapter, Southern Alleghenies Woodturners, in Johnstown, PA. (click here for details) -
Congratulations to Dave Roberts for "2 Hats" being selected as Turning of the Week for April 22, 2024 (click here for details) -
Welcome new registering member. Your username must be your real First and Last name (for example: John Doe). "Screen names" and "handles" are not allowed and your registration will be deleted if you don't use your real name. Also, do not use all caps nor all lower case.
You are using an out of date browser. It may not display this or other websites correctly.
You should upgrade or use an alternative browser.
You should upgrade or use an alternative browser.
Natural Edge Bowl Model
- Thread starter Randy Anderson
- Start date
Interesting idea Randy. I think it might make an interesting art piece. Give a name like "Evolution" or "Convergence".
Haven’t seen anything like that, but I get the same thing on a basket illusion. Interested to see your “explanation" post.
I have a set I made using 5 inch diameter log. The first two pieces are the half log with the bowl blank band sawed out, and just set back in its place. Then, from the same log, two bowls, one flat rimed the other natural edge. This way I can take the bowl blank out and set either the flat or natural edge in its place to show the orientation. It helps in a few ways, it's interactive, so it gets people talking (and touching, touching sells), it shows the different grain pattern in the bowl, oval or X, and, when someone offers you wood to turn, you can discuss why it has to be cut longer then they would think. A lot of people think that bowls come out of the tree in what we would call an "end grain bowl", as in the diameter of the bowl would be the diameter of the tree. After a discussion, you hear, "Oh, you mean the bowl is sideways in the tree". When I find the box it's in, I'll take pics, 5 inches is kind of small, but that makes it portable...
Another option Randy, is to take a series of photos of each step and then assemble them onto one page in Power Point or a similar software. Print the page and take it with you to shows. Should be easier for them to understand once they can see each step. I have a similar page with about 12 steps for turning a bowl. It starts with Step 1: Grow a tree for 200 years, and ends with Step 12: Find a new owner to buy it. This helps customers understand why a large walnut salad bowl is $150 and not $40.
Kevin, a good idea and probably as effective and where I end up but hey, then I don't get to make something which is half the reason. Thanks.
I bet you could do it with a small half log and a completed natural edge bowl from the other side of the log. Just hold them up together, oriented the same. But the sequence of pictures is a good idea, too.
- Joined
- Apr 27, 2004
- Messages
- 8,638
- Likes
- 4,979
- Location
- Lakeland, Florida
- Website
- www.hockenberywoodturning.com
A simple half model might do the trick.
Hollow a half log blank ( could hollow a whole log section) with the ends left square the stand it in end they will be able to see the bowl. A small piece shallow hollowing. 5” diameter 8” long hollow 6” x 3.
I have had success explains this by holding a bowl oriented like the the tree grew and waving a hand around where the bark was. Everyone seems to understand this explanation in less than 10 seconds.
One could core a bowl from the middle of a log keeping the sections from above and below the bowl. The 3 parts would tell your story.
I would suggest turning the right-hand bowl around so there is a consistent orientation.
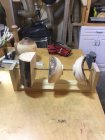
I thought about that but thinking that I show them how it's turned, headstock to left so mount log, turn bottom, make tenon, then flip then hollow holding by tenon. Easy to slide them off and on so if they still looked puzzled I can adapt. I even left the corners of the blank on so there's no confusion on how it got that shape. If they can't visualize how to split a round log down the middle then not sure I can help them.
Nice little model!
Might replace the bowl on the right with a rimmed bowl, in the orientation its in. You will have finished NE bowls on display to show how the middle pice gets hollowed out.
I agree, a change of orientation, would tell a better story in my mind.I would suggest turning the right-hand bowl around so there is a consistent orientation.
Randy, you might get some ideas from this:
Woodturning: How to Cut Logs for Turning.
View: https://youtu.be/I8kCjtLUqzY
I ran across this several years ago and this guy made some really cool props to show how to carve up a log into turning blanks.
Woodturning: How to Cut Logs for Turning.
I ran across this several years ago and this guy made some really cool props to show how to carve up a log into turning blanks.
I tested my model on some folks and some of you were right, turning the right hand bowl to match the orientation of the others helped. Folks aren't thinking about mounting orientation like I was. Dave, some good ideas in his video for small props I might try.
Very timely and interesting post as I have been thinking about this very subject. Thanks for all the suggestions.