• Beware of Counterfeit Woodturning Tools (click here for details)
  • Johnathan Silwones is starting a new AAW chapter, Southern Alleghenies Woodturners, in Johnstown, PA. (click here for details)
  • Congratulations to Keven Jesequel for "Big Leaf Maple" being selected as Turning of the Week for April 15, 2024 (click here for details)
  • Welcome new registering member. Your username must be your real First and Last name (for example: John Doe). "Screen names" and "handles" are not allowed and your registration will be deleted if you don't use your real name. Also, do not use all caps nor all lower case.

Narrow parting tool "burn"

Joined
Aug 22, 2009
Messages
68
Likes
0
Hi all,
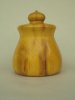
I've been spending a fair amount of time recently making boxes. Of course, with any type of wood that has alot a grain character, it makes a very attractive box if the join between the base and the lid is very narrow so that the grain can be aligned after you've fashioned a nice friction lid. I only know of 2 ways to accomplish this. The first and probably most accurate is to band-saw the top section from the bottom and then proceed with the box turning of the lid and the base. Of course, if you inadvertenly forget to leave a tenon on the ends of both the top or the base, you're sunk right after you cut the piece in half. And, to safely cut the rounded stock on the band saw, one has to also fashion a sacrificial "v-block" so as to avoid the cylinder rolling into the blade uncontrollably.
The second and pretty widely used method is to use a narrow parting tool.("1/16"). I don't know about you all but, I invariably end-up with a friction burn on the ends of the wood by parting in this manner. Yes, my parting tool is plenty sharp. Because we want our boxes to be finished nicely on all parts...inside, outside, top and bottom, this friction burn causes extra work to remove slightly charred wood at the base of the lid and, top of the base at the very least and, also at the "base of the base" when jam-chucked and finishing the bottom of the base. I understand that these various "ends" need to be trued up with a skew or spindle gouge (or both) but, in the case of the join, that just removes a little bit more wood. Sanding the charred portion doesn't seem to really work very well and, it can also lead to an untrue surface to fashion the friction lid if you sand too much at any given area of the end before you cut the rebate and spigot.
So, what to do with the "smoking burn" part with a narrow parting tool?
Thanks,
J
 

john lucas

AAW Forum Expert
Joined
Apr 26, 2004
Messages
8,328
Likes
3,584
Location
Cookeville, TN
Jay Cutting round things on the bandsaw is dangerous. You might get by with it for a while but sooner or later it will run on you and at the least, damage the work. The worst you don't want to know about.
Using any parting tool you should make 2 cuts to give the tool clearance so that the sides of the tool don't rub and create the burn.
To part of boxes I use a sort of angled approach. I make my first parting cut, pull the tool out and make the second cut at a slight angle but through the same outer hole as the first. I repeat this procedure pulling the tool out and making a cut at the left angle, pull it out and cut at the right angle.
This gives me lots of clearance on the inside of the box and very little clearance at the lip so the grain is more likely to match.
If you still get burning on the outer lip make 2 cuts very close together to give more clearance. Then start the angled cuts to part it off.
 
Joined
Mar 25, 2008
Messages
301
Likes
246
Location
Suwanee, GA
Website
www.mikepeacewoodturning.com
Excellent suggestion, John, on getting more clearance on the parting cut.

I have had the BS grab a round block. Fortunately my fingers are still intact. I now use a 12" handscrew clamp to clamp a round piece of wood and provide a flat surface to slide across the table. It secures the wood and keeps my fingers away from the blade.
 
Joined
Aug 22, 2009
Messages
68
Likes
0
parting burn

thanks John. I've tried doubling up and, probably will do it again many times. In the end, I guess it's getting pretty picky about 1/16" as opposed to a double cut= 1/8". that's what I've been doing mostly...parting in with the 1/16 until I can feel the friction and know that the heat is going to build quick, then back out and go again as exactly close to my first cut as possible...maybe only taking 1/32. You really don't need much room to basically end-up with a part of 3/32 to 1/8". Of course, the 1/8" pt will give you the same burn. That's a curious thing...I watched a Ray Key video a while ago and, he seems to mostly use a 1/8 parting tool. And, he doesn't seem to get a burn. But, as I remember, he stops the lathe and finishes the cut with a back-saw. Don't think I've ever seen Raffan get the smoky burn either but, I also don't remember seeing him using a 1/16" tool either. I mostly remember him using a diamond tool which we know shouldn't do it if it's sharp.
Now, there's a curious thing...Mr. Key's video is done with Masur birch which, while beautiful (and expensive!), is basically grainless. So, i remember he makes a basic easy box(just a cylinder pretty much as I recall) and, there is no attention to the grain 'cause there isn't any to match.
Not to worry about the bandsaw John. I don't want to match the grain bad enuf to lose a finger or worse. But, I have done it with a v-block. Never just roll something round at the blade...never, never.
Maybe I'll try hitting the part from either side and see how it goes.
Tks,
J
 

odie

TOTW Team
Joined
Dec 22, 2006
Messages
7,109
Likes
9,701
Location
Panning for Montana gold, with Betsy, the mule!
Question for you Jay......

Is the wood you are parting still have some moisture content to it?

I have the Nick Cook fluted parting tool. Since I got it, I've been very happy with the results I've been getting. The flutes are great for getting the cleanest cut I've been able to get. I used to do all my parting with the diamond point, like Raffan does. His suggestion of putting the spur on both sides of the point helps, but I've never been able to get a consistent spur on mine. I guess it takes a technique that I've never been able to master.....:mad:

You don't need to do a double cut with your 1/8th parting tool that is much wider a swath than if you had plunged in with a single cut. All you need is another 1/128th inch in width (or so), and your burning will be history. Just a "smidgen" wider is all you'll need.

BTW: If you're getting a lot of burning, you may, or may not be aware that you're playing with fire, there! If it's burning, that means there is a lot of friction causing it. That friction is an accident waiting to happen, because the slightest torque on your cutting blade.......and, it could result in a real doozy of a crash! The farther you reach over your tool rest, the more likely that kind of crash becomes a possibility.......so, be aware, my friend! :D I can't remember who it was, off hand, but somebody related the story of ruining their thin parting tool on this forum, under similar such circumstances.....This was some time ago.

I asked about the moisture content, because heat and water might cause the wood to swell further.....exacerbating the burning problem.

ooc
 
Last edited:
Joined
May 7, 2004
Messages
315
Likes
1
Location
Lincoln Hills, CA (At the foot of the Sierra Nevad
Website
jerryhallstudio.com
A couple thoughts..

I don't think you are being obsessive trying for a narrow kerf, you are aiming for a high standard. I think your sacrificial V block is a good safe approach. If you want you could glue some course sandpaper to the V to resist rolling, but I have never had that problem. I would use a thin parting tool, mine is homemade from a big sawzall blade, and cut a 1/2" deep kerf, then use your V block and follow the kerf. Take a black marking pen and write in large letters "CHECK BOTH ENDS FOR TENON" :) Then follow the kerf with your band saw so the cut will be true. If you don't have the kerf your cut is likely to be off. I like John's idea , but but you get a bigger kerf. By the time you true and clean up the edges of the box you will have lost even more matching grain.

Another idea is to gently wiggle the 1/8" parting tool as you go thru to widen the kerf.

Here is a 1/16" thin parting tool for ten bucks: http://www.pennstateind.com/store/LCTEN.html

PS:Make sure your band saw table and V jig are perpendicular to the band saw blade.
 
Last edited:

john lucas

AAW Forum Expert
Joined
Apr 26, 2004
Messages
8,328
Likes
3,584
Location
Cookeville, TN
Jerry I actually lose only a tiny bit more than the thickness of the blade. All of the waste of moving the tool sideways is in the open area of the box. If you make your wall thick you might lose a little more kerf using my method.
Of course the best way is to use straight grain timber. Then the grain usually matches even if the kerf is 1/4"
 
Joined
Oct 2, 2006
Messages
1,049
Likes
35
Location
Tallahassee FL
Could one of you please post a cross-section image of this situation? It's unclear how a minimal kerf would allow the top and bottom pieces to engage without a third piece of wood - basically a ring, or a bunch of dowels. A wide kerf generally allows a step on one of the pieces.
 

odie

TOTW Team
Joined
Dec 22, 2006
Messages
7,109
Likes
9,701
Location
Panning for Montana gold, with Betsy, the mule!
Could one of you please post a cross-section image of this situation? It's unclear how a minimal kerf would allow the top and bottom pieces to engage without a third piece of wood - basically a ring, or a bunch of dowels. A wide kerf generally allows a step on one of the pieces.

Hi Joe.......

The mating lip will be done after it's parted.......

The main concern is to get the kerf as thin as practical, so that grain patterns on the two pieces are distorted as little as possible. The actual fitting of the lid to base will be addressed at a later time.

ooc
 

john lucas

AAW Forum Expert
Joined
Apr 26, 2004
Messages
8,328
Likes
3,584
Location
Cookeville, TN
Joe I actually do what your saying. I use a wider parting tool to cut the step that will be the lip of the vessel. Then I use the thin parting tool to cut through the top of the lip leaving just a tiny hair on the lid portion. The thin parting tool lets me take as little waste as I can. I use the hairline left on the lid to speed up sizing the female part of the tight fitting lid. I think I learned that from a Chris Stott demo.
I mentioned going back and forth with the thin parting tool but really I'm going straight in on the box bottom and then I angle the tool toward the lid for the next pass. This way the cut is concave toward the lid which I'm going to hollow anyway.
I'll try to post a photo tonight or Saturday. I'll be in the shop working and can probably stop and do a box real quick.
 
Joined
Oct 2, 2006
Messages
1,049
Likes
35
Location
Tallahassee FL
Phew! Thanks, John & Odie. I was afraid I was losing something.

I like your trick of parting uphill, John - almost like a bowl saver. The interior gets cut away anyway. And there might be enough to form a tiny step, functional after the gap is closed on assembly.

You guys do like to swing for the fences, don't you?:eek:

I usually try to place the joint where there's minimal grain wandering, with the joint centered on the waves. It sometimes works.:eek:

Thanks again.

[Like this (attached). Guachepelin (gwatch-a-pel-EEN), from a region in Costa Rica of the same name; 4-1/4" diameter x 5" high. I shaped the outside, cut a wide kerf with a regular parting tool, then cut the bottom of the step with a backsaw on the lathe (stationary and rotated by hand) until the center was breakable. Tenons at both ends to hollow the insides, and chuck in expansion mode to shape and finish the top and the bottom. IIRC - 2008_03_27/0019]
 

Attachments

  • 100_0019.JPG
    100_0019.JPG
    23.1 KB · Views: 31
Last edited:
Joined
Aug 22, 2009
Messages
68
Likes
0
burn

Hi Odie.
Wet wood for boxes? Never! What's the point in going thru the effort of making a nice friction fit on wet wood that's gonna warp? As for a "crash", don't exactly know what you're referring to. A very dense piece will create a certain amount of friction if you try to part too narrow and deep, no question about that. No, I'll just probably continue to make my initial part for design and measuring purposes and then, come back and move over a smidgen when I'm ready to fully part thru. Elsewise, if you are careful and use a sacrificial v-block AND, are sure to cut at 90 degrees, you will get the thinnest part between lid and base. If you're prudent and careful, it's really not all that dangerous. Course, if you go to that trouble and then screw-up either the lid or the base while hollowing, cutting the profile etc...then you've wasted your time anyway. And, that happens to me sometimes when back-hollowng. But, there again, you can't really reasonaly back hollow some of this real tough stuff...coco, canary etc...either can Raffan. Works OK on cherry, myrtle etc. but, not the really dense woods that are loaded with grain character and, great wood for boxes.
The potential beauty of using the parting tool is to allow you to keep the piece(s) on the lathe so as to not stop what you're doing to go to the band saw...breaks my ever-increasing short train of thought.
BTW, the new Vic 300 got here. Not sure I know how to attach a pic that you asked for earlier. I absolutely love it. It's very quiet which, makes a huge difference when your turning. ou can hear when you might be getting into trouble. Never culd do that before.
Thanks for the input,
J

Question for you Jay......

Is the wood you are parting still have some moisture content to it?

I have the Nick Cook fluted parting tool. Since I got it, I've been very happy with the results I've been getting. The flutes are great for getting the cleanest cut I've been able to get. I used to do all my parting with the diamond point, like Raffan does. His suggestion of putting the spur on both sides of the point helps, but I've never been able to get a consistent spur on mine. I guess it takes a technique that I've never been able to master.....:mad:

You don't need to do a double cut with your 1/8th parting tool that is much wider a swath than if you had plunged in with a single cut. All you need is another 1/128th inch in width (or so), and your burning will be history. Just a "smidgen" wider is all you'll need.

BTW: If you're getting a lot of burning, you may, or may not be aware that you're playing with fire, there! If it's burning, that means there is a lot of friction causing it. That friction is an accident waiting to happen, because the slightest torque on your cutting blade.......and, it could result in a real doozy of a crash! The farther you reach over your tool rest, the more likely that kind of crash becomes a possibility.......so, be aware, my friend! :D I can't remember who it was, off hand, but somebody related the story of ruining their thin parting tool on this forum, under similar such circumstances.....This was some time ago.

I asked about the moisture content, because heat and water might cause the wood to swell further.....exacerbating the burning problem.

ooc
 

Attachments

  • m & j turnings 011.jpg
    m & j turnings 011.jpg
    68.6 KB · Views: 36

odie

TOTW Team
Joined
Dec 22, 2006
Messages
7,109
Likes
9,701
Location
Panning for Montana gold, with Betsy, the mule!
That Vicmarc is a beauty, Jay.......

Yes, of course you are right about using dry wood for the finished product, but it's not uncommon to use wet wood for boxes, bringing it to a rough shape with lid parted and interrior partially removed, prior to additional seasoning. After seasoning further, the box is completed.......very much like the process used for roughing, seasoning, and finishing of wet wood for bowls.

I believe I have an old Raffan vhs tape around here that explains the whole process.

I am not one who has produced many lidded boxes, so whatever I say about it should not be considered as having come from an experienced turner of boxes. Most of my information on this subject is gleened from others, and from those who professionally teach box turning methods.......so, take it for what it's worth, pardner!

As far as the crash with the narrow parting tool.......there was someone who posted on this forum who told of his crash. I can't remember who that was, off hand, but I remember the explaination as being a pretty severe crash.......tool ruined, bent out of shape. I haven't ruined a tool this way personally, but I can certainly understand how it's possible to get such a catch. From what I can remember, the turner was extending the tool a long distance over the tool rest, without a double kerf. He was probably experiencing some friction, as you have described......and, I'd be willing to bet a dollar that there was some tool "torque" involved in the overall scenario. This could easily be the case with any tool that is hand held......and, that's my best guess as to what happened.

Anyway, you can draw your own conclusions as to what happened, but the fact is that the turner in question did have a severe catch, and the result was a violent action that resulted in the destruction of his turning tool.

I'm sure you are in for a lifetime of satisfying turning with that Vicmarc......I am a little jealous, Jay!

ooc
 

john lucas

AAW Forum Expert
Joined
Apr 26, 2004
Messages
8,328
Likes
3,584
Location
Cookeville, TN
I should have mentioned, if you cut round pieces on the bandsaw make a V shaped table for it to ride in. This reduces the chance of it rolling and causing a catch. Cutting round stock can be very dangerous. It happens before you can blink you eye. I cut small tenons and things like this for years before getting a catch. Ruined the blade, scared the bejeebers out of me and happened in a 1/100th of second. I now cut anything round using the V jig.
We also didn't mention using a handsaw. When parting really thick wood I will part down until I feel the tool trying to bind. Then I will simply use a hand saw. I find the pull saws easier to use for this. Remove your tool rest so you won't damage the saw when it cuts through. I also use the saw for cutting bowls off.
 
Joined
Aug 22, 2009
Messages
68
Likes
0
burn

Hi guys,
Thanks Odie...I just love the lathe. So quiet and, I think I said to somebody previously, with the $$$ I saved buying it versus the tube, I've got myself a bunch of jaws and, 4 more vic chuck bodies. need about 3 more 100's and, 3 more 120's and, I'll be in shape to avoid switching out jaws, pretty much.

As for the wet wood and boxes, yes you can rough out boxes with wet stuff. It makes excellent practice for some more challenging cuts...sheer cuts with a skew, and the back-hollowing. Much easier to learn with some wet cherry etc. Then, with the top and lid trued with tenons and partially hollowed, I just tape them together with the hollow ends exposed and, let 'em dry out. I put anchor seal on the end grain but, I don't think that Richard ever bothers with that.
You can also leave flat facets when rounding wet and, go back to the band saw and cut 2/5 and 3/5, then back hollow and tape them. Something to think about.
Have a good one,
J
 
Back
Top