• Beware of Counterfeit Woodturning Tools (click here for details)
  • Johnathan Silwones is starting a new AAW chapter, Southern Alleghenies Woodturners, in Johnstown, PA. (click here for details)
  • Congratulations to Keven Jesequel for "Big Leaf Maple" being selected as Turning of the Week for April 15, 2024 (click here for details)
  • Welcome new registering member. Your username must be your real First and Last name (for example: John Doe). "Screen names" and "handles" are not allowed and your registration will be deleted if you don't use your real name. Also, do not use all caps nor all lower case.

Multiaxis Spindle Turning for Salt & Pepper Mills

Joined
Oct 14, 2018
Messages
6
Likes
6
Location
Turramurra, NSW, Australia
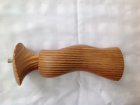
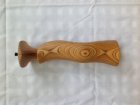
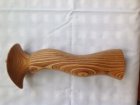
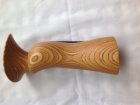
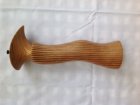
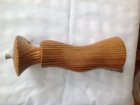
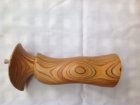
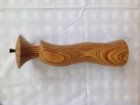
I recently came across these "unique" salt & pepper mills at a dinner party. As I have been spending some time studying Barbara Dill's articles and videos in my endeavor to learn the techniques of multi axis spindle turning, I was wondering if @barbara dill or, any forum members could give me any guidance on how to turn similar shapes to use for salt & pepper mills.
IMG_0727.JPG

IMG_0737.JPG

IMG_0729.JPG

IMG_0736.JPG

IMG_0734.JPG

IMG_0728.JPG

IMG_0735.JPG

IMG_0730.JPG

The big challenge for me is how to achieve the core hole through the centre of the spindle whilst turning the perimeter shapes. I haven't been able to work out yet the positioning, and number of axes to be used to end up with a turning that will accommodate the conventional Danish grind mechanisms.

I have uploaded 4 photos each of the shorter salt mill (205 mm) and the taller pepper mill (255 mm) which show 4 aspects of each mill's turning.

Any tips or suggestions will be highly appreciated.
 
Last edited by a moderator:
Joined
Aug 26, 2006
Messages
656
Likes
558
Location
Hampton Roads Virginia
What fun. When I start a pepper mill, I rough round between centers, tenon each end then drill appropriate holes. To turn multi axis, I think I would start the same way, then turn tight fitting plugs for each end. The part of the plug outside the mill could be any diameter, within reason, for your additional axis points. The "twisted" mills with only three axis are not that difficult and might be a good place to start, then jump off the rails and go crazy...
cc
 

hockenbery

Forum MVP
Beta Tester
TOTW Team
Joined
Apr 27, 2004
Messages
8,628
Likes
4,969
Location
Lakeland, Florida
Website
www.hockenberywoodturning.com
Ditto what Clifton said. Get practice with 3 sided off centers and off centers with a twist.

They appear to be turned on two centers so will be oval. You may need to adjust the offset. Start with a 1/4”
Male a plug to cover the drilled holes?

After turning to a cylinder off set the centers 1/4”
Turn the green profile. Off set in the opposite direction 1/4” turn the red profile
Measure to leave at least a 3/16 wall thickness
This will leave edges which can be features.
Put back on center and some light sanding will blend the edges
Then sand with the lathe off with the grain.

If you want to do lots of them you can make and offmset plugs for your chick and live center.

59399407-B096-4D41-8F84-E17E55CE834B.jpeg
 

hockenbery

Forum MVP
Beta Tester
TOTW Team
Joined
Apr 27, 2004
Messages
8,628
Likes
4,969
Location
Lakeland, Florida
Website
www.hockenberywoodturning.com
Another way to do this this is with an inside-out style turning.
This is a technique I used to make matching columns for hour class holders

You mount 4 together ( paper glue joints or mechanical clamping
Turn the profile..
Break the glue joint reglue with the turned part inside.
Turn matching profile
Put them between centers maybye do a little turning and sand the edges away.


AD2EB17C-C2C1-407B-8E61-F2D7D24B5DD8.jpeg
 
Joined
Oct 14, 2018
Messages
6
Likes
6
Location
Turramurra, NSW, Australia
Thank you Clifton C and Hockenbery for your responses. I must apologise for the deluge of repetitive photos - I though that my first photo upload wasn't responding, nor the second, so, I repeated them a few times, and it turned out that about 3 of them did work!!

I am going to try out both recommended techniques to see whether I can come up with something similar to what I looking to achieve. I'll let you know in due course how I fare.

Thanks again
 
Joined
Oct 14, 2018
Messages
6
Likes
6
Location
Turramurra, NSW, Australia
I tried both techniques and found that using 4 parallel axes produced the best and most attractive outcome.
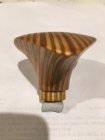
But, what has really got me stumped now is how the angular shaped mill top was made - I just cannot see that this could be another multi-axis turning - looks like it could have been carved??
Any suggestions would be welcome.IMG_1818.JPG
 

hockenbery

Forum MVP
Beta Tester
TOTW Team
Joined
Apr 27, 2004
Messages
8,628
Likes
4,969
Location
Lakeland, Florida
Website
www.hockenberywoodturning.com
I tried both techniques and found that using 4 parallel axes produced the best and most attractive outcome.
But, what has really got me stumped now is how the angular shaped mill top was made - I just cannot see that this could be another multi-axis turning - looks like it could have been carved??
Any suggestions would be welcome.View attachment 28686

Good to hear you are caving some success.

Could be done with be done a specialty Chuck.

But I think you can get it with some multi centers.
Maybe changing the axis on some

Something Like this diagram
There could be some refinement with disc and drum sanders


40098F18-8A1F-40A9-A212-0E2DF9A0037E.jpeg
 
Joined
Oct 14, 2018
Messages
6
Likes
6
Location
Turramurra, NSW, Australia
Thanks very much for your response.
I tried every which way to implement your suggestion for producing the mill top using the multi-axes shown on your diagram, but, i was not able to come up with anything remotely similar.
The photo I sent was just the side view - I attach a front & top view to show this aspect. If you still think that it can be achieved by a multi-axis turning, I would appreciate it if you could lead me through the process you envisage as I'm very new to this form of spindle turning Front view.JPGTop view.JPG
 

hockenbery

Forum MVP
Beta Tester
TOTW Team
Joined
Apr 27, 2004
Messages
8,628
Likes
4,969
Location
Lakeland, Florida
Website
www.hockenberywoodturning.com
The top view helps
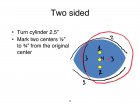
The point is what I get with Two sided napkin rings which have two points from two centers off set the same.
With these I preserve a space to drill a 1.5” hole.
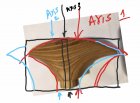
I annotated the slide I use in demos below.

It looks like you can get the top shape using the centers shown.
The on the top needs to turn away the center points.
Sanding on axis 3 will blend in the corners.
You’ll have to play a little with tuning the sides on axis 4 will blend in the corner edges left on the side and round the point.

Hope this does it for you. Also when I do napkin rings I do 4-6 from the same spindle parting in to divide them. If you get into production on these you could turn multiples from the same spindle. This leaves center points 1,2,3 only on the end ones which can move these center points to the narrow side if you only turn the side on center 4.

53AC476D-E0FD-443D-BF75-A1C49D962878.jpeg
 
Last edited:
Joined
Oct 14, 2018
Messages
6
Likes
6
Location
Turramurra, NSW, Australia
Sorry for long delay in responding - had a few health issues which kept me out of my shop - am back now and have been trying to progress the turning of the top using your kind suggestions. Sad to say I'm still stymied trying to reproduce the challenging shape of the top. I have got the oval shape in the top view, but getting the curved cutaway sections just eludes me - just cannot find the axes which allow me to cut away the curves under the front and back points

Any further suggestions would be very much appreciated
 
Joined
Dec 7, 2012
Messages
272
Likes
115
Location
Albuquerque, NM
I suspect the top piece was done with something like the Escoulen eccentric chuck (manufactured by Vicmarc).

I would also look at at some of Mark Sfirri's work.
 
Back
Top