• Beware of Counterfeit Woodturning Tools (click here for details)
  • Johnathan Silwones is starting a new AAW chapter, Southern Alleghenies Woodturners, in Johnstown, PA. (click here for details)
  • Congratulations to Keven Jesequel for "Big Leaf Maple" being selected as Turning of the Week for April 15, 2024 (click here for details)
  • Welcome new registering member. Your username must be your real First and Last name (for example: John Doe). "Screen names" and "handles" are not allowed and your registration will be deleted if you don't use your real name. Also, do not use all caps nor all lower case.

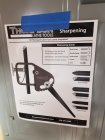
Grinder angle setup / Raptor setup tools

hockenbery

Forum MVP
Beta Tester
TOTW Team
Joined
Apr 27, 2004
Messages
8,629
Likes
4,970
Location
Lakeland, Florida
Website
www.hockenberywoodturning.com
why I getting a really sharp point on my 3/8" bowl gouge using the recommended settings from the instructions. It's an awful and unusable grind to say the least.

It is hard to give advice without observing your process.

From the photos the nose is too pointy and the wing appears to have a slight dip in it.

Why is the question
My guess - you are grinding the wing too much and maybe not rolling the tool to the end of the wing.
A slight stop or hesitation will cause the dip and contribute to the pointy tip.
The flute design appears to be a vee which will be more pointy than a parabolic.

The wing can be convex or flat but not concave. Put a straight edge in the top of the wing and hold it toward a light. You will see a dip if one is there.
 

Bill Boehme

Administrator
Staff member
Beta Tester
TOTW Team
Joined
Jan 27, 2005
Messages
12,896
Likes
5,181
Location
Dalworthington Gardens, TX
Website
pbase.com
The Varigrind or any other jig only determines the angle of the grind on the tool. It is up to the user to control the shape. The narrow pointed shape is caused by spending too much time grinding on the wings and not enough time on the nose.However, I agree with you that the new settings will result in a better and more useful shape.
 

Emiliano Achaval

Administrator
Staff member
Beta Tester
TOTW Team
Joined
Dec 14, 2015
Messages
3,315
Likes
4,267
Location
Maui, Hawaii
Website
hawaiiankoaturner.com
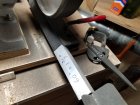
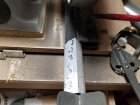
Toss the Raptor jigs far into the darkness of the night and go with 1' PVC pipe to set the V-arm extension distance. See attached photos. Cut PVC pipe to length (trial and error) that sets the V-arm to the proper distance for required grind. Works great with CBN (or similar) grinding wheels because they never change diameter. With a constant diameter grinding wheel and extension of V-arm set by PVC pipe, two of three variables required to reproduce your favorite grind are set. The only remaining variable is the angle of the leg on the Oneway (or equal) vari-grind jig. I have my vari-grind leg more/less permanently set. So, when I want to change grind, all I have to do is pull out the proper PVC pipe, set the V-arm and grind away. - John

PS - Not the originator of this idea. Picked it up on some woodturning forum/website. - J
View attachment 21005 View attachment 21006
Darn, just when you think you have seen it all, this is a really good tip. I have seen all kinds of inventions for the same purpose, but I really like this one.
 
Joined
Jun 30, 2008
Messages
172
Likes
212
Location
Chatham, Ont.
At this point, you could spend just a little more time grinding the point, (dead on) and then blend that into the wings. The jig does not control the amount of time spent at each position and so you need to move smoothly to get desired shape.
Once you establish desired profile, in future (grind) mark the bevel with black marker as Bill suggested, grind the wings, then blend in the center with light grind, using the black as visual confirmation.
 

Emiliano Achaval

Administrator
Staff member
Beta Tester
TOTW Team
Joined
Dec 14, 2015
Messages
3,315
Likes
4,267
Location
Maui, Hawaii
Website
hawaiiankoaturner.com
I'm not sure how important it is, but many years ago David Ellsworth pointed me to Don Geiger vertical solution to be able to set up my wolverine jig the right way. I guess my set up was off. I assumed that I wasnt the only one since Don invented a "solution" All the advice given is great, but we have to assumed that the wolverine is set right. I still have David's hand written instructions for the dimensions he wants to sharpen his gouge. He made a home made version of the wolverine out of wood... I have the original "Vertical solution" There are a few other versions after the one I have...
Odie: what do you use now? I still use mine, but I do the 40/40 by hand, so most of my bowl gouges i do it with out the jig...
 

john lucas

AAW Forum Expert
Joined
Apr 26, 2004
Messages
8,333
Likes
3,586
Location
Cookeville, TN
If you get a pointy nose on any tool you are simply grinding too much on the sides. Grind longer on the tip and you can round it over any way you want. What people seem to do is to grind continuously from one side to the other thinking that's all that's needed. what you really have to do is grind where it needs it and only lightly where it doesn't. for example with a 3/8" thompson detail gouge it's very easy to get a slight cove or dip on the wing near the tip. So you have to be really careful and not grind in this area and grind more leading up to and away from this area. Same is true for a pointy nose, simply stick the nose into the stone and grind left and right until you have it as round as you like. Now it will always be pointier than a U shaped flute.
 

odie

TOTW Team
Joined
Dec 22, 2006
Messages
7,113
Likes
9,741
Location
Panning for Montana gold, with Betsy, the mule!
There is another method of matching a current existing gouge grind to the wheel that works perfectly every time. This works for both the vari-grind jig/v-arm, and the standard (traditional) grind, using only the V-arm. Those using cbn wheels, in conjunction with a vari-grind (or Ellsworth jig) can rely on settings never changing (as long as the extension in the vari-grind jig remains a constant).......however, those who are using matrix wheels and standard grind, need a method of matching an existing grind to the wheel, because the length of the tool and the diameter of the wheel will change.

By looking at how the bevel matches the wheel surface from the side, it's a snap to adjust the v-arm perfectly, so the bevel matches the wheel surface. (If you want a longer, or shorter bevel, this can easily be done by adjusting the length of the v-arm incrementally.)

For seeing how the existing bevel matches the wheel more clearly, a piece of white paper can be attached to a short stick that pivots out of the way, on a magnet.

Mark......It appears as though you've already decided on the method you want to use, and by posting this, I'm only giving an alternative method in this thread.....for general thought on the subject. Hope you don't mind.

View attachment 21007 View attachment 21008 View attachment 21009

For many turners, they wish to match their tool to a specific pre-determined angle, or repeatable to a what was previously done. For those who may wish to consider a method by which it's very easy to match whatever angle you have already ground on your tool to the wheel, this method I describe in post #9 in this thread makes that very easily done. It's not something that's mechanically repeatable, but the match between the bevel and wheel is perfect, and easily done within seconds of time.....but, you do have to use your eyes to look from the side to make it work.

Note: Photo #1 shows the view from the side, and in this photo, I've shown it needing a slight adjustment. I've done this so that, in the photo, it's easier to see the relationship between the bevel and the wheel, than it would be with a photo showing a perfect match. From here the adjustment only takes a couple seconds to achieve the perfect match.

If you click on the little arrow next to my name in the quote above, it'll take you directly to post #9.

Af far as I know, I'm the only one who has devised, and use this method of setting up a tool for grinding......for those willing to give it a try, a few might find it as dead simple, and fool-proof easy.....as I do! :D

-----odie-----
 
Joined
Jul 5, 2016
Messages
469
Likes
244
Location
San Antonio, TX
Don changed his vertical solution to a simple arm setting on the verigrind. I use Ellsworth jig and verigrind jig, both give me near identical shape using just the wolverine jig. I got a crown pro-pm Ellsworth gouge, put it in my veri-grind jig and adjust the arm until I got the right setting. I now sharpen with either jig.

Have you checked that the height from the wolverine jig to the center of the wheel is correct? Change the angle on the jig, ignore the 23 degrees.
 
Joined
Aug 14, 2007
Messages
5,479
Likes
2,832
Location
Eugene, OR
A friend of mine, Larry Karlin, commented about the Raptor jigs years ago, "They look really nice..... Hanging on the wall...." Using a stop block/PVC pipe/angle iron is an age old method of repeatability. I did a video with him and his sharpening set up because he did things differently...

View: https://www.youtube.com/watch?v=fdZ4iDyPhWo


robo hippy
 
Joined
Sep 27, 2018
Messages
73
Likes
30
Location
Auburn, MA
Thank you for the replies, I was about to reply stating that I just can't get a good grind at 23° but I never give up. So I went back to the grinder and did just what you guys recommended and I got a nice rounded grind! What a difference cutting with a nice grind with the bowl gouge! Now I just have to work on my technique to eliminate torn grain. Thank you for the help, I'm so happy that I am able to use the recommended settings with great results.
 

odie

TOTW Team
Joined
Dec 22, 2006
Messages
7,113
Likes
9,741
Location
Panning for Montana gold, with Betsy, the mule!
Thank you for the replies, I was about to reply stating that I just can't get a good grind at 23° but I never give up. So I went back to the grinder and did just what you guys recommended and I got a nice rounded grind! What a difference cutting with a nice grind with the bowl gouge! Now I just have to work on my technique to eliminate torn grain. Thank you for the help, I'm so happy that I am able to use the recommended settings with great results.
As Bill mentioned here......there is more emphasis on what the operator does, than the specifics of the set-up. You do need a combination of the two, so getting a set-up that works is only half of the equation......:D
The Varigrind or any other jig only determines the angle of the grind on the tool. It is up to the user to control the shape. The narrow pointed shape is caused by spending too much time grinding on the wings and not enough time on the nose.However, I agree with you that the new settings will result in a better and more useful shape.
 
Joined
Sep 27, 2018
Messages
73
Likes
30
Location
Auburn, MA
As Bill mentioned here......there is more emphasis on what the operator does, than the specifics of the set-up. You do need a combination of the two, so getting a set-up that works is only half of the equation......:D
You're absolutely right about that my friend! I think with me, I watched so many videos of people spending a lot of time on the wings and barley touching the point. So that's what I was doing, spending way too much time on the wings and not enough on blending the point. I get it now, I'm going to regrind all my bowl gouges now to get them all fixed up. I was thinking of converting one of my gouges to a bottom feeder. What would be a good angle on that using the raptor jigs? The flattest angle I have is 60°, I would think that would do a good job in the bottom, right?
 

hockenbery

Forum MVP
Beta Tester
TOTW Team
Joined
Apr 27, 2004
Messages
8,629
Likes
4,970
Location
Lakeland, Florida
Website
www.hockenberywoodturning.com
watched so many videos of people spending a lot of time on the wings and barley touching the point. So that's what I was doing, spending way too much time on the wings and not enough on blending the point. I get it now, I

Once you get it you know what works for you.

It has been my experience that the most common error is to oversharpen the tip making a dip in the tip.
I teach my beginners to sharpen each wing just shy of the tip and then sharpen the whole edge blending the edge together. This in effect sharpen the wing twice and the tip once whence works for most people.

This may explain the appearance of videos sharpening the wing so much,

I sharpen the whole edge and lift up a little on the nose - this works for me
 

odie

TOTW Team
Joined
Dec 22, 2006
Messages
7,113
Likes
9,741
Location
Panning for Montana gold, with Betsy, the mule!
Take a look here Dylan.....

5c1f5b290b2f7f362bb1ab69b78b791d.jpg


I use the traditional grind (top) for just about everything these days.....but, for someone beginning turning, I wouldn't suggest that for a bottom feeder. It can get grabby, and could be big trouble unless you have some time in the saddle with it. (This is because it is not used as a bevel rubbing cut.)

What Bill is suggesting is something like the micro-bevel (bottom) without the secondary bevel. This is a more generally accepted grind for a bottom feeder, as it allows a little more straight-in tool orientation for doing the bottom interior of bowls.

(Note: The secondary bevel allows a little more clearance for negotiating inside of tight curves. A full length bevel would normally interfere with that.)

-----odie-----
 
Joined
Aug 14, 2018
Messages
48
Likes
31
Location
South Londonderry, VT
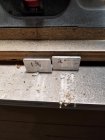
I used the Raptor set up jigs for a while. It worked okay and while the gouges were sharp they never really cut right and they got too pointy. After I upgraded to CBN wheels, I started using Doug Thompson's sharpening method. I use aluminum angle to set the V arm and either a 2" or a 1.75" projection from the Vari-grind. I grind my bowl gouges to 60 degree using a 1.75" projection and my spindle gouges to 40 degrees with a 2" projection. I only use the Raptor jigs to set up the platform.

20181017_085000.jpg 20181017_084952.jpg 20181017_085120.jpg 20181017_084954.jpg
 
Joined
Aug 14, 2007
Messages
5,479
Likes
2,832
Location
Eugene, OR
The dip in the tip comes from not rolling the tool quickly enough. The more round the flute shape is, the smaller this problem is. The more V shaped the flute is, the bigger this problem. With a round flute like the SRG, you keep the same roll rate. With a deep V flute, you roll the nose slowly, then do a pretty quick flip over to the wing, spending almost no time on the transition area.

robo hippy
 
Back
Top