• We just finished moving the forums to a new hosting server. It looks like everything is functioning correctly but if you find a problem please report it in the Forum Technical Support Forum (click here) or email us at forum_moderator AT aawforum.org. Thanks!
  • Beware of Counterfeit Woodturning Tools (click here for details)
  • Johnathan Silwones is starting a new AAW chapter, Southern Alleghenies Woodturners, in Johnstown, PA. (click here for details)
  • Congratulations to Dave Roberts for "2 Hats" being selected as Turning of the Week for April 22, 2024 (click here for details)
  • Welcome new registering member. Your username must be your real First and Last name (for example: John Doe). "Screen names" and "handles" are not allowed and your registration will be deleted if you don't use your real name. Also, do not use all caps nor all lower case.

fixing a blow out on hollow form

john lucas

AAW Forum Expert
Joined
Apr 26, 2004
Messages
8,337
Likes
3,595
Location
Cookeville, TN
The other day I was trying to turn a demo piece for a router class I'm doing and the wood apparently had a weak spot and blew out 2 small sections as I hollowed it. Not wanting to throw it out and needing to practice this technique again I patched it.
As you can see in photo 1 it wasn't 2 awfully bad an not terribly thin. I inflated a ballon inside the vessel to act as a dam to keep the epoxy from running all over the inside. Then I mixed some epoxy and added thickener. I also added some paint to roughly match the color I wanted. I coated the surface and let it dry. See photo 2.
In some cases what I've done is to drill out a small hole near the middle and add some more epoxy of a different color to sort of simulate a knot. I've also taken a thin permanent marker and made a small line hear or there to look more like the colors in knots. I have also been known to take the Dremel and reshape the torn areas. In this case I didn't do any of those.
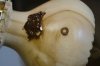
Here is a photo of the final piece repaired and the final piece. Notice there already was a real knot in the piece.
 

Attachments

  • routed bowl-2-2.jpg
    routed bowl-2-2.jpg
    55.5 KB · Views: 144
  • routed bowl-0007.jpg
    routed bowl-0007.jpg
    52.8 KB · Views: 138
  • routed bowl-0008.jpg
    routed bowl-0008.jpg
    48.8 KB · Views: 137
  • routed bowl-0010.jpg
    routed bowl-0010.jpg
    46.6 KB · Views: 141
Joined
Nov 1, 2012
Messages
115
Likes
0
Location
Tampa, FL
That balloon dam idea is brilliant! Did you coat the surface of the balloon with anything to keep the epoxy from adhering, or did it simply pull away when deflated?
 

john lucas

AAW Forum Expert
Joined
Apr 26, 2004
Messages
8,337
Likes
3,595
Location
Cookeville, TN
I debated over that but decided if it stuck and I had to break it away no one would notice because the opening is so small. I think if I do this again or on a grander scale I'll rub some vaseline on the baloon to insure it won't stick. I thought about wax but was afraid that by the time you inflate it nothing of the wax would be left. After thinking it over I had some vaseline that I use when making some of my cupcake icing decorations so I believe that would be a good release agent.
 
Joined
Sep 7, 2012
Messages
45
Likes
1
Location
Mesquite Tx
I use duct tape on the inside when applying epoxy in a void like that, its handy, its strong, it even allows you to first make an "outie" dimple in it so that the epoxy is proud of the inside surface so there are no voids when you peel it back. Of course you have more epoxy to now remove by either turning or sanding as well.

Also, I have used colorants in two seperate mixings. In one container (plastic cough syrup cup) I mix a color that approaches that of a known feature like a knot, I use ground up fine burnt mesquite, then in a second container I mix a slightly different color, either darker or lighter. When filling the hole, place a spatula load of one colorant in one half of the void then add a dollop of the second colorant to fill the hole. Take a toothpick or dental tip probe and drag and twist it through the two different pools of colored epoxy to get a natural swirl effect. When it dries, its not uniform, but more natural looking. I use this technique on areas larger than 3/8 inch, smaller holes are not worth the effort.

Like lots of discoveries I first did this by mistake. I made a blob of epoxy for a job, realised I didnt make enough. In adding the burnt mesquite to the second mixing, it was lighter than the original, so to make it less noticable, I mixed the two in the void and saw that it looked better than just the one plain color. Nature is rarely uniform.
 

john lucas

AAW Forum Expert
Joined
Apr 26, 2004
Messages
8,337
Likes
3,595
Location
Cookeville, TN
Bill Never knew how Trent does his thing. The vessel was too small to reach in. I usually use tape like mentioned below but when you can't you have to be inventive. Balloons came to mind .
I also will mix epoxy in 2 colors and stir it together. Another trick I use when patching knots is to make the epoxy translucent with some color. Not only does it have some color but it will then pick up some of the surrounding color helping it look natural.
 

Bill Boehme

Administrator
Staff member
Beta Tester
TOTW Team
Joined
Jan 27, 2005
Messages
12,898
Likes
5,188
Location
Dalworthington Gardens, TX
Website
pbase.com
I have used wood colored epoxy putty. By itself, it does not really look much like wood, but it absorbs dyes and pigments well enough that it can be made to look realistic. After it has cured, I use an Xacto knife to create "grain" that mimics the surrounding wood. I then use graining pens of suitable colors to "draw" grain into the wood.

Trent's reason for using a balloon is to get the insert to conform to the shape of the interior top of the vessel which won't be circular since it has been carved at the opening. The insert is boiled for an hour or so until it can be rolled up and stuffed into the opening of the hollowform. Once that is done, a balloon is inserted through the small hole in the insert and inflated. The balloon is left in place for about a week until the wood has stabilized. After the balloon has been deflated, a few dabs of glue are placed on the perimeter of the insert and then the balloon is inflated again while the glue dries. this last step is not necessary if you have another way to hold the insert firmly in place while the glue cures.
 

john lucas

AAW Forum Expert
Joined
Apr 26, 2004
Messages
8,337
Likes
3,595
Location
Cookeville, TN
My balloons always shrink. Wonder how he keeps them inflated that long. Maybe better balloons or perhaps he clamps the nozzle end instead of tying it so it can be re inflated.
 

Bill Boehme

Administrator
Staff member
Beta Tester
TOTW Team
Joined
Jan 27, 2005
Messages
12,898
Likes
5,188
Location
Dalworthington Gardens, TX
Website
pbase.com
The typical dime store balloons won't hold air because they are thin. However, there are "industrial strength" balloons (that is not their real name) used by businesses that sell helium filled balloons. Helium would pass through the wall of an ordinary balloon like it wasn't there so the helium rated balloons are thick enough to hold helium for several days which means that it can hold the much larger molecules of oxygen, nitrogen, etc much longer.

He doesn't tie the balloons since untying would present a problem. It is a good idea to check the inflation daily. He twists the end of the balloon a couple turns and then tucks it under the rim of the opening. I was surprised to see how well that works.

I still have the balloon from a class that i took from Trent a couple years ago and it probably is good for a few more hollowforms.
 
Last edited:
Back
Top