You understood correctly, filling that particular piece with epoxy would be a challenge.
If I
had to fill a piece like yours with epoxy, I'd start at one end of the void and do a small pour. As soon as that set, rotate the piece a few degrees and do another pour, etc. As long as the epoxy was still sticky and hadnt fully cured, it should still bind. It would be a pain, but could be done.
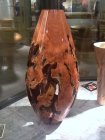
This bowl was done like that, I think I poured epoxy 8 different times to fill voids around the curve. The hot glue was already removed when I took the picture. Although you can't really see it in these pics, the split/void went down the side and almost to the center of the bowl.
View attachment 32602
Finished bowl.
View attachment 32603
View attachment 32604

 This photo of a birch burl bowl that had a bark inclusion that was open on both inside and out. I used masking tape on the inside then filled the void from the outside with crushed pipe stone and CA. The problem I have is that the masking tape bonds to the CA and is extremely difficult to remove so I am wondering if anyone has a better solution.