• Beware of Counterfeit Woodturning Tools (click here for details)
  • Johnathan Silwones is starting a new AAW chapter, Southern Alleghenies Woodturners, in Johnstown, PA. (click here for details)
  • Congratulations to Keven Jesequel for "Big Leaf Maple" being selected as Turning of the Week for April 15, 2024 (click here for details)
  • Welcome new registering member. Your username must be your real First and Last name (for example: John Doe). "Screen names" and "handles" are not allowed and your registration will be deleted if you don't use your real name. Also, do not use all caps nor all lower case.

Cherry Burl....suggestions?

Joined
Nov 4, 2006
Messages
2
Likes
0
Location
Wisconsin
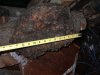
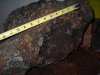
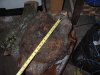
A local arborist/tree specialist gave me this nice cherry burl. I've never worked with cherry burl before and would appreciate some insights as to how I might really take advantage of this opportunity. Any tips on drying or cutting as well as how to orient this would be appreciated. (My lathe shouldn't limit me--16" / 2hp).
 

Attachments

  • P1000532.JPG
    P1000532.JPG
    420.4 KB · Views: 101
  • P1000531.JPG
    P1000531.JPG
    422.9 KB · Views: 84
  • P1000530.JPG
    P1000530.JPG
    426.9 KB · Views: 78
Joined
May 14, 2004
Messages
445
Likes
1
Location
Middlesex County, Virginia
Website
www.velvitoil.com
It almost looks as if most of the burl is on one side of the branch. When I have had small burls like that I have cut the burl away from the branch lengthwise. I then put the chunk between centers with the sawn part at the headstock end. With face protection in place I then shape the outside and turn a tenon for the bottom. I turn the piece around and chuck it up and continue turning a bowl.

The reason I approach the piece this way is because if you get any burl figure it will be on the outside. The deeper you go from outside to inside the less figure you will have. It has been my experience that the amount of hurled wood in these small burls is little.

At the risk of offending you, remember that when sawing this piece and turning the bark off you should be very careful. Be sure if the sawing is done on the bandsaw you secure the piece so it will not roll. You will have sharp hard pieces of bark flying when you turn it off so be sure to protect yourself.

BTW this forum is for telling not asking.
 
Last edited:
Joined
May 16, 2005
Messages
3,540
Likes
15
Take 'er up the middle of the tree/branch with the chainsaw. You can then get a preview of the depth of burl figure. If it's shallow, make a bowl with the center of the tree up. If deep, your choice of up or down, smooth or interrupted edge.

Turn at no more than a moderate speed to keep the energy of a throw down, and listen carefully for clicks or ticks indicating gaps or cracks. Stop often and glue them in stages as you go. Else, be prepared for disaster.

Lots of burls have bark inclusions in them. Some are pretty mushy, so drawknife and keep a bunch of the bark from the log to fill the gaps after you clean out the mush.

I don't use tenons because they steal visual and often actual depth, especially if you have the curved side down. Just a thought.
 
Joined
Feb 7, 2007
Messages
16
Likes
0
Location
Clemmons, NC
Website
www.mljwoods.com
Cherry Burl

Turn it as either of the previous posts suggested. Burl is a bit more stable than regular wood in my experience. I leave wall thickness on the initial turning about 8-10% of the major diameter, or in your case there will probably be 3/4" thick by the time you get it round and shapely. Put it in a plastic bag, wait two days then take it out, turn the bag inside out and place the turning back inside. Repeat this until you put your hand inside the bag and feel no condensation. This means that the free water content has evaporated, usually for me in NC that will be a month to a month and a half. Skim cut it to true it up and open fresh pores. It will be OK to sit out in the atmosphere and dry for an additional few months (for me 4-5) so that the bound water evaporates. Then do your final turning. This process has worked for me on most any type of wood, burl or other, for many years. It takes a while but minimizes checks and cracks, creates a micro climate around your turning each time you flip the bag, and lets the wood slowly relieve it's stresses. OR... you could turn it green down to 1/8" and let it move however it wishes. They are kinda cool that way too. Good luck with it!
 
Back
Top