• Beware of Counterfeit Woodturning Tools (click here for details)
  • Johnathan Silwones is starting a new AAW chapter, Southern Alleghenies Woodturners, in Johnstown, PA. (click here for details)
  • Congratulations to Keven Jesequel for "Big Leaf Maple" being selected as Turning of the Week for April 15, 2024 (click here for details)
  • Welcome new registering member. Your username must be your real First and Last name (for example: John Doe). "Screen names" and "handles" are not allowed and your registration will be deleted if you don't use your real name. Also, do not use all caps nor all lower case.

Beginner's DIY laser guide for hollowing

Joined
Dec 4, 2018
Messages
80
Likes
123
Location
Milon La Chapelle France
Website
www.youtube.com
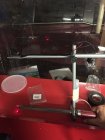
Thanks to the forum’s recent discussion of replacement lasers for the Monster system, I realized that I could easily build a simple laser guide for my EWT hollowers using a $5 cat laser (Didn’t find the Ron Brown laser guide here in France). After timidly turning a few hollow forms with tape on the gouge for depth, continuously checking the thickness with bent wire loops, this is a cool alternative. There may be other beginners in the same situation, so here’s a photo of my prototype version made out of scraps on a rainy Sunday afternoon (tape marks on the horizontal shaft are for the #1 and #3 hollower positions). Admittedly the prototype elbows aren't very elegant, but they clamp well.

DJR_7871.jpg
 
Joined
Dec 4, 2018
Messages
80
Likes
123
Location
Milon La Chapelle France
Website
www.youtube.com
Since the laser guide is perhaps not that obvious to use I have added below two photomontages which should help. First the laser spot distance from the cutting edge needs to be adjusted to your desired wall thickness. Then when the gouge is far from the wall, you will see the spot on the upper surface of your piece (first photo). As you reach the desired wall thickness, the spot drops to the horizontal plane and elongates as seen in the next photo. If the elongated "spot" disappears you have gone too far!

DJR_7908_tool visible.jpg DJR_7910_tool visible.jpg
 
Joined
Dec 10, 2018
Messages
7
Likes
0
Location
San Luis Obispo, CA
Looks like it does the job. I know the laser diodes are cheaper, did you add a current limiting resistor in your setup? If not the diodes usually don't last long and the beam power can go over 5mW (pointers and cat toys usually have them).
The website says it’s a 4.5V laser, 20mA, 51 resistance(?). I have two 1.5V batteries in series plugged in. I figured I’d be safe that way but I’m no expert.
 
Joined
Dec 4, 2018
Messages
80
Likes
123
Location
Milon La Chapelle France
Website
www.youtube.com
The website says it’s a 4.5V laser, 20mA, 51 resistance(?). I have two 1.5V batteries in series plugged in. I figured I’d be safe that way but I’m no expert.
Steve, from what you say, there is a 51 ohm resistor in series with the diode (its internal resistance is probably around 20 ohms). So assuming even a 4.5V battery and a 2V drop at the diode when it’s lasing that’s 35mA (recall V=IR). Since the batteries also have some internal resistance, you’re safe. If yours works with only a 3V battery there's even some margin, though you may need to go to three cells for longer period use. However, I wouldn’t connect it up to a non regulated power supply (check around on the web for a regulator circuit if you want to go that way).
 
Back
Top