• We just finished moving the forums to a new hosting server. It looks like everything is functioning correctly but if you find a problem please report it in the Forum Technical Support Forum (click here) or email us at forum_moderator AT aawforum.org. Thanks!
  • Beware of Counterfeit Woodturning Tools (click here for details)
  • Johnathan Silwones is starting a new AAW chapter, Southern Alleghenies Woodturners, in Johnstown, PA. (click here for details)
  • Congratulations to Dave Roberts for "2 Hats" being selected as Turning of the Week for April 22, 2024 (click here for details)
  • Welcome new registering member. Your username must be your real First and Last name (for example: John Doe). "Screen names" and "handles" are not allowed and your registration will be deleted if you don't use your real name. Also, do not use all caps nor all lower case.

Rehoning an edge between trips to the grinder......

odie

TOTW Team
Joined
Dec 22, 2006
Messages
7,116
Likes
9,817
Location
Panning for Montana gold, with Betsy, the mule!
Gretch reminded me of this, and is something I've been intending to mention, but I keep forgetting........:D

(They say that memory loss is a common thing with aging. It seems that my memory is no exception, and it's getting worse! :()

Since I began honing both sides of an edge about a half dozen times between trips to the grinder, I began noticing a certain benefit to the changing shape of that edge. This benefit is not possible with a bevel that has the normal sweeping curve from tip to shaft.

When you hone the bevel side of an edge, in effect, what you are doing is creating a secondary bevel near the tip. This secondary bevel is very thin. The more times a rehone is done, the greater the width of the secondary bevel.

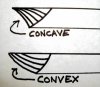
I'm finding there is a benefit among the drawbacks, when utilizing that secondary bevel on a sweeping curve on the outside of a bowl. Certainly controlling the cut is more difficult, but if that "sweet spot" is engaged, it can be a very nice flowing cut. If the edge is very sharp, the resulting manual sweep, and quality of that cut can be very satisfying......and require little sanding. This observation is only applicable to a point. There is a point when the secondary bevel works against the cut.......it can be too much, or too little, but when the presentation and the secondary bevel is perfect, it's a great benefit to my efforts. I believe there are many things, like species of wood, direction of grain, shape of the bowl exterior, proper direction of cut, that come into play with this.......in other words, everything has to be just right to reap the benefits.

The opposite is true for inside bowl cuts. Here, the larger the secondary honed bevel is, the worse the tool responds, and the worse the cut will be as a residual effect of that loss of response with the tool. I usually go to the grinder first thing with a gouge I'm using for finishing cuts on the interior. That way, during the course of shaping the interior, the secondary bevel is as small as possible.

ooc
 
Last edited:
Joined
Mar 20, 2009
Messages
207
Likes
1
You sure your not John Daly from the game show Whats my line. He kind of ran on & on & pinned things down to a fine point too. Oh he must have used a hone too. Ha Ha.
 
Joined
Aug 14, 2007
Messages
5,488
Likes
2,836
Location
Eugene, OR
Well, a couple of things here. First the term secondary bevel has always confused me. It implies that it is some thing you use, when most of the time it is considered to be what you get when you grind off most of the heel of the bevel for better cut control on the inside of the bowl, and to eliminate or greatly reduce the bruising you get from a sharp heel on the bevel.

When cutting and using a bevel rub, the closer the bevel is to the cutting edge, the easier it is to control. On the outside of the bowl, which is convex in shape most of the time, it makes little or no difference how long the bevel is. You are always cutting with the bevel rubbing close to the edge. When turning the inside of the bowl, which is mostly concave, a long bevel puts the cutting edge a lot farther away from the rubbing part. This makes tool control more difficult.

I have never been able to tell/feel/notice that honing the bevel makes any real difference. The micro bevel is not like what you use on a hand plane or bench chisel which actually changes the cutting edge bevel angle. You are mostly polishing the edge. I have never noticed that it improves the edge. I also always go back to the grinder, in part because it is harder to lose the grinder in the shavings. If you 'sharpen' instead of grind, it does pretty much the same thing in that you get a fresh edge. Most of us tend to grind rather than sharpen. All you have to really do is just a very light kiss on the grinding wheel and you are done.

robo hippy
 

hockenbery

Forum MVP
Beta Tester
TOTW Team
Joined
Apr 27, 2004
Messages
8,637
Likes
4,976
Location
Lakeland, Florida
Website
www.hockenberywoodturning.com
Well, a couple of things here. First the term secondary bevel has always confused me. It implies that it is some thing you use, when most of the time it is considered to be what you get when you grind off most of the heel of the bevel for better cut control on the inside of the bowl, and to eliminate or greatly reduce the bruising you get from a sharp heel on the bevel. When cutting and using a bevel rub, the closer the bevel is to the cutting edge, the easier it is to control. On the outside of the bowl, which is convex in shape most of the time, it makes little or no difference how long the bevel is. You are always cutting with the bevel rubbing close to the edge. When turning the inside of the bowl, which is mostly concave, a long bevel puts the cutting edge a lot farther away from the rubbing part. This makes tool control more difficult. I have never been able to tell/feel/notice that honing the bevel makes any real difference. The micro bevel is not like what you use on a hand plane or bench chisel which actually changes the cutting edge bevel angle. You are mostly polishing the edge. I have never noticed that it improves the edge. I also always go back to the grinder, in part because it is harder to lose the grinder in the shavings. If you 'sharpen' instead of grind, it does pretty much the same thing in that you get a fresh edge. Most of us tend to grind rather than sharpen. All you have to really do is just a very light kiss on the grinding wheel and you are done. robo hippy

My grinder is easier to find in the chips too. :)
Got a big laugh! :) We find all sort of things hauled out with the shavings
Who knows what we do not find.

One other element of short bevel is less drag and less vibration, especially important on thin walls and longer reaches off the tool rest.
While the bevel rub should be as light as possible there is always a tiny bit of grab from the wood on the bevel and the shorter bevel has less.
The Johannes Michelson grind with the convex bevel is an ideal tool for thin turning. It also works great for hollowing small vessels because it can make tight radius bevel riding cuts.
 
Joined
Oct 25, 2005
Messages
935
Likes
241
Location
Newberg, OR: 20mi SW of Portland: AAW #21058
All you have to really do is just a very light kiss on the grinding wheel and you are done.

For much of my turning, I’d agree with you; however, some final cuts really do benefit from a diamond honed edge. My “fine” wheel is 80 grit (185 micron) which leaves 80 grit serrated edge on the tool. When I hone with my blue or red diamond sticks, the edge is refined to 320 (45 micron) and 600 (25 micron), respectively.

This afternoon I reworked a dry alder bowl. The endgrain was tearing out something awful. Thousands of tiny torn pinholes. Honed tools did the trick and I was able to begin sanding at 220. Having the hones on hand for such instances is something I’m happy to have in the tool kit.
 

odie

TOTW Team
Joined
Dec 22, 2006
Messages
7,116
Likes
9,817
Location
Panning for Montana gold, with Betsy, the mule!
For much of my turning, I’d agree with you; however, some final cuts really do benefit from a diamond honed edge. My “fine” wheel is 80 grit (185 micron) which leaves 80 grit serrated edge on the tool. When I hone with my blue or red diamond sticks, the edge is refined to 320 (45 micron) and 600 (25 micron), respectively.

This afternoon I reworked a dry alder bowl. The endgrain was tearing out something awful. Thousands of tiny torn pinholes. Honed tools did the trick and I was able to begin sanding at 220. Having the hones on hand for such instances is something I’m happy to have in the tool kit.

(Sorry, I've been away for a couple days until this morning.)

I think we're drifting away from the point a little here. Those who choose not to hone......go for it! The point was that a very thin "secondary bevel" is the result of honing, and there may be some specialized uses for that bevel.

I mentioned this to see what comment would come up, and sure enough......it looks like Ian has made some similar discoveries:
You are right Odie I have found the same it makes for a good cut on the out side.

Ian

For myself, I'm not saying I fully understand all the "whys and wherefores" of what can be done with the tiny secondary bevel.......Just saying that under some circumstances, it certainly looks like it can be used for benefit.

ooc
 

john lucas

AAW Forum Expert
Joined
Apr 26, 2004
Messages
8,337
Likes
3,595
Location
Cookeville, TN
In my opinion a secondary bevel doesn't do anything. It just out of the way. It idea of having what I call a secondary bevel is simply to make the primary bevel shorter. I do this for several reasons. First I can hone the entire short bevel instead of just the very tip. Honing just the tip gradually increases the tip cutting angle. By honing the entire short bevel I keep the original cutting angle
Secondly I think Al mentioned. It reduces the friction which lets you "feel" the cut better. When you can feel the cut you don't have as much tendency to force the cut so you get a cleaner cut.
On the inside of a bowl the shorter bevel act more like a convex bevel and won't leave the little ridges that a long flat or concave bevel does.
At least that's why I do it. I actually have 3 or more bevels on my tools. I do a primary bevel. Move the tool forward in the V arm and grind the secondary bevel. Then I remove it from the Wolverine jig and grind the bottom sharp corner off by hand as the grinder is slowing down. Neither of the bottom 2 bevels actually do anything for my cuts.
 

odie

TOTW Team
Joined
Dec 22, 2006
Messages
7,116
Likes
9,817
Location
Panning for Montana gold, with Betsy, the mule!
I can see I'm having a hard time getting everyone to understand what I'm attempting to convey......but, I think Ian gets it. He does, only because he has experienced the same thing......he has "made the discovery"!

For those who want to learn something that is completely out of the mainstream thought of "the herd", and have no conception of what's being presented......the only thing that is left is to actually "make the discovery", which means don't take my word for it. Find out if it has any benefits, by what your own hands and eyes can tell you! :D

ooc
 
Joined
Mar 20, 2009
Messages
207
Likes
1
In my opinion a secondary bevel doesn't do anything. It just out of the way. It idea of having what I call a secondary bevel is simply to make the primary bevel shorter. I do this for several reasons. First I can hone the entire short bevel instead of just the very tip. Honing just the tip gradually increases the tip cutting angle. By honing the entire short bevel I keep the original cutting angle
Secondly I think Al mentioned. It reduces the friction which lets you "feel" the cut better. When you can feel the cut you don't have as much tendency to force the cut so you get a cleaner cut.
On the inside of a bowl the shorter bevel act more like a convex bevel and won't leave the little ridges that a long flat or concave bevel does.
At least that's why I do it. I actually have 3 or more bevels on my tools. I do a primary bevel. Move the tool forward in the V arm and grind the secondary bevel. Then I remove it from the Wolverine jig and grind the bottom sharp corner off by hand as the grinder is slowing down. Neither of the bottom 2 bevels actually do anything for my cuts.


"In my opinion a secondary bevel doesn't do anything."

But than you go on to mention all the things it does do....

So which of your opinions am I to believe ?????? Chuckle...
 
Last edited:

odie

TOTW Team
Joined
Dec 22, 2006
Messages
7,116
Likes
9,817
Location
Panning for Montana gold, with Betsy, the mule!
"In my opinion a secondary bevel doesn't do anything."

But than you go on to mention all the things it does do....

So which of your opinions am I to believe ?????? Chuckle...

Hello Bart......

I believe I understand exactly what John is saying.......and, that he completely misses the point I've been trying to make. He's right, in that removing some of the heal of the bevel does do what he says it does......It makes room for a more tight curve during the sweep of the gouge. I do this, as well. What he misunderstands is this kind of secondary bevel isn't what I'm talking about at all. If the gouge is honed, and that gouge has a secondary bevel for the purposes of clearance through a tight curve, then my comment specific to that gouge would be rightly called a third bevel instead. I know this is confusing to some, but I trust there are a few people here who are on the same page with me.......well, hopefully!


ooc
 
Joined
Mar 20, 2009
Messages
207
Likes
1
Understood...Paragraph 2 line 2 page 2002... I'm well honed in now. I may be getting older but I'm still tarp as a shack.

We're all shiny but we're not all brand new.
 

odie

TOTW Team
Joined
Dec 22, 2006
Messages
7,116
Likes
9,817
Location
Panning for Montana gold, with Betsy, the mule!
Understood...Paragraph 2 line 2 page 2002... I'm well honed in now. I may be getting older but I'm still tarp as a shack.

We're all shiny but we're not all brand new.

You are always good for a good laugh, Bart.......

You could probably make a living as a stand-up comedian......:D

later.......

ooc
 
Joined
Sep 8, 2005
Messages
303
Likes
13
You are talking about the "micro-bevel" on the bevel correct? The Michelsen grind used a similar bevel.
Odie, if you've not tried the Michelsen grind I highly recommend you give it a try. I have 2 large gouges with his grind and it definitely has it's place.
 

odie

TOTW Team
Joined
Dec 22, 2006
Messages
7,116
Likes
9,817
Location
Panning for Montana gold, with Betsy, the mule!
You are talking about the "micro-bevel" on the bevel correct? The Michelsen grind used a similar bevel.
Odie, if you've not tried the Michelsen grind I highly recommend you give it a try. I have 2 large gouges with his grind and it definitely has it's place.

Hi Brian......

I'm always trying new things......where can I see the Michelsen grind in demonstration?

thanks

ooc
 

odie

TOTW Team
Joined
Dec 22, 2006
Messages
7,116
Likes
9,817
Location
Panning for Montana gold, with Betsy, the mule!
Here is a vid on creating the grind:
http://youtu.be/wevTPeJoOrs
Then do a search on you tube and there are others. I have his DVD. If I ever perfect his grind then I'll be a happy camper. Really great for inside bowls.

Hi Brian.......

I just watched the video (twice). It looks like the Michelson grind has one very obvious difference over what I'd call a basic standard grind. That would be the Michelson grind looks to have a convex shaped bevel, instead of a concave bevel. In order to achieve this, it looks like he is pushing the tool shaft forward slightly while minimally rotating the shaft. It doesn't look like Michelson swings the tool from side to side very much (Ellsworth fashion).....but does to some minimal extent.

Having never tried the Michelson grind, my first impression is that it probably will respond very similarly to the secondary bevel being produced on a standard grind with the addition of multiple honings that I've described in this thread.

With any convex shape of the bevel, it seems unlikely that a smooth unvarying bevel can be achieved without some mechanical advantage point for steady progression through the grind. Maybe Michelson has acquired some dexterity with practice......don't know?

Don't know the answers to how the Michelson grind will respond in any difference to a concave standard grind with a honed slender bevel.......but, I will find out!......I just wrote a note to myself that will end up in my shop. Eventually, I'll have some answers to these questions, because I usually apply theory to practice, to experience, and let the chips fall where they will. With hands on experimentation, the results usually transform theory into knowledge!......:D

ooc
 

Attachments

  • Convex vs Concave (2).JPG
    Convex vs Concave (2).JPG
    87.7 KB · Views: 42
Last edited:

Steve Worcester

Admin Emeritus
Joined
Apr 9, 2004
Messages
2,693
Likes
96
Location
Plano, Texas
Website
www.turningwood.com
Odie, assuming you are talking about honing a gouge that comes off of a grinding wheel, which I think you are, then when you hone it keeping the hone in contact with the top and bottom of the bevel, would "flatten" out those sections, leaving a micro bevel. The reality I think is that if you are rubbing the bevel in the cut, you still have both the top and bottom of the gouge (heel and toe if you will) in contact through out the cut. To be able to have just the tips micro bevel in contact would be real tough (unless you honed the hell out of it and created a longer micro bevel).
I definitely see the benefits of the honing, keeping it sharp without going back to the grinder, but I don't see how you could keep a micro bevel on the toe in contact during a cut. But this philosophy comes from keeping the bevel rubbing while making a cut, because without that, the gouge easily gets out of control.
 

odie

TOTW Team
Joined
Dec 22, 2006
Messages
7,116
Likes
9,817
Location
Panning for Montana gold, with Betsy, the mule!
Odie, assuming you are talking about honing a gouge that comes off of a grinding wheel, which I think you are, then when you hone it keeping the hone in contact with the top and bottom of the bevel, would "flatten" out those sections, leaving a micro bevel. The reality I think is that if you are rubbing the bevel in the cut, you still have both the top and bottom of the gouge (heel and toe if you will) in contact through out the cut. To be able to have just the tips micro bevel in contact would be real tough (unless you honed the hell out of it and created a longer micro bevel).
I definitely see the benefits of the honing, keeping it sharp without going back to the grinder, but I don't see how you could keep a micro bevel on the toe in contact during a cut. But this philosophy comes from keeping the bevel rubbing while making a cut, because without that, the gouge easily gets out of control.

Hi again, Steve.......

Using the heel of the bevel, contrary to popular belief, is sometimes an optional choice. Sometimes it is the best option, and sometimes it isn't! Same is true for how honing might be done. It's not necessary to contact the bevel with the honing instrument at two points. Functionally, all that is necessary to come in contact with the honing instrument is the cutting edge, nothing more. The purpose is to renew the edge, although the more acute the angle, the better the longevity of the edge prior to returning to the grinder is evident.

I assume you are not alone in your thinking that the heel of the bevel making contact with the wood is necessary for a clean cut, but I don't believe this is so. There are other things that contribute to stability......hands, body, tool rest, technique.....and knowledge are all critical elements. Nothing is sacred here, and the rules only apply to those who feel constrained by them.

I keep finding it necessary to state what should be obvious to everyone.......the one and only thing that really matters.....is results!

Happy New Year to everyone! :D Hard to believe another year has just gone by like the blink of an eye! :rolleyes:

ooc
 
Last edited:
Joined
May 4, 2005
Messages
203
Likes
1
Location
Derby, Kansas, USA
Honing

I have been taught to hone the flute more than the bevel. The idea of honing is to put a final edge on the tool. After honing the flute with a slip stone for a few trips to the grinder, you begin to see the flute is not at all level. So honing that part of the edge actually sharpens and does not create any type of secondary or tertiary bevel.

Secondly, Creating a free hand bevel has been likened by many experienced turners as turning on the grinder (to paraphrase). Your sharpening begins to mimic your turning. Or your turning begins to mimic your sharpening. With experience and practice you become accustomed to the shape and feel of the edge on your tool. Pick up a tool sharpened by another turner and it does not work quite the same.

Sharpen and hone as you will. Put the tool to the spinning wood. Get your best cut, eliminate some sanding. Practice, Practice, Practice!
 

odie

TOTW Team
Joined
Dec 22, 2006
Messages
7,116
Likes
9,817
Location
Panning for Montana gold, with Betsy, the mule!
Good morning, and happy new year! :D

Am I correct that the Michelson grind has a convex bevel? If this is so, then it isn't possible to ride the bevel in any other place than right up close to the cutting edge. This is essentially what is happening with a slender honed bevel up close to the cutting edge while not riding the bevel in the traditional fashion.

If all of these things are true, then I'm guessing Michelson has "made the discovery" being discussed in this thread. There is circumstance where this cutting action produces a very clean tear free cut.....a cut that requires little sanding, however, this cut isn't a "cure all". It is useful, but not applicable in all situations, and I hope the reader hasn't been concluding that's what I meant. It is one more thing that can be used in the search for "the perfect cut", but is not a substitute for a regular standard grind with a traditional concave bevel.

ooc
 

hockenbery

Forum MVP
Beta Tester
TOTW Team
Joined
Apr 27, 2004
Messages
8,637
Likes
4,976
Location
Lakeland, Florida
Website
www.hockenberywoodturning.com
Good morning, and happy new year! :D Am I correct that the Michelson grind has a convex bevel? If this is so, then it isn't possible to ride the bevel in any other place than right up close to the cutting edge. This is essentially what is happening with a slender honed bevel up close to the cutting edge while not riding the bevel in the traditional fashion. If all of these things are true, then I'm guessing Michelson has "made the discovery" being discussed in this thread. There is circumstance where this cutting action produces a very clean tear free cut.....a cut that requires little sanding, however, this cut isn't a "cure all". It is useful, but not applicable in all situations, and I hope the reader hasn't been concluding that's what I meant. It is one more thing that can be used in the search for "the perfect cut", but is not a substitute for a regular standard grind with a traditional concave bevel. ooc

Yes! A convex bevel.

The Michelson grind is terrific for turning thin walls, makes and excellent finish cut on most woods, and I like it for hollowing a tight radius.
I keep a couple gouges in my tool kit.

I know several,people who use the Michelson grind on almost all their work.
I prefer the Ellsworth grind for most of my work.

When I occasionally turn a twisting figure or punky piece of wood I might try half a dozen different cut/grind/scrape combinations to find one that gives the cleanest cut.
Might even try honing too!
 
Joined
Aug 14, 2007
Messages
5,488
Likes
2,836
Location
Eugene, OR
I chatted with Johannes about his grind and told him it was similar to one that Christian Burshard used that had no bevel at all, just rounded over on the outside. Christian commented that in theory it shouldn't be able to cut, but did so nicely. Johannes said that he showed that grind to Christian. I would guess that the Michaleson grind works well, but I need to see it in person and play around with it. Hope to do that in Phoenix. I quit using the swept back/Ellsworth/O'Donnel/Irish grind some time back. I prefer the more traditional fingernail grind, about a 45 degree bevel and sweep, and a bottom feeder type. I use scrapers for any shear scraping I do. I use the burr from the grinder, and have tried honing a burr on my scrapers, and there is not any noticeable difference. Using CBN wheels helps. Same with a burnished burr.

robo hippy
 
Joined
Mar 20, 2009
Messages
207
Likes
1
You are always good for a good laugh, Bart.......

You could probably make a living as a stand-up comedian......:D

later.......

ooc

If I tried that they would call me the vortex comodian that needed to be flushed & then watched to make sure I swirled to the right.
 
Last edited:
Joined
Apr 13, 2013
Messages
269
Likes
2
Location
Ct
I use a dry grinding with an 8 inch wheel to shape the tool and the Tormek for the final sharpening. In both grinders I have the supporting jig that comes with the Tormek thus, when I go from one to the other the set is identical in both cases. What changes is the different diameter of the wheels.
Originally the Tormek wheel had a full diameter of 10 inches and this difference in diameters produced a sharp edge with a thin bevel that is fantastic because allows to have a very low friction on the wood (no markings, excellent control etc). Thus the larger diameter in this case act as a diamond honing tool if I'not mistaken.
I always grind away the heel to have a better access to tighter spots both for the spindle and bowl gouges. I assume we are talking about the bowl gouges. When the thin bevel became to large a fast pass on the Baldor restored the 8inch concavity and the Tormek the fine edge with the thin bevel.
Now the Tormek wheel is reduced to just a little over 8 inches and to get what I want I have to change the distance from the wheel which is so easy with the micro adjust that comes with the Tormek support.
As far as the concave bevel, I've used and seen it. I believe in Raffan books and DVD but I' not absolutely sure. Nothing is new in this world.
 
Joined
Sep 10, 2010
Messages
148
Likes
0
Location
Stow,Ohio
I use a diamond hone and my reasoning is, most everyone says that the burr produced by the grinder brakes off.:( My idea is if the burr brakes off then there's a flat spot and a flat spot means your tool is dull. If you start with a non honed blade your starting with a dull tool as soon as you hit the wood and the burr brakes off.:mad: So I hone and do think it helps from the very start hone the burr off and you'll start with a sharper blade.:D
Just my $0.02:D
 

odie

TOTW Team
Joined
Dec 22, 2006
Messages
7,116
Likes
9,817
Location
Panning for Montana gold, with Betsy, the mule!
I use a diamond hone and my reasoning is, most everyone says that the burr produced by the grinder brakes off.:( My idea is if the burr brakes off then there's a flat spot and a flat spot means your tool is dull. If you start with a non honed blade your starting with a dull tool as soon as you hit the wood and the burr brakes off.:mad: So I hone and do think it helps from the very start hone the burr off and you'll start with a sharper blade.:D
Just my $0.02:D

I've heard the same thing, Harry.....

Theoretically speaking, I don't see how a non honed edge can have the burr broken off and maintain sharpness.

I'm also using a diamond hone, and it's so quick and easy, that is doesn't make much sense to not do it.

Eventually someone with access to the proper equipment will supply some photos before and after of both honed edges and non honed edges immediately after the first use. I'd be interested in seeing that.

ooc
 
Joined
Apr 13, 2013
Messages
269
Likes
2
Location
Ct
The burr is produced by the accumulation of metal particles on the edge while the wheel rotates, irrespectve of the direction of rotation. The burr is removed by honing (leather, leather plus compund, fine diamond etc) i.e. "stressing" the burr to the breking point thus leaving the edge clean. The perfect example is a carpenter or carving chisel in which you hone the flat side and then the bevel side until the burr breaks off. This process can be seen by naked eyes or better with a simple magnifying lens or felt with a finger.
Thus removing the burr leaves a sharpe edge that does not have the burr to interfere with the cutting edge itself.
Using a fine diamond hone between grindings restore the edge without leaving a noticeble burr which is present in any case but very small and thus with little negative effect.
The scraper is a different story and the burr itself represents the cutting edge being much more strong than the one produced on a tool whith a narrower angle at the edge. There are three typer of burrs but this is nor relevant to our purposes.
 
Joined
Apr 19, 2007
Messages
169
Likes
26
Location
Ottawa, Ontario
WRT to the Michelson Youtube video and his "grind", it is noteworthy, I think, to note that Michelson no longer grinds that way. He has invented and markets a fixture/jig that he calls the Vector. He says that he now uses it exclusively and no longer grinds his gouges freehand. He says that the Vector reproduces his signature convex grind. I have the Vector and have not been able to achieve those results. (I'm not saying it's not possible, just that I cannot do it.)
 
Joined
Sep 8, 2005
Messages
303
Likes
13
I was thinking about purchasing the "vector". Guess I need to talk with Johannes and see what the learning curve is and if he has a vid on its use.
 
Joined
May 15, 2004
Messages
96
Likes
0
Location
Western North Carolina mountains
People hone no matter whether it works.

I used to work in a ceramic plant that trashed AlumOx round tubes. Over the years I gave away a 5 gal bucket of those tubes at symposiums from FL to VA. I retired in 2009 and lost my source of tubes. The tubes ranged from 1/8" to 5/8" in diameter. They were perfect for honing the inside of the flute of gouges. If people weren't using them then why are they still asking me for them four years later?
 
Joined
Apr 19, 2007
Messages
169
Likes
26
Location
Ottawa, Ontario
Brian: If you learn anything about using it successfully, please post it or write me. Hannes has 2 youtube videos showing its use. I guess that I'm dense. I wrote to Hannes 3 times over a period of a few months for some advice, but I did not receive a reply to any of them. Mine gathers expensive dust and I'm back to the Varigrind.
 

Bill Boehme

Administrator
Staff member
Beta Tester
TOTW Team
Joined
Jan 27, 2005
Messages
12,897
Likes
5,187
Location
Dalworthington Gardens, TX
Website
pbase.com
I bought his fixture at SWAT and he gave me a personal tutorial on its use. It didn't seem to be particularly hard. I'll admit that I have not used it yet, but I better do it soon or I may forget what he showed me (I think that I can remember how he did it ... I hope).
 
Joined
Apr 19, 2007
Messages
169
Likes
26
Location
Ottawa, Ontario
Bill: I admit that it does not seem like rocket science and Hannes does have two videos on it on Youtube. I simply cannot get it to work well, giving me a consistent bevel from one side of the gouge to the other. I have had some help from another turner who has one, and that did improve things somewhat. However, I still don't get the results that I would like. If you do, and find some "secret" I would be grateful for any advice you can pass along.
 

Bill Boehme

Administrator
Staff member
Beta Tester
TOTW Team
Joined
Jan 27, 2005
Messages
12,897
Likes
5,187
Location
Dalworthington Gardens, TX
Website
pbase.com
Bill: I admit that it does not seem like rocket science and Hannes does have two videos on it on Youtube. I simply cannot get it to work well, giving me a consistent bevel from one side of the gouge to the other. I have had some help from another turner who has one, and that did improve things somewhat. However, I still don't get the results that I would like. If you do, and find some "secret" I would be grateful for any advice you can pass along.

Grant, it sounds like you may not have the middle hole perfectly centered on the middle of the grinding wheel. If it is not perfectly centered then the bevel on the two sides won't be the same.
 
Joined
Apr 19, 2007
Messages
169
Likes
26
Location
Ottawa, Ontario
Tks, Bill, but it is spot on. I've played with this thing for hours, changing how much the gouge extends from the holder, changing angles, etc. Hannes says not to use the center hole at all. I'm not sure why he put it there, if it is not to be used. The turner who gave me some advice does use it.
At any rate, I am taking this thread off track, and I apologize to the OP for that.
 

Bill Boehme

Administrator
Staff member
Beta Tester
TOTW Team
Joined
Jan 27, 2005
Messages
12,897
Likes
5,187
Location
Dalworthington Gardens, TX
Website
pbase.com
Tks, Bill, but it is spot on. I've played with this thing for hours, changing how much the gouge extends from the holder, changing angles, etc. Hannes says not to use the center hole at all. I'm not sure why he put it there, if it is not to be used. The turner who gave me some advice does use it.
At any rate, I am taking this thread off track, and I apologize to the OP for that.

You may have misunderstood him. He told me that the center hole is used for the nose of the gouge and the side holes are only used on the wings. In fact, if you use the center hole and then have the gouge extending two inches out of the jig you have exactly the same set up as the Ellsworth jig -- not similar or almost, but EXACTLY. But, it is better than the Ellsworth because you do not need to make you own base part of the fixture. So if you have some gouges that you want to put an Ellsworth grind on, use the center hole.
 
Joined
Apr 19, 2007
Messages
169
Likes
26
Location
Ottawa, Ontario
Well, Bill, Hannes may have told you that, but his video says not to use the center hole. If you look at the Vector intro video at just over 5 minutes in, you'll see what I mean. I'm not arguing with you about what he may have told you. I can't get a reply from emails to him, so maybe he would say the same thing to me, if he would take the time to help.
 
Joined
Sep 8, 2005
Messages
303
Likes
13
Hannes may be out of town. I know he makes trips to Denmark on occasion. Have you tried phoning him?
 

Bill Boehme

Administrator
Staff member
Beta Tester
TOTW Team
Joined
Jan 27, 2005
Messages
12,897
Likes
5,187
Location
Dalworthington Gardens, TX
Website
pbase.com
Well, Bill, Hannes may have told you that, but his video says not to use the center hole. If you look at the Vector intro video at just over 5 minutes in, you'll see what I mean. I'm not arguing with you about what he may have told you. I can't get a reply from emails to him, so maybe he would say the same thing to me, if he would take the time to help.

I think that I remember somebody asking him about the center hole -- Johannes Michelsen was doing a short demo for each customer and I think that I recall him saying something about not using it, but I think that there was a comment that he made about just using it to touch up the nose of the tool if needed because it could otherwise get somewhat pointed. A couple years ago when I bought my Johannes gouges he showed me how he did his hand sharpening because he said back then that a jig could not sharpen the way that he sharpens with the tool rolled over so far. I might take one of the tools that he sharpened by hand and compare it to how his jig does. Of course watching him do things, you know that you are seeing a master craftsman when he can turn a hat to 1/16 inch thick and maintain perfect thickness.

When I got home, I compared the jig to my very old Ellsworth jig and was not too surprised to see that the dimensions are exactly the same. The only difference is that the tool made by Johannes is much higher quality compared to my very old Ellsworth jig (probably his first version which appears that it might be a sand casting). I suspect that most people who buy the Hannes jig never realize that they also can use it to put the same familiar swept back edge on their bowl gouges that the Ellsworth jig does.
 
Back
Top