• Beware of Counterfeit Woodturning Tools (click here for details)
  • Johnathan Silwones is starting a new AAW chapter, Southern Alleghenies Woodturners, in Johnstown, PA. (click here for details)
  • Congratulations to Jim Hills for "Journey II" being selected as Turning of the Week for May 6th, 2024 (click here for details)
  • Welcome new registering member. Your username must be your real First and Last name (for example: John Doe). "Screen names" and "handles" are not allowed and your registration will be deleted if you don't use your real name. Also, do not use all caps nor all lower case.

Looking for suggestions on polishing bowls with detail grooves.........

odie

TOTW Team
Joined
Dec 22, 2006
Messages
7,134
Likes
9,954
Location
Panning for Montana gold, with Betsy, the mule!
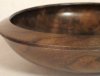
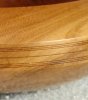
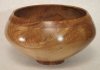
I'm having some trouble with some lint residue stuck in the interior of detail grooves on bowls, after using Beale buffing system.

The number one thing that helps with this is to get the cleanest cut possible within the interior of these grooves, but a small amount of lint seems to be inevitable in the endgrain areas.

I've tried using a toothbrush, but this only works marginally.....bristles too soft to be effective.

I've tried a dental pick with needle point. This works, but is rather tedious. If you slip, you've just scratched the surface of your bowl.

Tried a stiffer nylon brush, made in a toothbrush configuration, made for cleaning grout. So far, this seems to be the best way to do it, but I still have to resort to the dental pick to clean up some occasionally left over lint in the endgrain areas.

I've tried a nylon brush attachment on a Foredom type tool. This is much too aggressive, and will mar the surrounding finish around the detail groove.

Any other suggestions would be appreciated......thanks.

ooc
 

Attachments

  • 683-4 Curly Claro Walnut.JPG
    683-4 Curly Claro Walnut.JPG
    200.2 KB · Views: 104
  • 709-4 Desert Ironwood.JPG
    709-4 Desert Ironwood.JPG
    76.7 KB · Views: 112
  • 741 Figured Spalted Maple.JPG
    741 Figured Spalted Maple.JPG
    206.6 KB · Views: 99
Joined
Apr 25, 2004
Messages
165
Likes
3
Location
Milkyway
Don't buff the details. Cover the problem area with something that can be more easily be removed after buffing. Automotive pin striping tape come in narrow widths. You could put a piece of wire in the grove when you buff. This can be a hazard if the wire comes lose while buffing so be careful and mind what you are doing.
 
Joined
May 16, 2005
Messages
3,540
Likes
15
Shoe brush, used as if you were buffing your brogans. Second choice is a china bristle brush mounted for power brushing. That stiff nylon-bristle brush will burnish the wood pretty nicely if you care to use it before or in lieu of finish application.

If you don't want to buff the grooves, you'll have to cover 'em as suggested.
 

Bill Boehme

Administrator
Staff member
Beta Tester
TOTW Team
Joined
Jan 27, 2005
Messages
12,903
Likes
5,194
Location
Dalworthington Gardens, TX
Website
pbase.com
I have a Beale buffing set, but almost never use it. While it seemed like a nice gadget and I read a lot of nice comments about it on various forums, I stowed it in the gadget bone-yard beneath my radial arm saw after a few uses. It resides with some not-quite-ready-for-prime-time good ideas such as lathe dust collection shrouds, funnels, and scoops.

I think that burnishing the end grain fibers might help prevent them from catching lint. I usually use ultra-fine sandpaper with a backer to burnish the stubble-like fibers of end grain and usually also polish with Micromesh. I have also found that an oval burnishing tool I use for pulling burrs on cabinet scrapers can be sometimes be used to burnish rough end grain.

I don't know if you have tried tape yet to remove the lint, but it would be worth a try. If you have any Gorilla brand tape, it should be able to pull out just about anything that is not part of the wood. Duct tape would also be a good choice.

I don't brush my Brogans.:D
 
Joined
Nov 5, 2006
Messages
16
Likes
0
First of all, I like the detail of the "micro grooves". The lint, is coming from torn fibers that are exposed. I assume....that the grooves may have been put in by using a portion of a fine tooth hack saw blade. If not, please forgive me for making that assumption. The issue is, how do you deal with the torn grain...? Get a small piece of Formica (Lowe's sample display) and sand, with a belt or disk sander, a sharp edge on the Formica, then very carefully, burnish the grooves. At this stage, you will have to do it by hand, but for future projects, you can do it on the lathe. If it is done on the lathe, is will be neccessary to resharpen the Formica frequently....One word of caution, if left in the groove too long, in will actually "burn" the wood. It will also help to use a soft wax, (Johnsons Paste Wax) for a lubricant to combat the burning.

One suggestion to deal with torn fibers, is to "lock" the fibers together BEFORE you turn the grooves. This can be done by applying the water thin CA glue to the area. YOU MUST use some sort of sealer on the wood before the CA glue is applied. IT WILL, stain your wood if you don't. I usually apply MinWax #209 to the surface. After you rub off the access oil. apply the CA, it will penetrate the fibers and lock them together.

Hope this helps, Keep up the good work....
 

john lucas

AAW Forum Expert
Joined
Apr 26, 2004
Messages
8,348
Likes
3,604
Location
Cookeville, TN
The 3M bristle disc probably would but you would have to be very selective over which grit. The courser grits add a texture of their own on the top edges of fine detail and if you stay there very long would even round over the edges. I just played with them extensively on a piece the other day and there is definitely a learning curve.
 
Joined
Oct 12, 2008
Messages
143
Likes
0
Location
The Adirondacks
I've never used them, so I may be talking through my hat, but I happened to see on the Beall site horsehair buffs intended for delicate work. That might be worth investigating.
 
Joined
Aug 5, 2011
Messages
78
Likes
8
Location
westlake, LA.
Odie

Every now and then when it happens, I reach for a brass bristle brush and brush lightly to remove what ever is caught.

GAry:cool2:
 
Joined
Sep 10, 2010
Messages
148
Likes
0
Location
Stow,Ohio
I use an electric tooth brush with a hard head I get them from Discount Drug Store. Most any replaceable head electric tooth brush will have soft, med, hard or some even have like med hard or extra soft just look for a hard and try it. I believe I have around $10.00 in mine.
It works great for getting wax out of bark inclusions also.
 
Joined
Oct 6, 2009
Messages
26
Likes
0
Some kind of liquid finish to help lift the fuzzies in combination with a shoe brush or china bristle chip brush. Never tried it, but floating or lubricating the things usually helps.
 

odie

TOTW Team
Joined
Dec 22, 2006
Messages
7,134
Likes
9,954
Location
Panning for Montana gold, with Betsy, the mule!
Thank you all for the most excellent suggestions. There are several things I'm going to try here.......

I have several additional follow-up comments to make, but don't have the necessary time to compile my thoughts right now........

Any further discussion is greatly appreciated......

ooc
 

hockenbery

Forum MVP
Beta Tester
TOTW Team
Joined
Apr 27, 2004
Messages
8,667
Likes
5,028
Location
Lakeland, Florida
Website
www.hockenberywoodturning.com
Something I learned from Christian Burchard.
Use a Japanese saw sharpening file.

When I cut a groove with a skew point I cut from each side and meet in the dead center bottom less often than 100%
The result when I miss are little fuzzes.
The Japanese file comes to a sharp edge and cleans the grooves up nicely. I've always used it with the lathe not turning.

Of course the real trick is to meet dead center then there is no clean up.

Al
 

odie

TOTW Team
Joined
Dec 22, 2006
Messages
7,134
Likes
9,954
Location
Panning for Montana gold, with Betsy, the mule!
I use an electric tooth brush with a hard head I get them from Discount Drug Store. Most any replaceable head electric tooth brush will have soft, med, hard or some even have like med hard or extra soft just look for a hard and try it. I believe I have around $10.00 in mine.
It works great for getting wax out of bark inclusions also.

This is a very creative idea. I wonder if one of those "sonic" toothbrushes would work.....? Anyway, I don't have an electric toothbrush, but I think they are pretty cheap........I put one on my list and plan to give this a try.

I think that the 3M bristlediscs would work well in removing the lint.
MZ

I didn't try the 3M brand, but did try a nylon bristle wheel. That was much too aggressive. I could be wrong, but to my thinking, it seems that anything high speed like that would be problematic. If I don't find solutions in these other suggestions, the 3M bristle brush might be something to try, though.


My solution is magnifying glasses and tweezers :)

Don't know about the tweezers, and how well they might work inside a tiny groove, but I'm going to keep in mind the magnifying glass for when I use the dental pick.....thanks.

Odie

Every now and then when it happens, I reach for a brass bristle brush and brush lightly to remove what ever is caught.

GAry:cool2:

I have a brass brush in the shop that's used for other things. At first thought, it might be a little too abrasive to the surrounding finish, where the nylon bristles were not too abrasive.......but, I must admit that I didn't try the brass brush. I'm going to give that a try and see for sure.


The lint is embedded into the wood grain and if caught just right by the dental pick, it's pretty easily removed. The problem is maneuvering the dental pick in exactly the right way to accomplish the desired result. I've got a magnifying glass, but never really thought to use it......dumb, yes, but, I'm going to give that a try first

Brass brush, cheap electric toothbrush, magnifying glass/dental pick, these things are on the agenda to try.


Thanks to all who responded...........

ooc
 
Last edited:

Bill Boehme

Administrator
Staff member
Beta Tester
TOTW Team
Joined
Jan 27, 2005
Messages
12,903
Likes
5,194
Location
Dalworthington Gardens, TX
Website
pbase.com
Have you tried using something like scotch tape or adhesive packing tape? I have used it in a manner similar to a lint roller.

I mentioned it in post #4, but I guess that the idea sounded too pedestrian. Since I am always using lint rollers (and sometimes Gorilla tape) to remove fur from articles of clothing, it seemed like a natural solution.
 

odie

TOTW Team
Joined
Dec 22, 2006
Messages
7,134
Likes
9,954
Location
Panning for Montana gold, with Betsy, the mule!
I mentioned it in post #4, but I guess that the idea sounded too pedestrian. Since I am always using lint rollers (and sometimes Gorilla tape) to remove fur from articles of clothing, it seemed like a natural solution.

Hello Bill.......

The reason I passed over that idea is that the grooves I make are narrow and deep. I doubt that any kind of tape is going to get down into the interior of the groove. It just didn't seem like tape was the solution for me, although it might be an idea someone else might use......and, thanks for the suggestion.

I did get a small brass "toothbrush" today......and proceeded to take out all the tufts of brass except for a few. That way I can pinpoint the target area.......or, so my theory goes. :D

I won't be polishing bowls for a few days, to a week or so.......So, I'm not going to know how that works for my purposes until then. All that's needed is to snag the lint in some manner, and it'll pop right out, but it does need to be pulled in a particular direction to work......we'll see!

ooc
 
Last edited:

odie

TOTW Team
Joined
Dec 22, 2006
Messages
7,134
Likes
9,954
Location
Panning for Montana gold, with Betsy, the mule!
Turn the pressure up on your air compressor and give it a blow.

Yep, John......that's what I always try first, and then resort to brushes and picks, and things like that. A blast of air does work sometimes, and I failed to mention that it's part of the "procedure".

I believe I've got the air up to about 150psi, which is close to max........

ooc
 
Last edited:
Joined
Oct 2, 2006
Messages
1,049
Likes
35
Location
Tallahassee FL
Packing Tape

The reason I passed over that idea is that the grooves I make are narrow and deep. I doubt that any kind of tape is going to get down into the interior of the groove. It just didn't seem like tape was the solution for me, although it might be an idea someone else might use......and, thanks for the suggestion.

Try using TWO pieces of tape, back-to-back sticky side out, with the edge into the groove.
 

Bill Boehme

Administrator
Staff member
Beta Tester
TOTW Team
Joined
Jan 27, 2005
Messages
12,903
Likes
5,194
Location
Dalworthington Gardens, TX
Website
pbase.com
Try using TWO pieces of tape, back-to-back sticky side out, with the edge into the groove.

Tape such as clear packaging tape and gaffer's tape and Gorilla tape (same thing as gaffer's tape) are stiff enough to use on edge. Alternatively, fold a piece backwards across the edge of a skew or knife blade and gently roll the edge along the groove. Obviously this is not done with the lathe running. ;)

I used the tape trick a few days ago on a couple pieces that had worm holes and bark inclusions. I packed cotton in those areas before spraying the pieces with lacquer and then after a few minutes of drying pulled out the cotton. The few bits of lint that remained because of the rough texture in the holes and where the fibers had adhered to the finish were easily removed later after the finish was sufficiently dry to handle.
 
Joined
Feb 3, 2011
Messages
164
Likes
1
Location
Niles, IL
Have you ever considered polishing it up, then remounting with vacuum chuck etc and then doing the groves?
 
Joined
Mar 19, 2009
Messages
1
Likes
0
Buffing your bowl

I do a lot of bowls with beads and textures on the rims of my bowls. How I eliminate this problem is simple, don't buff with anything that could be picked up with the rough end grain.

After completing the bowls And applying 3 applications of Waterlox or the finish of your choice remount it using a drum chuck with vacuum with the outside held in the drum. With a mixture of beeswax 30 % and mineral oil70% take a piece of 0004 steel wool apply some wax then with the bowl spinning rub with she steel wool to polish. Then while spinning wipe with a blue Scott paper towel.

Now remount the bowl on the drum holding the inside of the bowl. Do everything the same but don't touch the detail with the steel wool, it will become grapes within if you do. Now if needed with the lathe stopped use a 3M 120 grit brush quickly to remove any roughness. next apply the paste that you made to a small piece of 3M fine Scotchbrite and apply to the spinning bowl buff off excess with the paper towel.

I have used this method to do thousands of bowls and am very satisfied with the results give it a try.

Dave Lancaster
 
Last edited:

odie

TOTW Team
Joined
Dec 22, 2006
Messages
7,134
Likes
9,954
Location
Panning for Montana gold, with Betsy, the mule!
I haven't gotten back to polishing yet, although I have four completed bowls with finish applied......just waiting for a final polish.

I'll try the tape suggestions, but here's the thing that makes me think the tape won't do as good a job as some people think........


The lint from the Beale buff is driven into the wood under power.....and it's directional. When I say that, I mean when the rotation of the buffing wheel is exactly opposed to the corresponding wood grain at a straight shot, or 180 degrees, the lint is actually forced into the wood in the interior of the detail groove. With the entire other surface of the bowl, this is no problem at all because it's sanded smooth. Inside the recessed interior of that detail groove is a "tool finish" only, and sanding is not possible here. Just the slightest tearing of wood's endgrain fiber in the internal portion of the groove catches the buff lint and because of the reasons I mentioned above, the lint is forced into the grain under power. It's not just a matter of delicately adhering to the lint that is needed......there must be some real holding power and pulling necessary to cleanly remove the lint.

In the very beginning of this thread, I mentioned that the sharpest tool possible is necessary to produce the cleanest cut possible......this is what is needed within the interior of the detail groove, to make the lint problem a minimal consideration. Anyone who has more than basic knowledge about lathe turning, knows that sharp tools, and technique can produce some very fine cuts on woods, but absolute perfection without the need for sanding at all.......is just dreaming of an impossibility!

The choices are, to eliminate the need for buffing the surface around the detail groove......or, to deal with what is, and find a solution to an imperfect set of circumstances......

.......I've chosen the latter.

ooc


I do appreciate all the suggestions I've gotten, so far. Because I don't think all of the suggestions are applicable to my particular needs, or are acceptable alternatives, does not mean they aren't good suggestions, or that someone else won't be able to use them for their own needs......


.
 
Last edited:

odie

TOTW Team
Joined
Dec 22, 2006
Messages
7,134
Likes
9,954
Location
Panning for Montana gold, with Betsy, the mule!
OK......I have now polished a few bowls and believe I've come up with a solution that is going to work for my needs in eliminating lint within detail grooves.

First.....I tried the brass brush that I had modified earlier, and this I found to be unacceptable. The brass bristles were too stiff and abrasive...... and roughed up the surrounding polished surface. I found the brass bristles stiff enough to be great at removing the lint, but the other problems are too much headache to deal with. Removal of all but a couple of tufts of bristles works well, in that it helps to facilitate the "targeting" of a tiny piece of lint in the detail groove.

Next, I re-tried a plain old soft bristled toothbrush. This was also unacceptable, because the soft bristles are too soft, and do not do a good job of grabbing the lint with enough holding power for removal. I had tried this previously, and prior to initiating this thread, with the same result.

I then had a mental "light bulb" turn on.......:D

After removing all but a couple of tufts of bristles on the toothbrush, and using industrial shears to shorten what bristles were left, I found that it worked perfectly for the purpose intended....yay! Shortening the bristles from about 1/2" to about 1/8", in effect, stiffened them up considerably. Removing all but a few tufts in the toothbrush head gave me the ability to pinpoint, or target the "aim" of the brush. This little modified toothbrush has fine enough bristles to negotiate the detail grooves without marring the surrounding polished surface.......... and, the shortened bristle length makes them stiff enough to grab ahold of the lint, accomplishing the task satisfactorily.

After removing lint in a couple of bowls with detail grooves, everything looks very positive.......but, time will tell if this is the final solution!

Thanks to all for participating in this thread. I'm sure some of the ideas expressed here are going to benefit others who contemplate this and related subjects.........


ooc
 
Last edited:

Bill Boehme

Administrator
Staff member
Beta Tester
TOTW Team
Joined
Jan 27, 2005
Messages
12,903
Likes
5,194
Location
Dalworthington Gardens, TX
Website
pbase.com
Odie, I know that the party is over, but I think that I have a novel idea you might consider sometime in the future if the lint is cotton. If you have ever plucked and singed a chicken then this might make sense -- using a gas stove top or torch, quickly pass the bowl through the flame. It should be enough to singe the lint, but not char the wood.
 

odie

TOTW Team
Joined
Dec 22, 2006
Messages
7,134
Likes
9,954
Location
Panning for Montana gold, with Betsy, the mule!
Odie, I know that the party is over, but I think that I have a novel idea you might consider sometime in the future if the lint is cotton. If you have ever plucked and singed a chicken then this might make sense -- using a gas stove top or torch, quickly pass the bowl through the flame. It should be enough to singe the lint, but not char the wood.

Thanks, Bill......will keep that in mind. Off hand, I don't recall exactly the components that make up the three Beale buffing wheels, but there is more to them than just cotton, which is one of the materials used.

I'm not completely sure that I've solved the issue, but it looks very promising at this point.

I'll keep your ideas, along with some of the others on this thread for future reference, should I have further need. I never did get the electric toothbrush to try that out, either......but, it's another thing to try if I need more options.....

ooc
 
Back
Top