• Beware of Counterfeit Woodturning Tools (click here for details)
  • Johnathan Silwones is starting a new AAW chapter, Southern Alleghenies Woodturners, in Johnstown, PA. (click here for details)
  • Congratulations to Dave Roberts for "2 Hats" being selected as Turning of the Week for April 22, 2024 (click here for details)
  • Welcome new registering member. Your username must be your real First and Last name (for example: John Doe). "Screen names" and "handles" are not allowed and your registration will be deleted if you don't use your real name. Also, do not use all caps nor all lower case.

Forestner Bit Hollowing Question

Joined
Jan 31, 2009
Messages
137
Likes
0
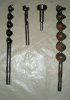
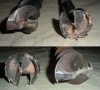
Question: I use a 2 1/2 - 3" Forestner bit (saw tooth type) usually use to bore a hole to depth prior to hollowing but I usually struggle with it because it freezes up as i bore even if I only do a little at at time and pull it out frequently.
Anybody, out there know a more effective way to bore with the forestner bit method ???? how fast are you drilling at??

Ohh and i know some turners do not do it this way but I perfer using the forestner bit to do initial boring.

Thanks Dan
 
Last edited:

Bill Boehme

Administrator
Staff member
Beta Tester
TOTW Team
Joined
Jan 27, 2005
Messages
12,897
Likes
5,183
Location
Dalworthington Gardens, TX
Website
pbase.com
It sounds like the bit may be dull. It can be sharpened with a small credit card size diamond file if done properly. However, the fact that it is binding implies misalignment between the centerline of the spindle and the centerline of the tailstock Morse taper socket. I suspect that you are drilling from the tailstock. It is always better to drill from the headstock. Try it before resorting to sharpening or buying another Forstner bit.
 
Joined
Oct 2, 2006
Messages
1,049
Likes
35
Location
Tallahassee FL
Some day, someone will make Forstner bits with a spiral pattern for the bottom chippers. Until then, consider this:

Forstner bits perform best in side grain. In end grain, extra care is
needed. The bottom chippers are essentially rotary chisels. Try cutting
across end grain with a hand chisel, and you'll appreciate what the bit
has to contend with. In many woods, aggressive drilling with a large
bit can be well nigh impossible, assuming you don't set the workpiece
on fire. Is there any solution to this dilemma? Yes, but it takes extra
time. Key is to drill successive pilot holes by sort of an inside-out
process: Drill a shallow hole with the largest bit to be used, only
deep enough to establish the circumference. With the next smaller bit,
drill another shallow hole, using the previous bit's divot for
centering, again only deep enough to establish its circumference.

Repeat until you reach a smaller bit size capable of drilling the full
depth of the desired hole. Now, with the next larger bit, drill to full
depth; the bit is guided by the circumference established by its use on
the way in, but the cutting is done only with the saw-teeth on the rim,
and the chipper doesn't have to work across the grain. Repeat until you
reach the original large size bit. In many woods, you may be able to
skip a size step and put a small portion of the chipper to work.


In addition, I suggest using the lowest speed available. If you're drilling deeper than the quill travel on your tailstock or drill press, and/or deeper than the bit's length, you'll also need extensions; and possibly multiple applications of the above process.
 
Joined
Nov 27, 2004
Messages
179
Likes
1
Location
Ephrata, Pa
Forestner Bits should be used at 500 to 700 RPM. Faster than that and you'll burn them up. Freud Diablo bits work well on end grain.
Jim
 
Joined
Apr 24, 2004
Messages
745
Likes
0
Location
Cowlesville,Western New York
I have used the method that Joe Greiner, described above, on several projects and though time consuming it is very effective.
 
Joined
Jan 4, 2006
Messages
286
Likes
1
Location
Goodland, Kansas
Or you could spray the bit with WD 40. I started doing this after seeing Richard Raffan do it. It does make matters a lot easier. Spray the whole bit on the first cuts and after you pull it out spray the outside of the bit. Never had a bit stick since. Of course when hollowing all the oil is turned away.
 
Joined
Oct 2, 2006
Messages
1,049
Likes
35
Location
Tallahassee FL
Recently-developed Colt MaxiCut bits seem to have more aggressive cutting action, and address the deficiency of straight-across bottom chisels. Not cheap, and so far the largest available is about 2 1/4".
 
Joined
Sep 24, 2009
Messages
98
Likes
56
Location
Astoria, Oregon
Richard Raffan and I discussed this via email last year. What he suggested, and what I do, is while using the Forstner bit, only drill about 1/2" at a time, then withdraw the bit. I keep an air hose handy and blast out the debris, and use a brass wire brush to lightly clean off the bit, then touch a block of paraffin wax to the bit as a lubricant, which will melt due to the heat. Yes, it's a slow process, but works. You don't want to get the wood too hot, as it could change shape and cause the bit to bind.

Smiles,
Rick
 
Joined
Sep 11, 2006
Messages
1,039
Likes
138
Location
Ormond Beach FL
Website
turnedbygeorge.com
When I started turning, I had been told that drill bits and the like were, somehow, less than "legal" for turners to use... "If you have a gouge, you have everything that you need for hollowing."
Like you, I prefer the drill bits method. I think it gives a clean true opening that is more easily and precisely controled.

Richard Raffan and I discussed this via email last year. What he suggested, and what I do, is while using the Forstner bit, only drill about 1/2" at a time, then withdraw the bit. I keep an air hose handy and blast out the debris, and use a brass wire brush to lightly clean off the bit, then touch a block of paraffin wax to the bit as a lubricant, which will melt due to the heat. Yes, it's a slow process, but works. You don't want to get the wood too hot, as it could change shape and cause the bit to bind.

Smiles,
Rick

I only start my hollowing holes with a Forstner bit.
Once I have a good starter hole, I switch over to old modified auger bits.

By grinding off those nasty, incredibly aggressive threaded center points and the outside wings, I've been able to safely and cleanly drill to significant depths. The antique augers can be found plenty long and in a LARGE variety of sizes. I have one that I have successfully used in this manner that is 3 inches in diameter.
A BIG advantage to this is that I get a nice smooth bottom to hollow to.

Not that I have found a big problem with staying centered, but if I were going to use this method for drilling pepper mills, I would probably leave the outside wings in order to help make sure the holes are true.

The ones pictured are 1 inch and 1 1/2 inches.
 

Attachments

  • 1b.jpg
    1b.jpg
    99.2 KB · Views: 41
  • 1a.jpg
    1a.jpg
    96.6 KB · Views: 36
Last edited:
Joined
Jun 9, 2004
Messages
1,223
Likes
49
Location
Haslett, Michigan
grinding off the point of auger bit

"By grinding off those nasty, incredibly aggressive threaded center points and the outside wings, I've been able to safely and cleanly drill to significant depths."

George-how to you prevent the wandering if you completely get rid if a point-as your picture shows???? Gretch
 
Joined
Sep 11, 2006
Messages
1,039
Likes
138
Location
Ormond Beach FL
Website
turnedbygeorge.com
"By grinding off those nasty, incredibly aggressive threaded center points and the outside wings, I've been able to safely and cleanly drill to significant depths."

George-how to you prevent the wandering if you completely get rid if a point-as your picture shows???? Gretch

I can't say for sure, but I THINK that the outside edges of the "ribbon" touching the sides helps to keep it straight.
I'm not suggesting that this method is accurate to .anything. I never check, but when I go in with the hollowing tools, it is generally a very smooth operation, indicating to me that the method provides an essentially true drilling.

So, I THINK that so long as the auger is straight and so long as I don't RUSH the drilling process, I get fairly to very straight holes.

I tried it, it worked, I tried it some more and it kept working, so I got and used other bit sizes.

But you should see the pile of discarded "tools" and items I have accumulated with my "scientific" methodology... This one just happened to work for me.
 
Joined
May 16, 2005
Messages
3,540
Likes
15
If you're not up to a spoon bit, you can certainly use a pointy gouge. Plunge with the point so it won't skate, shave inward or outward with the appropriate roll. Works faster than a Forstner for me.

http://i35.photobucket.com/albums/d160/GoodOnesGone/a63b77ab.jpg

http://i35.photobucket.com/albums/d160/GoodOnesGone/725a28f2.jpg

http://i35.photobucket.com/albums/d160/GoodOnesGone/5fa71f2e.jpg

Also works great when hollowing through a restricted hole, because a bit of tilt rolls the shavings out of the space. Doesn't jam as scrapers can.
 

Bill Boehme

Administrator
Staff member
Beta Tester
TOTW Team
Joined
Jan 27, 2005
Messages
12,897
Likes
5,183
Location
Dalworthington Gardens, TX
Website
pbase.com
After listening to a friend going on and on about how much he like the Forstner style bit made by Colt Tools in Germany to drill the interior of peppermills, I decided tht I would get one -- mainly because I wanted a 1 1/16" drill and I have not found that size commonly available previously.

I am not the type to get excited about things like drill bits (except when I break one), but I am really impressed at how well they perform. They cut through wood much faster than standard Forstner bits -- not just slightly faster, but probably something like three or four times faster.

The cutting edge is a departure from standard Forstner bits. They also incorporate chip breakers so that the wood comes off in chips rather than in curly shavings. The problem with shavings is that they quickly clog the flutes and prevent the cuttings from being expelled. With chips, clogging is much less of a problem. Colt says that their Forstner style bits work equally well in either end grain or cross grain.

These bits also have RotaStop shanks which is a very impressive way to insure concentric alignment when using a mating extension or Morse taper adapter.
 
Last edited:
Joined
Oct 29, 2005
Messages
886
Likes
10
Location
wetter washington
Website
www.ralphandellen.us
Here is something Dave Schweitzer taught me, at least for making a hollow form.

You want the bottom of the form to have a slight curve, and no little nipple at the bottom, right?

So, you drill out the center, all the way to your "bottom", only you use a modified spade-bit.

Grind off the point and wings of a spade bit, then grind the cutting blade to a gentle curve, carefully sharpen this new cutter. Note that, unless you are lots better then me, only one of these two blades will actually cut. It's just about impossible for a normal person to hand grind these two blades so they both cut.

Now measure the depth of the vessel and mark the shaft, I used an o-ring I had around that fits exactly on the shaft (VERY snuggly).

When I finish drilling the hole, I have also established the depth of the vessel and the bottoms curve. So "all" I have to do "down" there is make the transition from the hole to my hollowing smooth

TTFN
Ralph
 
Back
Top