• Beware of Counterfeit Woodturning Tools (click here for details)
  • Johnathan Silwones is starting a new AAW chapter, Southern Alleghenies Woodturners, in Johnstown, PA. (click here for details)
  • Congratulations to Keven Jesequel for "Big Leaf Maple" being selected as Turning of the Week for April 15, 2024 (click here for details)
  • Welcome new registering member. Your username must be your real First and Last name (for example: John Doe). "Screen names" and "handles" are not allowed and your registration will be deleted if you don't use your real name. Also, do not use all caps nor all lower case.

Filling a large void, or bark inclusion.......?

odie

TOTW Team
Joined
Dec 22, 2006
Messages
7,113
Likes
9,729
Location
Panning for Montana gold, with Betsy, the mule!
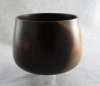
I have a nice 6x15" diameter Ash bowl that's been roughed and seasoned to stabilization. It has in the wall a rather large bark inclusion that goes all the way through, and is present on both sides of the wall.

In the past, I've had good results with adding epoxy to small voids, but this one is intimidating.

For past application, I've turned to very near final wall thickness, applied epoxy, and turned/sanded as per usual......worked pretty well, but it was an obvious fix. I used clear epoxy, and it really wasn't all that bad looking. I've found the clear epoxy to sand fairly well, having a dull sheen to it's final sanded preparation.

To fill this Ash bowl, it looks like it will take quite a lot of epoxy to do the job. More than one application may be necessary to completely fill in the void. First question for those who have attempted this: Will more than one application of epoxy make the fix even more obvious.....or, will the "seam" between applications be a big problem? At the moment, I only intend to fill in the interior void, and leave the outside in a natural state. My intentions are for a salad bowl.

If there are any other methods I should be aware of, please respond.....but, it has to look good in result. Filling the void and trying to match the color with a sawdust and glue mud, in my opinion, looks worse than the clear epoxy.

If you need a photo to advise me on this, that can be done, but there is nothing really radically different with this bark inclusion over what you all have seen before........just that it will require a larger than average amount of epoxy to fill the void. If you have a photo of a completed bowl that has a filled void, I'd appreciate your effort to show us that........:D

Once again, I thank you for your input to my constant questioning. :cool2:

ooc
 

odie

TOTW Team
Joined
Dec 22, 2006
Messages
7,113
Likes
9,729
Location
Panning for Montana gold, with Betsy, the mule!
Here is a picture of a bowl that has an epoxy fill in a void. The area that was filled in is in the interior around the little knot in the back side interior of the bowl. This one turned out very well, and you probably can't identify it from the picture.

ooc
 

Attachments

  • x Walnut Salad Bowl #644 (2).jpg
    x Walnut Salad Bowl #644 (2).jpg
    82.9 KB · Views: 146
Joined
Oct 1, 2008
Messages
706
Likes
1,128
Location
Sydney Australia
Hmmm, not an easy one Odie.
I tend to flood the area with CA in question at rough out time and evaluate as I go along. Generally using coffee grinds to fill the voids with CA. I keep two jars of coffee grinds one coarse the other fine, using the coarse first and then onto the fine later as I come to finishing and final sanding.
At times I saved chunks of bark to fill the really big voids and then coffee grinds. Rarely do I use epoxy I prefer CA its faster and gets you back into turning with too much delay.
Round about the time it takes to drink a cup of coffee :D then back into it.
 
Joined
May 14, 2004
Messages
445
Likes
1
Location
Middlesex County, Virginia
Website
www.velvitoil.com
I have filled large voids on round and flat with West System epoxy and coffee grounds (or some other filler). West System is more flexible than CA. On the large voids that go through I put painters tape on one side and prop the bowl so the epoxy will remain in place.
 
Joined
May 16, 2005
Messages
3,540
Likes
15
Proponent of bark, myself. Looks natural, and is available in larger pieces which can be adhered to the sides of the defect or each other so it won't absorb CA and exclude some finishes.

Not much of a fan of coffee grounds, except drinking the product. Bark grinds too, so I use that for the fine areas. Once again, the effort is made not to fill with resin, but to adhere the fill with it, so the fill will accept the finish and not look like a dead fish's eye.

If it's a crack with nothing but wood, I often wedge a piece of the same species in proper grain orientation into a pre-glued crack. A good repair can provide more visual interest rather than discordant effect.
 
Joined
Jan 31, 2009
Messages
137
Likes
0
Coffee grounds will work and I have used them also. You can try other things for visual appeal like crushed or powdered stone with CA glue, saw dust with CA is another filler (Although these are not my favorites but it works on certain projects). I never have really like the sawdust method and have stopped using it - just never gives me a decent finish or result......
I have also opened the void up some in different patterns (rotary carving tool) and blacken the edges by burning or by applying black dye to the edge. Bark from the same pc will usually make the best repair or filler.
Every crack or void presents a different challange to me, so how I handle it will be different each time. The hard part with a crack or the like is to make it visually appealing by enhancing it or altering it so it does not simply look like a vessel or bowl with a filled crack.
I also use CA for the speed as others have mentioned - epoxy works well to I just tend not to use it much but it to has its place when you need it.....
 
Last edited:

john lucas

AAW Forum Expert
Joined
Apr 26, 2004
Messages
8,333
Likes
3,585
Location
Cookeville, TN
I prefer to highlight the void. You can't hide it. You can blend in smaller voids using things like coffee grounds or sawdust. www.thesandingglove.com now sells colored sawdust for filling voids.
I'm a fan of Inlace. You can get it in a lot of different colors. You can also mix in plastic chips to set off the solid colors with splashes of other colors. I like the black with red chips or clear with gold leaf stirred up inside. I buy it from www.turtlefeathers.com but Woodcraft is now carrying a large supply.
I also like West Systems and use it like Barbara suggested. I mix black shoe dye with it. I put masking tape on the outside and tilt the bowl so the epoxy will fill the void. If that doesn't look like it will work I fill in stages tilting the bowl a little each time. This wastes less epoxy.
This is where the Inlace is nice. As it hardens it gets thicker so you can let it get close to toothpaste thick and sort of spread it in the hole. You have to do it quick because once it starts to get thick it keeps on going pretty fast.
 
Joined
May 14, 2005
Messages
75
Likes
0
Location
Kennebunkport, Maine, USA
Website
www.mainebowls.com
Brass

I'm working on a commissioned set of 5 oak burl bowls and a small clock. The customer would prefer the many voids filled. A lot of them are quite significant and go all the way through. Some parts of the rim also need to be re-created. I'm using brass key filings run through a yard-sale electric coffee grinder. The fine brass powder packs in solidly as I form multiple layers using CA glue. I've come to use electrical tape on the bottom of the void to seal the fill; adheres well and peels off cleanly. I coat the bowl with paste wax so the thin CA doesn't seep into the adjacent wood where I don't want it and make a stain . For the clock, I drilled holes for 12, 3, 6, and 9. and filled the holes with brass.

I'm spending more time filling than sanding, but I think the customer will be pleased (as long as he doesn't put them in the microwave).


Jack
 
Joined
Jun 16, 2009
Messages
202
Likes
1
Location
Southern California
Website
www.californiawoodartist.com
Odie,

Some epoxies like West System's 5:1 ratio slow and fast hardeners produce an amine blush on the surface when they cure. Amine is waxy and can interfere with adhesion. It can be washed off with soapy water and then sanded between coats. An easier way is to apply the next coat any time before the previous coat has fully cured (before it blushes).

You can use many things to thicken epoxy all the way up to the consistency of peanut butter. This can cause problems with adhesion. The solution here is to coat the joint with some of the unthickened epoxy and then thicken the rest of the batch and apply it over the wet epoxy. West sells some prepared thickeners but you can also use wood flour.

West and others are convenient and less wasteful to use with the pump system. A digital scale also works well. Just zero-out the container weight.

Remember gloves, respirator, paper mixing cups, disposable brushes. It's easy to use epoxy without using any acetone for cleanup.
 
Joined
Feb 15, 2007
Messages
148
Likes
1
Location
Woodland, CA
Odie,
I don't know if this would work for you.
I keep a bucket full of knots from various woods that I salvage when I cut them on the band saw.
I rough out the outside of the bowl and then carve out the punky area to the shape of the chosen knot and epoxy it (adding color to the glue) into place. I then can finish the outside and the inside normally.
I have attached a pict of a side grained milo calabash bowl (normally I turn milo end grain because the pith is usually punky and it hides well with ca saturation) with norfolk Isl. Pine knots in place.
 

Attachments

  • the eyes have it.jpg
    the eyes have it.jpg
    168.9 KB · Views: 80
Joined
Sep 8, 2006
Messages
270
Likes
1
Location
SoCal
Another option to add to the mix is black epoxy. (This is assuming you want to highlight, not hide, the void.) I've used powdered charcoal and epoxy or CA in the past, but now I tend to use a black epoxy that I found at one of the local home improvement stores (in the dual syringe) that works great for filling voids. It sands, finishes, and buffs well, and I've had no trouble filling larger voids with it. If need be, I'll do it in two or more layers to build up the depth of fill, but I've had no problems with bonding to previous cured layers.
 
Joined
Jan 4, 2006
Messages
286
Likes
1
Location
Goodland, Kansas
I use black epoxy also. I find it does a good job and may have to be layered in some. Other times if I kind of want to match the wood when in the finishing process I will save some sanding dust from the bowl, etc. mix with epoxy and fill.
 

odie

TOTW Team
Joined
Dec 22, 2006
Messages
7,113
Likes
9,729
Location
Panning for Montana gold, with Betsy, the mule!
Odie,
I don't know if this would work for you.
I keep a bucket full of knots from various woods that I salvage when I cut them on the band saw.
I rough out the outside of the bowl and then carve out the punky area to the shape of the chosen knot and epoxy it (adding color to the glue) into place. I then can finish the outside and the inside normally.
I have attached a pict of a side grained milo calabash bowl (normally I turn milo end grain because the pith is usually punky and it hides well with ca saturation) with norfolk Isl. Pine knots in place.

Capt. Jim......

Now, that is a creative way of approaching the problem! :D The particular bowl in question has a oblong crevice, and probably not going to be my solution here.......but, I'll stash that bit of information for future use. Thank you.

You know, somewhere in ancient memory, I have heard of the coffee ground solution before, and that just might work for my needs. I do have a question though........I would assume that the coffee grounds will become exposed through final sanding. Does this create additional concerns for final finishing?

Black epoxy is also something I hadn't considered.....stashing that bit of advice, also.....thanks for offering it.

I have CA here, but use it sparingly. It seems to penetrate the grain and cause problems (not always) that epoxy doesn't seem to share. IMHO, the epoxy is a superior filling and bonding method.......but, you don't have instant results with it......that's the drawback. I always have multiple turnings in progress at any given time, so I can usually "switch gears" anytime the need arises........:)

Thanks to all who have offered advice on this.........

ooc
 
Joined
Mar 14, 2010
Messages
106
Likes
0
Location
Wichita Kansas
I harvest walnuts let the hul dry & grind in a coffey grinder.Makes a very fine dark fill. Use CA glue almost exclusively. Matching bark through the coffey grinder with bark chunks for large voids works well. Again use CA. Careful use of CA will not affect the finish except for some of the oils. Does not affedt the oil I use--brand name is TruOil.
 
Joined
Oct 1, 2008
Messages
706
Likes
1,128
Location
Sydney Australia
You know, somewhere in ancient memory, I have heard of the coffee ground solution before, and that just might work for my needs. I do have a question though........I would assume that the coffee grounds will become exposed through final sanding. Does this create additional concerns for final finishing?

To date it has not been a problem. But I don't use it as a cure all, where possible I prefer bark. As for some timbers it does stand out and look less than natural.So bark works better on these occasions, no hard 'n fast rule, just go with the flow :cool2:
 
Back
Top