• We just finished moving the forums to a new hosting server. It looks like everything is functioning correctly but if you find a problem please report it in the Forum Technical Support Forum (click here) or email us at forum_moderator AT aawforum.org. Thanks!
  • Beware of Counterfeit Woodturning Tools (click here for details)
  • Johnathan Silwones is starting a new AAW chapter, Southern Alleghenies Woodturners, in Johnstown, PA. (click here for details)
  • Congratulations to Dave Roberts for "2 Hats" being selected as Turning of the Week for April 22, 2024 (click here for details)
  • Welcome new registering member. Your username must be your real First and Last name (for example: John Doe). "Screen names" and "handles" are not allowed and your registration will be deleted if you don't use your real name. Also, do not use all caps nor all lower case.

How do you handle the lost ones?

Joined
Nov 2, 2005
Messages
224
Likes
1
Location
Lancaster, PA
Website
www.gvpencheff.com
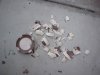
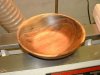
I was having a good evening at the lathe. Had a walnut blank from the tree we took down in the spring. Thought I was just gonna rough out a bowl but the shavings were coming off hot so I went for it. Had a nice smooth shape going. Real even wall thickness. Was able to sand out all the little annoying end grain tearout. Inside and out sanded to 400. Wiped it with some BLO to see what it was gonna look like. Looking good! Reversed it in the Jumbo Jaws to turn off the tenon. Making one of the last passes (of course) when the dig in occurred. The bowl became a UFO. Found it under the table saw with a big divot on the bottom a big dent and big crack in the side.

:mad:

What do YOU do when this kinda thing happens? Man that's frustrating.
 

Attachments

  • BowlBuster1.jpg
    BowlBuster1.jpg
    27.7 KB · Views: 527
  • BowlBuster2.jpg
    BowlBuster2.jpg
    43.1 KB · Views: 529
Joined
Sep 16, 2005
Messages
103
Likes
0
Location
Camas, Washington
Ha ha... (sorry it isn't funny), but I just did that a couple weeks ago. Doing the thing in the jumbo chuck. Catch!! and that thing hit me in the face... luckily I was wearing a face shield. I also had a nice dent in the side of the bowl and a large crack all the way down. I was able to fix the dent by lightly scraping it while in the jumbo chuck. I didn't try to fix the crack... I would have, but I wrecked the bowl first. I had a little bump left in the center so instead of doing a lot of cutting in the jumbo chucks I used a rotary sander. I start sanding and feeling the spot to make sure it was getting smoothed out when all of the sudden it felt like the bottom was getting soft. I realized I had like a 1/128" between it being a bowl and a funnel. So I ended up scrapping the thing. Yours looks fixable... the wood on yours is so nice that it would be a shame to scrap it. Try sanding the bottom by hand and try CAing the crack! Good luck!!!
 
Joined
Feb 19, 2006
Messages
170
Likes
0
Location
Phoenix, AZ
I had something similar happen when I was jam chucking a small shallow piece. That convinced me to get a vacuum chuck going. Otherwise it's CA glue & light cuts.
 
Joined
Jun 10, 2004
Messages
792
Likes
9
Location
Ames, Iowa (about 25 miles north of Des Moines)
Website
rwallace.public.iastate.edu
Got a Vacuum Chuck?

Greg:

You can probably fix the crack in the side with CA glue and some careful sanding following the repair. If you have a vacuum chuck (?) you could continue work on the bottom and shear scrape a clean transition from the sides to the bottom. As long as the bowl has not completely blown apart or cracked beyond reconstruction, this one looks pretty salvageable! This is where a vacuum chuck can be very handy. Depending on how thick the bottom is, you may be able to turn away the dig-ins. Alternatively, you could drill a shallow pattern into the bottom (including the gouge digs) with a Forstner bit to try to eliminate them, OR you could flatten the bottom, glue-on another piece of walnut (or a contrasting wood) attached to a glue block and start over with the bottom, turning a pedestal-like base for the bowl. There can be many other creative solutions. It depends on how much time you want to spend on this particular piece.

BTW - Thanks for sending the image of that grand old Ginkgo! Quite a tree, and I agree it looks like a centennarian to me - Let us know how the ginkgo turns and more importantly, how it dries and finishes.

Best regards,

Rob
 
B

Brian Myers

Guest
Do your best with it and move on. "It was just practice", keep on repeating it to yourself. :eek: Speaking of moving on, did you try any of the Ginkgo yet?
 
Joined
Apr 24, 2004
Messages
146
Likes
0
Location
Winston, OR
Darn gouges!

I haven't used a gouge to finish the bottom of a bowl in a few years. I use scrapers, either round-nose, square-nose, or notched. I haven't had a "catch" since.

Give'um a go, lad. What have ya got to lose?
 
Joined
Nov 21, 2005
Messages
390
Likes
0
Location
Oshkosh, WI
I throw them in the shavings barrel but my in-laws burn the shavings and one day I saw several toss outs sitting around in their house. :eek: Now I cut them in half first.
 
Joined
Feb 21, 2006
Messages
105
Likes
1
Location
Suffolk, England
Website
www.cobwebcrafts.co.uk
saving mistakes

Save! Save! Save!...at least where ever possible. There will be pieces that simply have to be tossed away, but in the main I think you can recover most errors. The problem for me, has always been that the resulting piece is not what I have envisioned, and therefore becomes almost a second class piece and I simply can't enjoy it.

I had an awful ***ew up a few weeks ago. I'd turned and hollowed a vessel from the some green sycamore. The wood was very white, very even grained, and cut very well indeed. I was just finishing the foot, prior to parting off when I revealed a knot with large shakes. Only...I didn't see the knot and only found out it was there after the bang!

The vessel exploded, flew off the lathe, hit a few things, smashed, and fell about the workshop like meteor debris. I found 16 pieces of it, but 2 were gone forever. I was so mad I decided that it wasn't going to win. I glued the pieces back together, placed tape inside the vessel under the voids left by the missing pieces, back-filled with fine wood dust, CA'd it all. Chucked it using the rim section. Cut an even surface on the open end, removed it and turned a "foot" from the original waste, glued the vessel to the foot, brought up the tailstock and re-turned the whole thing true. It's about 2-3mm thick now!

Then I had to hide the joints, but how? Pyrograph the lines in! No. Looked awful. Make more lines and hide them? Better but not quite. Carve the lines out? Hummm. Stain it and gild the lines?

Well that's as far as I got. I can't see anybody ever buying it, but at least when I look at it on the shelf, I can think, "there's one that didn't get away".
 

Attachments

  • recover.jpg
    recover.jpg
    26 KB · Views: 469
Joined
Oct 26, 2006
Messages
35
Likes
0
On the back cover of Woodwork magazine a couple of months ago was a bowl that had been stiched back together after it came apart. It is a very striking peice. It made me think about not trashing things just because they are not perfect.

I'm new to turning and have made a mess of a few things, but they always go on the shelf in the shop to remind me of what I did wrong and help me learn from my mistakes.
 
Joined
May 29, 2004
Messages
995
Likes
2
Location
billerica, ma
Hey Andy,

I love that vase! Knowing it blew up makes it even more attractive. Kinda a whimsical aspect.

One thing I've noticed is folks posting pretty regularly about blowups from using Jumbo Jaws. As much as they are a benefit in making your base look really clean, they are also pretty finicky. When you stabilize a piece by compressing it all the way out on the edge where it is generally the thinnest, it doesn't take much pressure at the center to torque the whole piece beyond it's structural limits. This often results in the piece "exploding" and will almost guarantee that the piece goes flying.

I rarely use my jumbo jaws anymore for exactly this reason. I've found it easier to just flip the piece onto a waste block mounted in the chuck and pressure chuck it with the tailstock. I turn it down to a small spigot then carve/sand it smooth. A catch at the end in such a setup results in the piece stalling, rather than exploding. Worst case, you get a friction burn on the inside of the bowl/vase.

Dietrich
 
Joined
Oct 5, 2005
Messages
451
Likes
48
Location
North Georgia
I have to say with the others, that's a very impressive save Andy. I'd be proud to put that on my shelf. Wish all my saves turned out that well.

That being said, here's one that I had several "design opportunities" on. I saved it a couple of times. The "sanding lines" you see are not actually sanding lines, it's the result of wiping lacquer on. I have yet to put the "finishing" touches on it.

http://www.woodturner.org/photopost...16&password=&sort=1&size=medium&cat=500&page=

So all that being said, my advice is to save whenever you can. For one thing it's good practice. But if it's too far gone, let it go. You might put it on the "oops" shelf in your shop...
 
Joined
Feb 19, 2006
Messages
170
Likes
0
Location
Phoenix, AZ
One other possibility to try to save the bowl, would be a homemade donut chuck. It would be more secure than a vacuum chuck, and likely much cheaper. One thing to keep in mind is to try a few different outer rings to get the right amount of exposure to clean up the bottom of the piece.
 
Joined
Feb 21, 2006
Messages
105
Likes
1
Location
Suffolk, England
Website
www.cobwebcrafts.co.uk
Sorry Greg!

Thank you all for your kind comments on the saved vase! And I should say "sorry" to Greg for highjacking his thread! I'd only posted the picture as an example of a saved piece.

I do agree with subsequent comments about the Jumbo/Cole jaws, though. I think often they give too much confidence, and heavier cuts than are possible are taken. Jam-chucking between a softwood blank and a piece of sponge or router mat is a far safer option - and I think most will find it far quicker then removing and re-setting up to a dozen machine screws.

I made a few versions. A blank with a dovetail for the C jaws of my Axminster scroll chucks, a plywood plate glued onto it, and a 1" hard foam pad glued to that. With tailstock support I use it exactly as Dietrich suggested. The only proviso is that you centre-mark your bowl base before you hollow it, so that you have an accurate centre to bring the tailstock to later on. After that it's a breeze.

A donut chuck is another quicker, and far safer option. I really must build one soon!
 
Joined
Nov 2, 2005
Messages
224
Likes
1
Location
Lancaster, PA
Website
www.gvpencheff.com
Andy Coates said:
Thank you all for your kind comments on the saved vase! And I should say "sorry" to Greg for highjacking his thread

Hijack? Nah... that's one of the things I like most about this forum compared to all the others of a similar ilk. I can always rely on the AAW forum for thoughtful and useful responses. If the thread goes off on a tangent from time to time it's almost always useful info.

As for my busted bowl I just put it back in the jumbo jaws and, as I should have done initially, brought up the tailstock to make sure that rascal stayed in place. I filled the big dent on the side with some coffe grounds and CA and was able to shear scrape the bottom to clean up the divot. Not sure yet what I'm going to do about the crack down the side. I'm leaning towards opening it up a smidgen with a dremel or chisel or something and filling it with a contrasting material. If I had some Inlace I'd try that. Maybe it's time to order some?

Whether or not the final results are a keeper or a tosser this has been both a design opportunity and a learning experience. Thanks all.
 
Joined
May 16, 2005
Messages
3,540
Likes
15
You were using a "bowl" gouge to finish the bottom and it rolled? Easy to do, which is why I use a forged gouge standing on edge, supported for depth of cut on its own bevel. Advantage to that unchanging bevel angle.

Had you ever considered using a mortise and non-marring jaws to hold the piece for hollowing and decorating and/or sanding prior to reversal? That way there's no third re-centering to be done. Can be simple, as this one, or more elaborate. Even possible to grab a bead on a "foot" if you like feet.
 

Attachments

  • Seasonal-Plate-Rear.jpg
    Seasonal-Plate-Rear.jpg
    60.7 KB · Views: 144
Joined
Nov 26, 2004
Messages
5
Likes
0
Location
Mt Clemens, MI
One evening, 3 funnels...

I've been away from turning for about a year. Finally, I have a little time!

Wednesday, I went to my shop, grabbed a rough bowl & started finish turning it. The outside went great. Yeah-- I remember how this turning thing works! The inside was going great. Bam- catch with the big scraper. Instant funnel!! Hmmm, looks like a big burr on the tool rest. Hmmm, another one...... Theory: scaper hit first burr, rose up a bit, caught bowl, smashed down & put another ding/ burr on tool rest. Moral: Run finger over the tool rest before starting & file off any nasties!

The next two funnels were created by having the inside try to be bigger than the outside at some point of the curve. I'm most definately out of practice!

ChuckS
 
Joined
Apr 7, 2005
Messages
178
Likes
0
Location
Saginaw, Michigan
The wife has me cut them in half and uses them against the wall on top of speakers or shelves as half bowls (sconces I believe is the right term) to hold dried flowers, gourds, or what ever she's displaying as a seasonal decoration at the time. This started when she saw one on the burn pile several months ago.

Stoppy
 
Joined
Nov 30, 2005
Messages
286
Likes
4
Location
Mendota IL
I think Dietrick is right. Jumbo jaws leave dirty little marks that sometimes don't rub off.

Most of my 'troubled' pieces become shop bowls. Even damaged they are more charming on the workbench than coffee cans.

Frank
 
Back
Top