Lessons learned the hard way!!!
I was turning my newest segment vessel and had it nearly complete. I decided I needed to sand the inside better since I had created some rough patches with my hollow master. My dilemma was that I did not have a good way to do it. Therefore, I improvised. I took a little dowel I had and taped on a piece of sand paper and proceeded to sand the inside. That is when it happened . . . the dowel slipped out of my hand and shattered the top 2 layers off my piece. I was a little upset but I decide I could fix it. I remade the top two rings and while they were drying, I thinned out the walls a little more and sanded them down. Unfortunately, I thinned them a little too much and the entire vessel shattered apart. So, after 20 hours of work and 145 separate pieces cut and glued I ended up with an nice pile of rubble.
Below is what it looked like before it blew up. Inspired by Curt Theobald’s Blood Brothers
http://www.curttheobald.com/photos/BloodBrothersLg.jpg
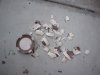
Attached is what it did look like and what is left now.
Does anyone have any suggestions on how to CORRECTLY sand the inside of a hollow form??
I was turning my newest segment vessel and had it nearly complete. I decided I needed to sand the inside better since I had created some rough patches with my hollow master. My dilemma was that I did not have a good way to do it. Therefore, I improvised. I took a little dowel I had and taped on a piece of sand paper and proceeded to sand the inside. That is when it happened . . . the dowel slipped out of my hand and shattered the top 2 layers off my piece. I was a little upset but I decide I could fix it. I remade the top two rings and while they were drying, I thinned out the walls a little more and sanded them down. Unfortunately, I thinned them a little too much and the entire vessel shattered apart. So, after 20 hours of work and 145 separate pieces cut and glued I ended up with an nice pile of rubble.
Below is what it looked like before it blew up. Inspired by Curt Theobald’s Blood Brothers
http://www.curttheobald.com/photos/BloodBrothersLg.jpg
Attached is what it did look like and what is left now.
Does anyone have any suggestions on how to CORRECTLY sand the inside of a hollow form??