About a week ago I had the VFD on my 3520B go out with a puff of smoke. I found two of the capacitors inside had blown. So I purchased and soldered on replacements but the failure also took out the controller board. In researching a replacement as I was not about to spend $600 on a 20 year old designed VFD I looked to see what I could do to replace it with something newer and more cost effective.
After a bit of research, I landed on a Lapond SVD-P 3hp unit that I found on amazon for a little under $150 with a 5% off coupon. They do offer a different model that is 2hp that is only $100 and would do just fine but I would have been giving up the brake resistor which helps the lathe slow those big bowl blanks down quicker. There is also a 2hp version of the SVD-P but going over size means the VFD doesn't have to work as hard.
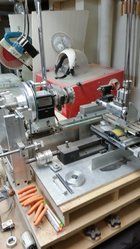
Here is what I had to do to make the new VFD work with the Powermatic motor and controls.
Here we can see what looks like a jumble of wires but it is not actually all that difficult to wire this up. I would recommend doing the larger cables on the bottom first as the smaller ones will get in the way.
On the bottom left of the VFD we have the power in from the outlet which is 220V single phase. Being single phase the white and black can be switched without harm. Black and White go to L1 and L2. The greenwire goes to the ground on the left most terminal. You'll notice all of these have additional wires.The second Green wire on the ground comes from the motor. The Gray and Red wires are for the RPM readout. They, like the black and white wires does not matter which ones go where. You may have to strip away some of the covering from the main wire bundle to get the Red and Gray wires to connect down, while the rest of the bundle connects above to the other terminal blocks.

Now looking at the lower right hand side of the VFD we have the brake resistor and motor connections. The brake resistor goes to the terminal towards the middle marked with the + and to the "PB" terminal, again these can be switched without harm. Now the remaining 3 wires from the motor do have an order to them as they are 3 phase 220V. Red goes to U, Black to V, and White to W.

Now to connect the headstock controls we have to make a little modification to get everything to work right. The right most leg of the potentiometer is usually connected to the blue wire from the on/off switch. This will not work with this VFD. To get around the conflict we remove the white lead wire from potentiometer to the blue wire and instead connect it to a new wire that we add. I had a brown wire of about the same gauge so that is what I used. Route your wire through the head stock so that it won't get caught on any of the moving bits. You can wire tie it to the main bundle if you like. Make sure your blue wire is still connected securely to itself as it is still needed.
Now onto hooking up the controls to the VFD. For the potentiometer we have the Yellow in the +10V terminal, Green in the AI1 terminal, and the new Brown wire to the GND terminal just below the+10V and AI1. The forward and reverse Black and White wires go to DI1 and DI2. The blue wire goes to the COM terminal. Now on to programming the VFD to our needs. This seems a bit intimidating but once you get the hang of the navigation it is pretty easy and explained pretty well in the manual which I do recommend on still skimming.
First we want to input our motor information. For this we are going to select P1 and start setting P1-00 through P1-05 as follows.
P1-00=1 (this is for the type of motor we have)
P1-01=1.4 (this is the Kw of Power our motor can use. This could be set to 1.5 but I went on the low side)
P1-02=220 (this is our motor voltage)
P1-03=6.2 (the amperage of our motor)
P1-04=50(we will need to change this later. You will see that you cannot set it higher yet. So just leave it for now)
P1-05=3440 (this is our RPM of the motor which it does say 1720rpm on the motor plate but powermatic runs the motor a 120hz to get the speed up and is completely safe on its 4 pole motor)
Now jump to P0 so we can change P0-10 and P0-12 both to 120. After changing P0-10 and P0-12 to 120 we can go back to P1-04 and change it's value to 120 as well. This will let us run the lathe at the intended top speed.
Now we will run the autotune. Go to P1-37 change the value to 1 and press enter, then press the run button on the VFD. You will hear the motor make some odd noises and maybe turn a little but don't worry this is normal. Once it completes, the VFD display should say what ever HZ the potentiometer on the vfd is set to. We are ready to test the motor with the VFD controls. You can use the dial to change the speed of the motor and the Run and Stop buttons to start and stop. Your rpm should be showing on the headstock so just confirm that your max speed is what it was before. If you are not getting the right rpm at max check to see if you missed something from the settings.
To use our headstock controls instead of the VFD's we need to change a few settings.
P0-01=2
P0-02=1
P0-03=2
P4-00=1 (if your forward/reverse switch is working in reverse swap this and P4-01 values)
P4-01=2
P4-02=0
Now check to confirm your headstock controls are working as expected.
Custom settings: Here are a few custom settings you may want to adjust to your liking.
P0-17= Time in seconds that the lathe will take to speed up from 0-max RPM. If you want to go fast faster set this lower. Hope that last sentence made sense. I use 3.5
P0-18= Time in seconds to decelerate from max RPM. Depending on the weight of what you are turning you may need to adjust this. If you frequently have the VFD trip and our work piece free wheels, (where it stops trying to stop the piece) you will want to increase this value. I use 4 for the time being but if big green blanks trip the vfd I'll increase accordingly.
P8-12= The time the lathe pauses between forward and reverse when you flip the switch with the lathe running. The default is 0.0 seconds which I like to have at 0.2 so the change in direction is less likely to unscrew a chuck.
P8-48= the VFD's fan control. 0= On only while powering the motor and 1= Always on. You may want to change it to always on to give yourself an audio cue to unplug the lathe or do like I did and wire a magnetic switch between the wall and the VFD so it isn't on all the time the way Powermatic had it from the factory. This is likely the cause of the somewhat early death of my VFD just outside of warranty.
After a bit of research, I landed on a Lapond SVD-P 3hp unit that I found on amazon for a little under $150 with a 5% off coupon. They do offer a different model that is 2hp that is only $100 and would do just fine but I would have been giving up the brake resistor which helps the lathe slow those big bowl blanks down quicker. There is also a 2hp version of the SVD-P but going over size means the VFD doesn't have to work as hard.
Here is what I had to do to make the new VFD work with the Powermatic motor and controls.
Here we can see what looks like a jumble of wires but it is not actually all that difficult to wire this up. I would recommend doing the larger cables on the bottom first as the smaller ones will get in the way.
On the bottom left of the VFD we have the power in from the outlet which is 220V single phase. Being single phase the white and black can be switched without harm. Black and White go to L1 and L2. The greenwire goes to the ground on the left most terminal. You'll notice all of these have additional wires.The second Green wire on the ground comes from the motor. The Gray and Red wires are for the RPM readout. They, like the black and white wires does not matter which ones go where. You may have to strip away some of the covering from the main wire bundle to get the Red and Gray wires to connect down, while the rest of the bundle connects above to the other terminal blocks.
Now looking at the lower right hand side of the VFD we have the brake resistor and motor connections. The brake resistor goes to the terminal towards the middle marked with the + and to the "PB" terminal, again these can be switched without harm. Now the remaining 3 wires from the motor do have an order to them as they are 3 phase 220V. Red goes to U, Black to V, and White to W.
Now to connect the headstock controls we have to make a little modification to get everything to work right. The right most leg of the potentiometer is usually connected to the blue wire from the on/off switch. This will not work with this VFD. To get around the conflict we remove the white lead wire from potentiometer to the blue wire and instead connect it to a new wire that we add. I had a brown wire of about the same gauge so that is what I used. Route your wire through the head stock so that it won't get caught on any of the moving bits. You can wire tie it to the main bundle if you like. Make sure your blue wire is still connected securely to itself as it is still needed.
Now onto hooking up the controls to the VFD. For the potentiometer we have the Yellow in the +10V terminal, Green in the AI1 terminal, and the new Brown wire to the GND terminal just below the+10V and AI1. The forward and reverse Black and White wires go to DI1 and DI2. The blue wire goes to the COM terminal.
Now on to programming the VFD to our needs. This seems a bit intimidating but once you get the hang of the navigation it is pretty easy and explained pretty well in the manual which I do recommend on still skimming. First we want to input our motor information. For this we are going to select P1 and start setting P1-00 through P1-05 as follows.
P1-00=1 (this is for the type of motor we have)
P1-01=1.4 (this is the Kw of Power our motor can use. This could be set to 1.5 but I went on the low side)
P1-02=220 (this is our motor voltage)
P1-03=6.2 (the amperage of our motor)
P1-04=50(we will need to change this later. You will see that you cannot set it higher yet. So just leave it for now)
P1-05=3440 (this is our RPM of the motor which it does say 1720rpm on the motor plate but powermatic runs the motor a 120hz to get the speed up and is completely safe on its 4 pole motor)
Now jump to P0 so we can change P0-10 and P0-12 both to 120. After changing P0-10 and P0-12 to 120 we can go back to P1-04 and change it's value to 120 as well. This will let us run the lathe at the intended top speed.
Now we will run the autotune. Go to P1-37 change the value to 1 and press enter, then press the run button on the VFD. You will hear the motor make some odd noises and maybe turn a little but don't worry this is normal. Once it completes, the VFD display should say what ever HZ the potentiometer on the vfd is set to. We are ready to test the motor with the VFD controls. You can use the dial to change the speed of the motor and the Run and Stop buttons to start and stop. Your rpm should be showing on the headstock so just confirm that your max speed is what it was before. If you are not getting the right rpm at max check to see if you missed something from the settings.
To use our headstock controls instead of the VFD's we need to change a few settings.
P0-01=2
P0-02=1
P0-03=2
P4-00=1 (if your forward/reverse switch is working in reverse swap this and P4-01 values)
P4-01=2
P4-02=0
Now check to confirm your headstock controls are working as expected.
Custom settings: Here are a few custom settings you may want to adjust to your liking.
P0-17= Time in seconds that the lathe will take to speed up from 0-max RPM. If you want to go fast faster set this lower. Hope that last sentence made sense. I use 3.5
P0-18= Time in seconds to decelerate from max RPM. Depending on the weight of what you are turning you may need to adjust this. If you frequently have the VFD trip and our work piece free wheels, (where it stops trying to stop the piece) you will want to increase this value. I use 4 for the time being but if big green blanks trip the vfd I'll increase accordingly.
P8-12= The time the lathe pauses between forward and reverse when you flip the switch with the lathe running. The default is 0.0 seconds which I like to have at 0.2 so the change in direction is less likely to unscrew a chuck.
P8-48= the VFD's fan control. 0= On only while powering the motor and 1= Always on. You may want to change it to always on to give yourself an audio cue to unplug the lathe or do like I did and wire a magnetic switch between the wall and the VFD so it isn't on all the time the way Powermatic had it from the factory. This is likely the cause of the somewhat early death of my VFD just outside of warranty.