baitbegger said:
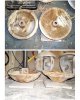
pretty wood, are those bullseye's where limb's came in, or is that birch crotchwood????

can you leave the centers in on smaller roughouts say in the 8 x 8 x 3 size range??????????
can you use the one way chuck to grab the center piece after the rough out dries out and you want to thin the walls and get rid of the warpage??????????
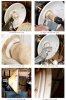
Bullseyes are the heart and the annual rings showing how earlywood loses water faster than latewood. White is not crotchwood, but the progression of spalt from outside sapwood and contrast with extractive-loaded heartwood. When I am cultivating, I roll the log periodically to even this out. This was a random event. Lost a bunch of depth on the one on the right because the rot had progressed to the point I could pull fistfulls of fiber from the log. A cut from the chainsaw let the stuff in.
If you leave the center pillar on smaller pieces, you come to a divide where you can't get a tool between a pillar of sufficient size to take the pressure of the chuck and the wall. Pointy gouges will work, but they take a a bit of leverage. I use a pin chuck or my NOVA pin jaws. I believe the Oneway jaws are not smooth and cylindrical, which is going to make it difficult to avoid splits and to get good centering second time around. Greater contact area means smaller force per unit of area, and averages over irregularities better. That's why I'm a smooth jaw guy all around.
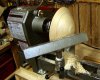
If I was without pin chuck or jaws, I'd use the worm on pieces smaller in size. I take the dry piece to the drill press whose stand is in the pictures, I believe, and drop a Forstner down the old hole. It's still the same 1" in length, just narrower, so the bit guides itself pretty well on center by following least resistance. I then put them on the chuck or pin jaws to do the outside, reverse to inside, taking the stub off at the peel point, when hogging and the stress it can put on the hold is done.
Using the worm or an outside grip on a dried rough gives you shoulder problems. I use a holesaw smaller than the pillar diameter, guide through the worm hole, and pare a flat shoulder. Takes a bit more time, but gives a repeatable flat mount. Keep a nylon tube around to resize the center hole for you.
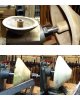
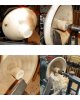
Picture of re-turning the outside on pin jaws, showing the bottom without its dovetail.