• Beware of Counterfeit Woodturning Tools (click here for details)
  • Johnathan Silwones is starting a new AAW chapter, Southern Alleghenies Woodturners, in Johnstown, PA. (click here for details)
  • Congratulations to Keven Jesequel for "Big Leaf Maple" being selected as Turning of the Week for April 15, 2024 (click here for details)
  • Welcome new registering member. Your username must be your real First and Last name (for example: John Doe). "Screen names" and "handles" are not allowed and your registration will be deleted if you don't use your real name. Also, do not use all caps nor all lower case.

Symposium Practice Piece

Joined
Oct 3, 2013
Messages
169
Likes
228
Location
Ambridge, PA
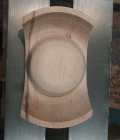
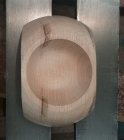
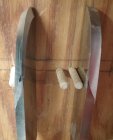
I really liked Craig Timmerman's arch bowl demonstration. Great instructions and explanations of why this and not that etc. etc. Never having done one of these, decided to give it a whirl this morning. Here's a couple pics of the results. Kind of satisfied with first attempt but kicking myself for not getting that last ridge out of the arch on the bottom side. Drew a pencil line like he does and got rid of it but could have gone just a touch deeper. Didn't sand anything except for the nub on the bottom. Went by Craig's instruction to start with a blank 7" x 4" x 2". The only thing I'd change would be to make it a little wider so my 3" vacuum chuck would work. Vacuum looks like it would be a little easier to shape the bottom of the bowl better. Don't like how my bowl shape came out. Piece is oak. Anyways, thanks to Craig for sharing.
arch1.jpg arch2.jpg arch3.jpg
 

Randy Anderson

Beta Tester
Beta Tester
Joined
May 25, 2019
Messages
839
Likes
1,256
Location
Eads, TN
Website
www.etsy.com
Dave, looks great. I also really liked his demo. Very good details on the tricky points. To me this is like a natural edge bowl turn with a few serious modifications. I plan to do one myself this week. I do a lot of natural edge turning so hope that helps me here.
 
Joined
Oct 3, 2013
Messages
169
Likes
228
Location
Ambridge, PA
Thanks Randy,
Tool wise, I did everything to Craig's specs except for the big thick scraper. I have them but not with the grind he was using. He said 10 degree top bevel but I haven't had any cutting success with that angle grind so I used a smaller curved scraper with the tool rest as close as I could get it to the bottom cut.
 

Randy Anderson

Beta Tester
Beta Tester
Joined
May 25, 2019
Messages
839
Likes
1,256
Location
Eads, TN
Website
www.etsy.com
For angle grind on NR scarpers you can find all sorts of different opinions on how they should be done. I've tried several and the piece of data that made all the difference for me was that the included angle (between the bevels) needs to be less than 90 deg. My experience is that works fine. I do mine 35 deg on each side that way I can flip them over and use each side as needed. Balances the wear and if curved can use left or right handed. I still don't get a great cut sometimes but usually because I try to do the grind in a hurry and have to go back. I also take a diamond hone and put a new bur on it a few times between grinds. Works well and saves steel. Best tool addition I've made in a while and getting ready to make more. Order blank steel from amazon and cut or grind the way you want it.
 
Joined
Feb 6, 2010
Messages
2,972
Likes
1,936
Location
Brandon, MS
Thanks Randy,
Tool wise, I did everything to Craig's specs except for the big thick scraper. I have them but not with the grind he was using. He said 10 degree top bevel but I haven't had any cutting success with that angle grind so I used a smaller curved scraper with the tool rest as close as I could get it to the bottom cut.

I used 25 on my top bevel. You will find angles from 30 to 20 and the point here is experiment until you find a working solution.
 
Joined
Oct 3, 2013
Messages
169
Likes
228
Location
Ambridge, PA
Thanks Gerald,
I've kind of settle in on a 30/30 grind for most of my "normal sized" NR scrapers. I originally bought these 2 large scrapers to convert over to NR but after seeing how much steel needed to be ground away, just set them aside and never really did anything with them. These are 7/16" thick by 1 5/8" wide. Yesterday I finally put a 60/25 on it and seems to cut pretty good as a NR. I'll mess around using it on a couple regular bowls to get some feedback of how it reacts before I stick it in one on the arched bowls.
scrape1.jpg scrape2.jpg
 
Joined
Mar 7, 2019
Messages
145
Likes
80
Location
Victoria, Texas
Great job, and on your first try! I haven’t tried one like this but I have done some bowls with wings. It’s challenging to get a clean finish on the wings.
 
Joined
Oct 3, 2013
Messages
169
Likes
228
Location
Ambridge, PA
Thank you Brandon. If it would just cool off a little bit, I'd like to completely finish another but just to dang hot in the shop.
 
Back
Top