• Beware of Counterfeit Woodturning Tools (click here for details)
  • Johnathan Silwones is starting a new AAW chapter, Southern Alleghenies Woodturners, in Johnstown, PA. (click here for details)
  • Congratulations to Keven Jesequel for "Big Leaf Maple" being selected as Turning of the Week for April 15, 2024 (click here for details)
  • Welcome new registering member. Your username must be your real First and Last name (for example: John Doe). "Screen names" and "handles" are not allowed and your registration will be deleted if you don't use your real name. Also, do not use all caps nor all lower case.

Help. I need help with a mathematical calculation

Joined
Jul 19, 2018
Messages
1,710
Likes
2,243
Location
Ponsford, MN
I have an idea of how to hold together a thin walled turning such as a large goblet form or a lamp shade. The pieces would have wall thickness from 1/16th" (1.5875 mm) down to 1/32nd" (0.79375‬ mm) so obviously butterfly's would not work. The idea is to make a strip of veneer cut to an arc that would meet at the circumference of the area being bound and also match the taper. (Think of the bands on barrels) The project in the photo is a goblet form turned from dead red oak that had checks in the outer surfaces but not in the inner green core. The rubber band is to keep the wood between the various checks from opening more due to centrifugal force, however a finished piece would need something more permanent. The area where I expect to put the band is about 5 1/2" diameter with a circumference of 17 1/4‬" (438.658‬ mm) and an angle of about 15 degrees. DSC00521.JPG
 

hockenbery

Forum MVP
Beta Tester
TOTW Team
Joined
Apr 27, 2004
Messages
8,629
Likes
4,970
Location
Lakeland, Florida
Website
www.hockenberywoodturning.com
You might consider taking a long strip of veneer and wrapping it around two or 3 times on top of itself.
use a edge banding.

You could rig some sort of knife so you could pull it through to get the width you want in a long length.
You can get it with PSA
Rocker has a big selection, Cherry, walnut, some plastics too.

a 36” length would go around twice. 50” .
 
Joined
Aug 26, 2006
Messages
656
Likes
558
Location
Hampton Roads Virginia
I think a copper band would look incredible. Making a cold joint with a rivet is not that difficult. Make a barrel hoop, then turn a hardwood disk the right diameter with a 15 degree bevel and with a soft hammer, form the hoop to the disk. Check the fit and change the angle if need be and try again.
That's a nice looking lampshade, I hope you post the finished pic...
 
Joined
Jul 19, 2018
Messages
1,710
Likes
2,243
Location
Ponsford, MN
I think a copper band would look incredible. Making a cold joint with a rivet is not that difficult. Make a barrel hoop, then turn a hardwood disk the right diameter with a 15 degree bevel and with a soft hammer, form the hoop to the disk. Check the fit and change the angle if need be and try again.
That's a nice looking lampshade, I hope you post the finished pic...
Hammered copper sounds like it might work though I wonder how I could hold it in place or if it would be to heavy.
 
Joined
Jul 19, 2018
Messages
1,710
Likes
2,243
Location
Ponsford, MN
You might consider taking a long strip of veneer and wrapping it around two or 3 times on top of itself.
use a edge banding.

You could rig some sort of knife so you could pull it through to get the width you want in a long length.
You can get it with PSA
Rocker has a big selection, Cherry, walnut, some plastics too.

a 36” length would go around twice. 50” .
I have some PSA backed walnut and white oak sheets already. I cut a 1/4" strip and wrapped it around but of course it did not conform to the taper so I thought it would work to cut the strip in an arc. The barrel makers (Coopers) use a rolling mill with a small taper between the rollers to stretch the edge of the steel band such that when laid flat it has a large arc. but I don't believe that method would work with veneer.
 
Joined
Jan 22, 2018
Messages
264
Likes
313
Location
Cameron, Illinois
You can get very thin gauges of copper sheeting that would form easily around your goblet. If you go that route, be aware some of them are raw copper that will age, and some come with antitarnish coatings- all depends on look you might be going for.
 
Joined
Aug 26, 2006
Messages
656
Likes
558
Location
Hampton Roads Virginia
I'm thinking electrical wire, 16, 18 gauge? Hammered as thin, flat and light as you want. Edges dressed but maybe leave the hammer marks on the face.
As for attaching? That has me stumped for the moment. Tiny copper staples strategically placed?
As for a template. Lightly draw the band on the shade, then rip little half inch pieces of painters tape and stick them on like paper mâché, go around a few times to build thickness, cut apart with an exacto, carefully peel off and stick to a piece of thin stock, true up the edges and you have a template...
 

hockenbery

Forum MVP
Beta Tester
TOTW Team
Joined
Apr 27, 2004
Messages
8,629
Likes
4,970
Location
Lakeland, Florida
Website
www.hockenberywoodturning.com
Here is a wild idea.
You could Cast a pewter ring in place.
Pewter does not bond to wood so you have to glue it in place after casting and cleaning up the pewter ring.
Make a mold to fit the turning with cereal box cardboard with a 5.5” diameter circle cut from it and MDF.
Finish the surface of the mdf to get a smooth surface in the casting
You will need to level the mold and use a small bit of pressure to get a tight seal on the form. Seal any opening with masking tape.

I melt pewter in a lead melting pot. You can melt it in tin can using a torch pewter melts are about 450 degrees. This temperature will not scorch the wood or the cardboard.
Most likely you will need to clean up the edges of the casting. I usually do with turning tools on the lathe however this ring will be difficult to hold. You can clean up the edges with sanding and remove pour over with a dremel.

the mold must be level - could be leveled with some bolts in base piece of mdf. A tennis ball on a dowel can support the form. Just pour molten pewter into the groove. The molten pewter will level and solidify in seconds and stay hot enough to burn fingers for many minutes.
one issue could be how out of round the turning is. The cardboard will conform to a little out of round but this will have the effect of making the ring thickness vary.


2BBE9C89-D57D-4FA4-B088-C4170558DC42.jpeg
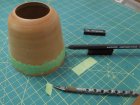
the parts of the mold.
B963C603-F3A5-4854-AC86-2F5D30151229.jpeg
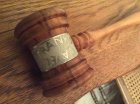
the pewter band on this gavel was cast using a cardboard mold.

51ACA1E2-778B-4404-B055-52A566D4EC55.jpeg
 
Last edited:
Joined
May 4, 2010
Messages
2,446
Likes
1,872
Location
Bozeman, MT
Could you take a ring of wood, steam it, slide it on and let it dry? It would need to stretch a little going on or maybe be just enough sloppier when wet and snugger when dry. Rawhide was used in this way in olden days, but perhaps you could do the same with a good steaming wood. Since you're a pretty precise guy, you might even figure out a way to cut out a single, intact growth ring of the proper size. :)eek: Makes my head hurt just thinking about it)
 
Joined
Jul 19, 2018
Messages
1,710
Likes
2,243
Location
Ponsford, MN
Thanks for the responses but I think you are all missing one pertinent point and that is the .040" wall thickness.
  • Unlikely that it would hold up to 450 degrees to cast pewter or if it did how would you work/trim the pewter.
  • Copper maybe but what kind of small staple would hold in that thickness.
  • Rawhide maybe but you would need a solid cone shape to form the band otherwise you would crush the piece. I know what I am talking about because I made 4 pairs of snow shoes strung with rawhide. The rawhide goes on soft, slimy and loose then shrinks tight and rigid as it drys.
  • I am disappointed that no one could tell me how to calculate the arc necessary to make a band, or it could be that my explanation was poor.
  • I tried laying out a triangle 75 30 75 degrees and used the circumference for the short side then struggled through the trig to calculate the the length of the other 2 sides. I then went to my CAD program and constructed a triangle to verify my calculation then drew an arc with the 30 degree point being the center point and the radius as the long sides. The measured arc came out to .16" longer then but the radius should be accurate enough to test on paper. Will let you know probably with a photo.
 
Joined
Apr 9, 2010
Messages
83
Likes
18
Location
Allen, TX
I have an app on my android phone called Flat Pattern. I does what I think you are asking for. When I went to the Play Store there are several apps that do what you want. I haven't looked for one that runs on a PC, but I would bet that Google could find one.
 
Joined
Apr 9, 2010
Messages
83
Likes
18
Location
Allen, TX
what you are looking for is "Create a flat pattern of a frustum from a solid truncated cone". I found one with Google, but it takes AutoCad. In the text from the link I found these instructions:

Draw a circle with a radius the same length as the side of your cone.

Draw another circle the same size as the base of your cone.

Use the formula Degrees= (360/Circumference of big circle)* Circumference of small circle).

For example a cone with sides 200 units and a base radius of 40 units would be

(360/1256.6)*251.3 = 72

So cutting a pie slice from the large circle of 72 degrees will give you a flat pattern for the cone.

This can be done on a piece of paper but using autocad it's much easier to get the circumferences. :
 
Joined
Aug 26, 2006
Messages
656
Likes
558
Location
Hampton Roads Virginia
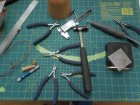
The walls were closing in and I just had to play. I've used the templating procedure before, no good at math, and clueless about CAD. But there it is. I didn't stick it to card stock cause I'm just playing. For the wire, I'd use a heavier gauge so I could get it a little wider. I like the hammered look and think when fine tuning it on the disk I'd burnish it with some kind of medium (?) to accent the texture. For the staples, old wire, pounded flat or not. I like the flat look over the round. When bending the flat staple, I inadvertently put the hammered side in, oops... You can see on the flat staple I filed the legs to fit holes drilled into the shade, a little rough, but I'd spend more time on the real deal. I can see drilling holes, fitting the staples around the band, then bending over the legs inside. For the rivet, I think I'd put two, in line, not side by side. Last pic is the mess... but it pushed back the walls and maybe even the cabin fever...
Don, I really like your lamp shade, obviously struck a cord with me, once I got started I couldn't stop...

DSCN1439.JPG DSCN1444.JPG DSCN1451.JPG DSCN1456.JPG DSCN1457.JPG DSCN1459.JPG DSCN1460.JPG
 
Joined
Jul 19, 2018
Messages
1,710
Likes
2,243
Location
Ponsford, MN
what you are looking for is "Create a flat pattern of a frustum from a solid truncated cone". I found one with Google, but it takes AutoCad. In the text from the link I found these instructions:

Draw a circle with a radius the same length as the side of your cone.

Draw another circle the same size as the base of your cone.

Use the formula Degrees= (360/Circumference of big circle)* Circumference of small circle).

For example a cone with sides 200 units and a base radius of 40 units would be

(360/1256.6)*251.3 = 72

So cutting a pie slice from the large circle of 72 degrees will give you a flat pattern for the cone.

This can be done on a piece of paper but using autocad it's much easier to get the circumferences. :
Paul thanks for the help but:
I measured the diameter of the large circle at 4.67" then 1/2 " lower for for the smaller circle at 4.44" and these values when plugged into the formula = 342.2986842. I then tried the example 200 and 40 units and came up with the same results you had.
I had previously laid out a a triangle as I detailed and although it is not right it is close. I tested it by drawing an an arc strip with a 27" & 27.5" radius, then marked the ends according to my 30 degree pie slice. The cut out paper strip when taped together fits close but looks like it would be right on with the arc radius about cut in half. The arc length which I measured with AutoCad, is about the same as the measured & calculated circumference.
 
Joined
Jul 19, 2018
Messages
1,710
Likes
2,243
Location
Ponsford, MN
Paul I must be missing something: per the formula you submitted I would need to take a 342 degree pie slice from the larger circle however it appears to me that would create a cone smaller then the large circle (about 95%). So how do I calculate the radius of the circle the pie cut is coming from. I have been using a beam compass to make the flat arc on paper and I tried 14" then 10 " and that is very close so I am thinking of trying about 7" radius.
 
Joined
Jul 19, 2018
Messages
1,710
Likes
2,243
Location
Ponsford, MN
I used the http://www.hampsonlife.com/conecalculator.php to calculate the band and it came out almost perfect. The first one that I glued the band onto didn't come out exactly as far as positioning, but as you can see by the picture it doesn't show. The flash light is 6" high and the area where the band is is less then 1/16". The end cap made from white oak burl is threaded 1 3/4" - 13 and secures the light socket while the lamp cord will run through the hollow stem made from hornbeam (locally known as iron wood). The stem has 1/2"-8 thread on both ends and will connect the lamp to ? ( I have not figured that part out yet) I have been thinking about maybe a round hollow globe with a screw on closure that the stem could be inserted into and held by a wooden nut.
DSC00537.JPG DSC00539.JPG
 
Back
Top