• Beware of Counterfeit Woodturning Tools (click here for details)
  • Johnathan Silwones is starting a new AAW chapter, Southern Alleghenies Woodturners, in Johnstown, PA. (click here for details)
  • Congratulations to Keven Jesequel for "Big Leaf Maple" being selected as Turning of the Week for April 15, 2024 (click here for details)
  • Welcome new registering member. Your username must be your real First and Last name (for example: John Doe). "Screen names" and "handles" are not allowed and your registration will be deleted if you don't use your real name. Also, do not use all caps nor all lower case.

help with rough spots in ambrosia maple

Joined
May 9, 2019
Messages
67
Likes
30
Location
Fairlawn, Virginia
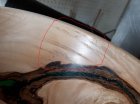
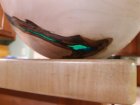
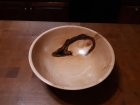
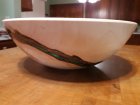
Looking for a little troubleshooting help on this ambrosia maple bowl that I am finishing. I am getting rough spots in the grain on the inside of the bowl. I used my negative rake scraper on the inside before sanding. I thought sanding would remove the rough spots which didn't feel that bad. I went through sanding grits 100, 120, 150, 180, 220, 280, 320, 400 and 600 with my right angle drill. I put some Myland's friction polish on and it just seemed to accentuate the rough spots. The bowl is 1/4 to 5/16 thick right now.

I am not sure if I am picking up vibration or if this is just in the grain. I did a thicker and smaller bowl from the same tree and it turned out very smooth. I don't have a bowl steady rest. I did use my finger on the outside while negative rake scraping. The inside does have some slight ripples so I know that I have some vibration. I did try varying the speed while scraping from 1000 to 1800 rpm.

Should I go back in there with my negative rake scraper with a fresh sharpening and keep practicing until I get it smooth? Or go back to sanding? Can ambrosia maple be troublesome? I did use a little water in the bottom while scraping and that helped in the bottom, maybe a little water on the sides will do the trick.

ambrosia1.JPG ambrosia1.JPG
 

Attachments

  • ambrosia2.JPG
    ambrosia2.JPG
    109.6 KB · Views: 106
Joined
Aug 26, 2006
Messages
656
Likes
557
Location
Hampton Roads Virginia
Brad, I see the torn grain (tear out) in the second pic. Don't know if you are sanding with the lathe running, but I would sand the "trouble" spots with the lathe off until they are gone visually, smoothness doesn't count. Once you get past the tear out, sand as usual. I find ambrosia can be a little problematic with tear out, so, the closer you get to the desired shape, the lighter the cut and the more frequent the sharpening, as in, sharpen a sharp tool...
As for going back with your negative rake, I would say no, you are bound to get vibrations now as there is no support for the outside of the bowl because the inside has already been turned. As for the inside, I turn down in steps, blending each step as I go. When I think I can go back and touch up a little spot I missed near the rim, I learn an already learned lesson, that is, you can't go back...
 

odie

TOTW Team
Joined
Dec 22, 2006
Messages
7,108
Likes
9,693
Location
Panning for Montana gold, with Betsy, the mule!
When I think I can go back and touch up a little spot I missed near the rim, I learn an already learned lesson, that is, you can't go back...

Well.....that gave me a little chuckle.......the more you do the dance, the less you have to go back to clean up your act! :eek:

Clifton has some pretty good suggestions, here........:D

=======================================

Out of curiosity, Brad.......Is that bowl fully stabilized yet? What is the moisture content....MC?

We get questions like this frequently on the forums......and, it's difficult to troubleshoot, without actually having "hands on" knowledge of the particular bowl in question.

What works this time, won't necessarily work in all cases.....so, the more you do it, the more arrows you'll have in your quiver. o_O

I know that others swear by the negative rake scrapers......but, after trying them myself, I'm not one of them.....:rolleyes:

-----odie-----
 

hockenbery

Forum MVP
Beta Tester
TOTW Team
Joined
Apr 27, 2004
Messages
8,623
Likes
4,949
Location
Lakeland, Florida
Website
www.hockenberywoodturning.com
the first few inches inside the bowl are prone to tearout if you take off too much wood or there is vibration.
Light cuts & sharp tools. Steps as Clifton mentioned.

better to prevent tearout than to fix it

if you go to the working with green wood demo and look at the turning a dried bowl demo
I’m turning sycamore - probably softer than your maple.
You can see how i treat this area. I probably spend half the hollowing time on the rim and first 2 inches
http://www.aawforum.org/community/index.php?threads/working-with-green-wood.11626/

21:00 I have begun the steps
true the rim and shear scrape it
23:30 cutting the final thickness
24:18 very very light finish cuts
24:38 inspect the surface - acceptable
24:48 the secret weapon for the first 2” of inside wall
The 1/4 “ bowl gouge(3/8 bar dia) with either a traditional grind 45 degrees or my preferred Michelson grind leaves an improved surface. Smaller gouge is sharper and take smaller cuts than the big one.
This surface Is extremely smooth.

note I have not yet taken any wood off the bottom inside because I want the mass.
 
Last edited:
Joined
Aug 14, 2007
Messages
5,475
Likes
2,830
Location
Eugene, OR
Well, that is tear out. It comes from cutting against the grain, and on bowls, for 1/4 turn you cut up hill, then 1/4 down hill, and repeat. The ambrosia maple is a softer wood, and just about always, the NRS or any other scraper does not cut cleanly on softer woods, and they actually cut best on end grain. I prefer a shear scrape for removing most tear out, and have a video up on You Tube about that. Some times it works better than others, and like with the NRS, it tends to work better on harder woods than on softer woods. Some times having a honed edge on your gouge for the finish cuts, or sharpening on a 600 or 1000 grit wheel can do the trick. Some times using a bit of water on the wood also helps it cut more cleanly: get it damp, let soak in for a minute or so, then take very light cuts to remove the damp wood. If nothing else works, then some times you have to resort to 80 grit abrasives. For sanding, slow drill speeds work best. You can also take a card scraper and make down hill cuts with it to remove the tear out, having a spindle lock greatly helps this.

robo hippy
 
Joined
Dec 7, 2018
Messages
89
Likes
48
Location
Port Angeles, WA
I've turned a lot of punky maple recently, and don't have much luck with scraping (shear, negative rake, or standard), especially near the rim. My tool of choice lately with this has been a 3/8" bowl gouge of my usual grind, but sharpened to 600 and the heel ground off. Nastiest spots can benefit from shellac, or CA and accelerator if you're in a hurry, before cutting, too.
 
Joined
May 9, 2019
Messages
67
Likes
30
Location
Fairlawn, Virginia
I greatly appreciate all the help on this. All great info! I was out of town for a couple of days. I am going to tackle this again tomorrow with better knowledge!
 
Joined
Jun 6, 2018
Messages
1,951
Likes
997
Location
La Grange, IL
@Brad Winesett , once you have the tear out and you are down to your final contour line I think the best solurion is sanding it out. Here's a few thoughts from someone who makes use of a lot of sandpaper.

You were right to start low and not skip grits. It's important to get the coarse problems solved with coarse sandpaper, but sometimes it's difficult to see that an area is still rough until the surrounding area has been smoothed to a higher grit (e.g. 220). In that instance I just write that off as an "educational expense" and go back to a coarser paper.

I use a tack rag once in a while so that I can get a better look at how smooth things are becoming. With maple I will often see bands of creamy white in some of the lighter areas of the grain. While this at first looks and feels smooth, it's not. It's fuzzy wood that needs more work.

It's OK to try to spot sand a particular trouble area. You might also try using the sand paper by hand. I think my fingers are much better at conforming to a contour that a sanding disk, and I get tactile feed back about rough spots. You'll want to keep your lathe speed slow, and I sand as much in reverse as forward.
 
Joined
May 9, 2019
Messages
67
Likes
30
Location
Fairlawn, Virginia
I worked on the tear out for a little over an hour last night. I think that I got about 95% of it out. This piece had some bark inclusions and branch knots, so there is some wonky grain in places. There were just a few spots in those tough places that I could not get out all the tear out, but they are pretty small areas that shouldn't be very noticeable.

I didn't try to re-turn anything. I was taking Clifton's advice that "you can't go back". I never turned the lathe on. I started out hand sanding and that was going to take forever. I took Reed's suggestion on trying a card scraper. I had a French curve scraper and it worked great! I scraped away the majority of the tear out and it also smoothed out the small ripples that I could feel with my fingers before. I was able to sharpen it on the side of my Tormek wheel and used a burnisher to produce the burr. After that I started hand sanding with 320 up through 600. I still had a few spots that didn't have tear out, but just felt a little rough. So, I went back on those with my angle drill and sanded those out to 600 grit. Everything feels pretty smooth now!

I haven't put the Myland's friction polish back on yet. The instructions talk about using sanding sealer first, but I don't have any stores near me that sell real sanding sealer. Would Zinnser Bulls Eye shellac work under the Myland's? I am thinking this would help fill a few of the 5% areas that still have tear out.

Odie - I missed your question about the moisture content. It was about 10-12% when I started on it.
 

Bill Boehme

Administrator
Staff member
Beta Tester
TOTW Team
Joined
Jan 27, 2005
Messages
12,894
Likes
5,178
Location
Dalworthington Gardens, TX
Website
pbase.com
First stabilize the wood then HAND sand off the lathe. Power sanding is too rough. Work through all of the grits.

Like others have said, the wood is probably too thin at this point to be doing any work with a tool such as a NRS. So clean it up with sandpaper off the lathe. Then call it good enough and add it to your lessons learned.
 

Bill Boehme

Administrator
Staff member
Beta Tester
TOTW Team
Joined
Jan 27, 2005
Messages
12,894
Likes
5,178
Location
Dalworthington Gardens, TX
Website
pbase.com
You can make your own sanding sealer. Foe shellac, thin it 50:50 with denatured alcohol. For lacquer, thin it 50:50 with lacquer thinner. If you are going to apply a polyurethane finish I like to first seal with thinned shellac. ... lightly sand ... then apply several coats of poly that has been thinned 50:50 with naphtha. Naphtha is a fast drying solvent and I like it much better than mineral spirits.
 
Joined
May 9, 2019
Messages
67
Likes
30
Location
Fairlawn, Virginia
I got the bowl finished up last night. It came out pretty well in the end, not perfect by any means. There was still a little torn grain on the inside that I just couldn't get rid of 100%. It is smooth after finishing but just shows up dark as you can see in the close up picture. When I turned the bowl around to cutoff the tenon and apply the Myland's, I did some more sanding on the outside without the lathe turning. At least on this maple, it seems sanding with the lathe spinning won't get out all the tool marks and torn grain. With my drill sander, I could work on those trouble spots pretty well with the lathe off.

Thanks again for the help!
 

Attachments

  • bowl_torngrain.jpg
    bowl_torngrain.jpg
    45.6 KB · Views: 52
  • bowl_bottom.jpg
    bowl_bottom.jpg
    50.2 KB · Views: 60
  • bowl_inside.jpg
    bowl_inside.jpg
    49.5 KB · Views: 60
  • bowl_side.jpg
    bowl_side.jpg
    56.5 KB · Views: 51

Bill Boehme

Administrator
Staff member
Beta Tester
TOTW Team
Joined
Jan 27, 2005
Messages
12,894
Likes
5,178
Location
Dalworthington Gardens, TX
Website
pbase.com
Would Zinnser Bulls Eye shellac work under the Myland's?

I don't care for layering different kinds of finish. I pick one type of finish and go with that. If you feel the need for shellac under another finish I suggest thinning it down to a one pound cut or less
 
Joined
Feb 6, 2010
Messages
2,972
Likes
1,930
Location
Brandon, MS
Bill that is what Clewes uses as a seal coat . I use 2 # cut (from flake) under some of my finish and the cut on shellace should make no difference to the final finish as it is universal . The problem may come for the inexperienced who might get lines from laying down a 2# or higher cut when the swipes overlap.
 
Back
Top