• Beware of Counterfeit Woodturning Tools (click here for details)
  • Johnathan Silwones is starting a new AAW chapter, Southern Alleghenies Woodturners, in Johnstown, PA. (click here for details)
  • Congratulations to Keven Jesequel for "Big Leaf Maple" being selected as Turning of the Week for April 15, 2024 (click here for details)
  • Welcome new registering member. Your username must be your real First and Last name (for example: John Doe). "Screen names" and "handles" are not allowed and your registration will be deleted if you don't use your real name. Also, do not use all caps nor all lower case.

Log to Bowl blank processing

Joined
Dec 25, 2019
Messages
74
Likes
30
Location
Glen Spey, New York
I've been cutting my logs up and processing them into bowl blanks to be stored down in a VERY dry basement shop.
I am now thinking that I am doing this wrong and exposing my bowl blanks to checking for no good reason. what do you all do with you log rounds.
1) leave them outside(or undercover, in shed or what have you) in full round and cut to blank as needed.
2) Cut to bowl blanks and leave undercover outside
3) or do you do as I have been and process all these rounds up into bowl blanks and platter blanks then stack them in the dry shop atmosphere.
I haven't ruined all my rounds YET, but I'm working on it. Given enough free time I will, please stop me if you see fit.
4) just sell all my gear and give it up because I'm all messed up.
 
Joined
Jan 22, 2009
Messages
444
Likes
680
Location
Crossville, TN
Well, if you really want to go with #4, I’ll give you bottom dollar :)

Actually my recommendation would be to process into first-turn bowl blanks as quickly as you can (turn to ~1” thickness for ~10” bowl, little more for larger, less for smaller) and then paint with Anchor Seal (double coat on end grain). I’ve done this on many and then put in MN garage (very dry in winter) and lost only a few; in MN it took 9-10months to be ready for second/final turning.
 
Joined
Dec 25, 2019
Messages
74
Likes
30
Location
Glen Spey, New York
Yes I do coat with Anchor seal but they've been going down into basically a kiln of a basement(extremely dry) coal burning stove down there. I didn't have too much issue last year with some storm damage trees I brought in but I wasn't really storing them down there too long.
I'm now cutting up these really nice spalted maple rounds (a little too spalted in some) and the ones I've done last week are already splitting in two or three or five.
So tomorrow I think maybe I'll return them outside under tarp in order to stop or slow the checking/complete splitting. I also am thinking that just storing these rounds up off the ground under cover would be a good idea, just cut my blanks as needed.
 

Randy Anderson

Beta Tester
Beta Tester
Joined
May 25, 2019
Messages
839
Likes
1,258
Location
Eads, TN
Website
www.etsy.com
I've tried different methods of storage for my log blanks and have settled on outside, covered with open air ventilation for my unturned blanks. My storage shed has three sides. These are half log blanks, cut to length and sealed on each end. On shelves about 24" off the ground with wide gaps between the shelf slats. I tried tarps for a while but everything stayed so damp that I would get a lot of mold growth in short time. If you do use tarps I would recommend keeping them well off the ground. Once I turn them to rough thick blanks I seal them all over and put on a shelf in my garage where the climate is a little more controlled. Door is up most of the day but still more controlled than my three sided barn. That said, I live in Memphis where most of the year the humidity is fairly high so not much risk of getting too dry too quickly.
 
Joined
Jan 22, 2018
Messages
264
Likes
313
Location
Cameron, Illinois
I never try to store whole bowl blanks, just lose too many. My process is very similar to what Randy does. Cut pith out of logs and coat end grain until ive got time to cut blanks and rough turn them. Half logs sit on pallets in machine shed until processed.

When I'm cutting blanks,I'll rough turn them the same day and then bring them into the basement and coat entire bowl in sealer. Six to twelve months later they are ready for final turning.

Basement stays at ~50% RH and around 60°. Machine shed (and my shop) are whatever temp/humidity it is outside.

If I'm cutting bowl blanks and can't rough them the same day, I just put them in plastic bags until I can. 90% of my processing occurs in winter, so usually don't have to deal with high temps and rapid drying. If I do have logs to process in summer, I process ASAP and will store blanks in a barrel of water until I can get them roughed and sealed.
 
Joined
Dec 25, 2019
Messages
74
Likes
30
Location
Glen Spey, New York
Okay so what I'm reading into these replies is that I am doing it wrong. Not a problem and not the first time so I'll recover and drive on.
I guess I'll construct a make shift shed with a a roof and at least 3 sides. Probably cut the big rounds in two for maneuverability mostly but also just to cut blanks as needed and keep the wood moist or at least with some moisture more than what they're getting now which is zero.
Please continue with your recommendations, I'm listening.
 

hockenbery

Forum MVP
Beta Tester
TOTW Team
Joined
Apr 27, 2004
Messages
8,629
Likes
4,970
Location
Lakeland, Florida
Website
www.hockenberywoodturning.com
I rip the biggest log sections I can handle through the pith.
I make the cut to get one great blank rather than 2 ok blanks.
I seal the ends and store as half logs stacked outside in the shade.

I will cut blanks on the bandsaw from the half log as I plan to turn them.
I plan on some waste from end checking.
 

Randy Anderson

Beta Tester
Beta Tester
Joined
May 25, 2019
Messages
839
Likes
1,258
Location
Eads, TN
Website
www.etsy.com
I will also sometimes not even split the log and leave it whole, about 2-3 inches longer than diameter to account for some cracks on the ends that will likely happen then seal the ends. Not crazy about doing it that way since as Tim mentions the pith is still there and will almost always be the initial source of cracks. Getting it out of the way soon is always preferred, I just sometimes can't get to the processing step when I get them home so seal them and next thing I know it's been a few weeks since I put them in shed.
 
Joined
Oct 25, 2020
Messages
233
Likes
195
Location
Minneapolis, MN
(sorry, looks like my typing got the best of me...)

Bruce, you're getting good advice. Things to consider-
- Your local climate. We are in late fall/winter now. In my MN, this generally means cold and dry. In my former northern ID/southeastern WA, this usually meant somewhat warmer and a bit more moist/humid. In the southern USA, well, winter weather varies greatly. The point, cold air can't hold the humidity of warm air, and if your winter is cold and bone dry for dew point/relative humidity, you need to slow the drying, either with added coats of end grain sealer, or adding humidity to the space (but not to the detriment of your building, don't grow mold on the wood or in your house). Seek stable temp and humidity through the year where your wood is stored. If bone dry, a simple cake pan of water adds humidity to a small space. Same with summer, wood dries at different rates depending on average temp and humidity.
-Fresh cut wood is sopping wet, and even in a humid environment it is wetter than the storage space and will still give off moisture to seek equilibrium to the environment.
-End grain sealer is meant to slow end grain moisture loss to be similar to that of the slower drying face/side grain. For most woods, there really is no need to seal face/side grain more than an inch or so down from the end.
-Slow and steady wins the race for seasoning freshly cut logs. Seal end grain (heavier coats if needed, esp. porous wood like oak), and control temperature and humidity. This will help minimize uneven drying, which causes uneven fiber shrinkage which causes radial cracks from the pith out to the bark.

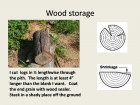
Lastly, my attached drawing is how I address prepping logs for storage. I'm not a production turner, nor dedicated shape turner (i.e. bowls and bowls and bowls...). I don't make piles of bowl blanks from my logs, because I don't know what I might want to make. For length, I cut the logs several inches longer than the log diameter to help keep small cracks at the ends, then I plan my rip cut through the log pith as shown in my drawings. (Edit, see the drawing note about rather than cutting the log through the pith, to consider cutting a central plank out of the wood that takes the pith with the plank. Large logs should permit for this, small logs may not leave much wood behind for your project.) The left log is ideal, the right log is probably more realistic, with the wider growth rings on the sunny side of the trunk and the downward face of a limb. These uneven growth patterns create uneven wood densities and stresses that you need to account for in your cuts if you hope to lose as little wood as possible to the natural drying process. If the log has a much larger diameter than you plan to use on your lathe, cut/split into thirds or quarters (think pie pieces), draw the third/quarter lines on the log end to show where the resulting even grain patterns will be.

Best of luck,
Steve.

20201115_091219.jpg
 
Last edited:
Joined
Jun 6, 2018
Messages
1,954
Likes
1,000
Location
La Grange, IL
Something I've been currious about, why divide the log in two exactly through the center of the pith? Wouldn't your "half" log be more stable if the pith were removed entirely? I'm imagining making two parellel cuts each an inch or so away from the pith to produce two somewhat smaller blanks and a middle piece that might end up as a quartersawn board.
 
Joined
Jan 22, 2018
Messages
264
Likes
313
Location
Cameron, Illinois
Mark,what you describe, is my typical way of "removing the pith". Usually though, I'm taking a thicker section closer to 2-3" , of course depending on log size, shape. Then cut the middle into spindle blanks.
 
Joined
Oct 25, 2020
Messages
233
Likes
195
Location
Minneapolis, MN
Something I've been currious about, why divide the log in two exactly through the center of the pith? Wouldn't your "half" log be more stable if the pith were removed entirely? I'm imagining making two parellel cuts each an inch or so away from the pith to produce two somewhat smaller blanks and a middle piece that might end up as a quartersawn board.

Hi Mark- I agree, and I put that in the text on the drawing, if needed remove a plank of wood that takes the pith out of the log. I won't say that doing so is a cure-all for cracking (it's not), but if the log is big enough it would likely be beneficial to remove a plank from down the center of the log bringing the pith with it. If the log were, oh, say 16" diameter, cutting a ~2" plank out of the center with the pith in the middle of the plank would go far to preserve the remaining wood by removing more stress. Small logs may not provide a lot of usable wood being left if slabbing out that center plank. I think Tim's process is right on the money, though, and he thinks ahead to make some spindle stock, too.

Steve.
 
Joined
Aug 14, 2007
Messages
5,479
Likes
2,832
Location
Eugene, OR
Well, this is an older video, but it does answer a bunch of questions:

View: https://www.youtube.com/watch?v=F3s6aN9REIY


Short explanation is that I keep my logs outside and under tarps. I will be considering another shed for storing furniture wood, but not bowl logs. The thing with cutting them into manageable sizes is that you lose a lot of wood to the inevitable end grain checking. It might be better if I used Titebond 3 for sealer, rather than the other end grain sealers as I think the glue works better, and you do have to spread it on thick...

Another of my videos to look up is Chainsaw Chopsaw.

robo hippy
 

hockenbery

Forum MVP
Beta Tester
TOTW Team
Joined
Apr 27, 2004
Messages
8,629
Likes
4,970
Location
Lakeland, Florida
Website
www.hockenberywoodturning.com
Something I've been currious about, why divide the log in two exactly through the center of the pith? Wouldn't your "half" log be more stable if the pith were removed entirely? I'm imagining making two parellel cuts each an inch or so away from the pith to produce two somewhat smaller blanks and a middle piece that might end up as a quartersawn board.

On a really big log yes. 24” and smaller probably no difference. Two issues are the straightness of the pith and how closely you hit center with the saw.

The main thing you achieve is shown in the slide I use in my working with green wood demo.

The whole round will develop radial checks because the growth rings shrink more around the log(tangengetial) than they do across the growth ring (radial). When the center ring is severed the rings can shrink without the radial checking.
EE0128BD-F7E7-47FD-AB7C-746FD38A7F90.png
 
Last edited:
Joined
Oct 25, 2020
Messages
233
Likes
195
Location
Minneapolis, MN
Reed, that was a good video on processing down a larger log for multiple blanks. I liked those plywood width templetes, too.

Steve.
 
Joined
May 13, 2020
Messages
149
Likes
718
Location
Ontario, CA
Here are some fresh sawn walnut blanks from this past summer. Since I couldn’t turn them all in the same week, I coat all end grain with wood glue. It takes a day or so to dry as the wet wood slows it down. Not sure how it compares in cost to Anchorseal, but it’s always worked well for me. I stickered these in the shade and covered with a sheet of tin, removing one at a time for coring over the next 2 months. The only checking had to deal with were checks that were already in the ends of the log when it was sawn.
644EA4B6-0E96-4CB5-8C5A-D3EA6374C88C.jpeg
 
Joined
Dec 25, 2019
Messages
74
Likes
30
Location
Glen Spey, New York
Wow guys some great replies and advice here, thanks so much.

Steve the diagram is perfect and explains a lot on how to cut with grain orientation.

Kevin, I also only coat the end grain with my flat work planks and now with my bowl blanks. As I understand it, the end grain(straws standing vertically) is what you want to stop from drying out faster than the face grain.

Reed I watched your video yesterday (I watch a lot of your videos, thanks for making them) which is what prompted me to start this thread, in that video you alluded to the fact that you cut your blanks as needed.

You guys are phenomenal help, what on earth did we do before the internet. ;)
 
Joined
Oct 25, 2020
Messages
233
Likes
195
Location
Minneapolis, MN
Bruce, you're welcome, and one step closer to taming the process. Lots of solid info shared here.

As you asked Kevin, you are correct, seal the "ends of the straws" that is where more of the water wants to move from, in the same manner that it moves inside the living tree.

Eons ago, before I discovered Anchorseal, I'd do what lots of woodworkers did (and some probably still do), brush a coat of latex paint on the ends of the logs, just like painting a wall. A coat of latex paint does still allow water to permeate out to the dryer environment. Most hardware stores have a few cans of mis-matched paint sitting around they'll sell for cheap, esp. if the color is hideous. I don't know the performance compared to Anchorseal or (what I'm hearing of for the first time) wood glue, but whatever slows down the water loss.

Finally, another benefit to watching growth ring orientation when slicing logs is that your finished projects come out with more uniform grain patterns, and the finished piece will have wood stresses that are balancing each other for long term stability.

Steve.
 
Joined
Aug 14, 2007
Messages
5,479
Likes
2,832
Location
Eugene, OR
I learned a lot from trial and error..... And even though I am not an engineer, other than by hobby, the engineer's motto: If it ain't broke, take it apart and fix it anyway...... Always experimenting....

robo hippy
 
Joined
Apr 13, 2017
Messages
267
Likes
140
Location
Gainesville, VA
The best storage that I have found so far is to cut the round in half...and then plop it into a barrel of water (with a couple cups of dish detergent added). I've done the same thing with roughed-out blanks and spindle stock. By far, I have had much less waste using this technique and you can count on preservation in terms of months here. On the other hand, if you need to do something relatively short term (say less than 1 month) then put the blanks in one of those black plastic construction bags, wet/soak everything down good, and tie the top off. I only use Anchorseal when I have roughed out a vessel.
 
Joined
Oct 25, 2020
Messages
233
Likes
195
Location
Minneapolis, MN
Donovan, do you get any fungus or mold growth on those wet bagged pieces? Has it contributed to spalting markings within the wood?

Steve.
 
Joined
Jun 13, 2020
Messages
233
Likes
312
Location
Jackson, NJ
Website
www.blacklabelwoodworks.com
Donovan, do you get any fungus or mold growth on those wet bagged pieces? Has it contributed to spalting markings within the wood?

Steve.

Not Donovan but in the warm weather yes. Spalting depends on the type of wood. Is that a bad thing? I purposely put blanks in contractor bags and put them in a warm place for a month or so to make them spalt. You can make some plain maple look much better doing this. As long as you take proper precautions it can be safe. good respirator, dust collector running full blast and cleanup immediately after finished.
 
Joined
May 4, 2010
Messages
2,446
Likes
1,872
Location
Bozeman, MT
Bruce, you're not doing it 'all wrong', you just haven't found the recipe that works for you, in your climate, with the woods you have available, in your shop/home circumstance. There are a bazillion ways to do this, and as has been mentioned, we all used trial and error to find a method that works for us.

Unless the wood you're roughing is fruit wood or full of knots, your biggest problem is probably the heated environment. If you have something available, a place with a more stable temperature (not heat on-heat off 24/7), would be better. Allowing a little air circulation, like wire shelves, with the open side of the bowl down, may help, and you might find putting the waxed blanks into paper bags helps, too.

You'll figure it out, and until then, it's frustration we all faced, except those folks in Florida who have too much humidity and less cracking trouble.
 
Joined
Apr 13, 2017
Messages
267
Likes
140
Location
Gainesville, VA
Donovan, do you get any fungus or mold growth on those wet bagged pieces? Has it contributed to spalting markings within the wood?
Steve.
Every location is different and there is no "one way" to preserve blanks. I live in Virginia so we get a bunch of hot humid days during the summer...as such, June/July/August the water bath might get a little stinky, but you have a blank that has a lot less cracking than any other method I have used. The bath helps with critter problems too. The dish detergent cuts down on most fungal growth but even so it does not present a problem to turn. You are into solid wood by the time you get the bark cut off. In regard to spalting, I don't use the water bath or bag to spalt wood because I think a good wood spalt needs air as well as moisture. I just stack the timber rounds that I want to spalt outside in the shade uncovered to get the max benefit of the spalt and let nature do it its thing. Again...a barrel submersion/bath of blanks is good in terms of months (depends on time of year) and the construction bag option is only good for the short term. I only use Anchorseal to coat the roughed-out vessel and to cover the end of timber that I plan to cut/process at some time in the future.
 
Back
Top