
odie
TOTW Team
- Joined
- Dec 22, 2006
- Messages
- 7,134
- Likes
- 9,954
With a bowl mounted, it's sometimes difficult to nail the tool height adjustment in relation to the centerline. My usual method is (was!) to make the best guess at the tool rest height, try it, and further adjust to meet my setting.....the ol' "trial and error" method! The only problem with that is if you've guessed wrong, you probably have made a cut on your work piece that you might wish you hadn't!
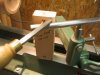
This block of scrap wood is cut to an exact length to match the centerline of my spindle. It sets on the bedways while you make the adjustment, and it's a snap to get the tool rest height right the first time. No guessing. (both ends of the set-up block must be exactly square) I've drilled a hole and attached a string......the tool rest height set-up block hangs within arm's reach, and easy to come into play.
For this photo, I used a scraper, because it was handy at the time, and it's useful for a gouge as well, although a little less so......but, I've come to really appreciate it for a parting tool.
Position the tool rest in the banjo, and close-in to your work. Adjust it as close as your intuition tells you. Then move the banjo away from your work and adjust the height to perfection with the use of the set-up block. Then move the banjo with the adjusted tool rest back into position. Simple, effective, quick, and a great help for specific applications.
As usual, I expect there will be those that will say something like this isn't needed......and, I've gone without a set-up block for many years myself, and was pretty good at making a best guess.....but, I'm coming to really appreciate the benefits of a perfectly adjusted tool rest height immensely......especially when I get it right the first time!
For most of us, this little dandy will cost nothing!
otis of cologne
edit: In the photo, it appears as if I'm positioning the tool's cutting edge below the centerline. The centerline is the very top edge of the set-up block......I've used a black felt tip marker to make that edge stand out a little more. Although that setting will work to some degree, for a scraper, I'd want it at the centerline, and I probably wasn't paying much attention to that while snapping the photo.......
OOC
.
Attachments
Last edited: