• Beware of Counterfeit Woodturning Tools (click here for details)
  • Johnathan Silwones is starting a new AAW chapter, Southern Alleghenies Woodturners, in Johnstown, PA. (click here for details)
  • Congratulations to Keven Jesequel for "Big Leaf Maple" being selected as Turning of the Week for April 15, 2024 (click here for details)
  • Welcome new registering member. Your username must be your real First and Last name (for example: John Doe). "Screen names" and "handles" are not allowed and your registration will be deleted if you don't use your real name. Also, do not use all caps nor all lower case.

Piercing, questions

Joined
Mar 19, 2016
Messages
1,183
Likes
1,278
Location
Haubstadt, Indiana
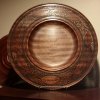
I wanted to try piercing. The photo is a elm bowl about 9" diameter and 3" high, as a practice piece. I like to try first so I can ask questions on how to improve. First I believe I turned it too thin, it is about 0.025" thick. What is a good thickness for piercing. When sanding the sandpaper caught and basically enlarged a couple of openings. Lesson learned is being careful. Any other hints? I used a Dremel highest speed (30,000 rpm) as that is what I had. I got a little burning. Also when sanded I got "fuzz" around the openings that I had to go back and remove. Is this common or nature of wood used? I know many use dental tools. However when looking on eBay it is noted you need to have a FDA license to buy. So how do you obtain these? Or is a carving tool a better option? What brand/type of tool?

CC welcome.

IMG_0483.JPG IMG_0484.JPG
 
Joined
Oct 4, 2010
Messages
232
Likes
391
Location
Baldwinsville, NY
Website
www.bayberrycrafts.com
you should be able to by the dental tools (NSK or the Chinese knock-offs) without a problem. With the compressor, hoses, regulators, etc. the price can add up quickly...although the 400,000 rmp gives a nice cut.
I've had good results using a micromotor tool (Micro-Pro). 45,000 rpm is better than the dremel, and the small handpiece size is comfortable to work with.
My favorite bit to use (discovered when I did a club demo on "cheap piercing") is a grout cutting bit (dremel has one...but there are cheaper versions that are identical). It cuts in all directions and doesn't grab.

index.php
 

john lucas

AAW Forum Expert
Joined
Apr 26, 2004
Messages
8,333
Likes
3,585
Location
Cookeville, TN
With the Dremel you need really thin. The lower speed tools want to grab the grain and follow it. The High speed tools will cut wood that thin like it's writing on paper. The High speed tools will burn the edges but some guys go back and make a cut it the direction of the spinning bit to take off the burn. I still don't have a High speed turbine and consequently don't do much piercing because it's such a chore with the Dremel. I bought one of the pencil air grinder that spins at 54K but it's not really any different than the dremel and didn't have as much power. Anything thicker than 1/16" is tough with the dremel. That would be about .064" so .020 is a little thin. Probably more like 30 or 40 thou would be good. Were you trying to sand the holes or sand the entire vessel. Ideally you sand the inside and outside first and then only have to do a very light touch up afterwords,
 
Joined
Mar 19, 2016
Messages
1,183
Likes
1,278
Location
Haubstadt, Indiana
Thanks for the tips/information egsigel and John.
Maybe my mistake. I sanded the entire vessel to 220 and then did the piercing. Then went on to sand the entire vessel to 280, 320, 400. I had the edge of the sandpaper catch in the openings and because it was so thin it broke a couple. I'm guessing I should have sanded to finish and then pierced. I didn't intend to turn it that thin, but got carried away before I knew it. Actually the Dremel I used was only 25,000. I have one that goes to 35,000 with a flex shaft that I will try next. Better, but not optimal. I need to learn more about the dental handpieces as to how much air needed and how to connect them to the air source. I guess another mistake was using a round burr in the Dremel. I looked in my box of bits and did find a 1/16" and a 1/8" grout bit as egsigel recommended. I have a piece in the lathe I want to make similar to what egsigel posted with a lid, but didn't want it to be considered an urn. If I pierce it that will take care of that. How much piercing of turnings I will do is unknown. I like to try different things should I need them. I'm saving my money for the symposium as I'm sure there will be things there I will want. Maybe a piercing system, hollowing tools, or something else.
 

Bill Boehme

Administrator
Staff member
Beta Tester
TOTW Team
Joined
Jan 27, 2005
Messages
12,895
Likes
5,178
Location
Dalworthington Gardens, TX
Website
pbase.com
However when looking on eBay it is noted you need to have a FDA license to buy. So how do you obtain these? Or is a carving tool a better option? What brand/type of tool?

The eBayer's in China are just blowing smoke and covering their backsides because the handpieces they sell probably are not FDA certified. You can buy the Chinese dental handpieces. Dentists here buy US made and other handpieces that have FDA certification.

I have purchased handpieces, turbines, and miscellaneous parts from Chinese eBayer's and sometimes received the items in less than a week. They are shipped by epacket to the US and delivered by USPS.

The most common handpiece style is the type that has a bend of about 20 degrees in the middle ... I would advise NOT getting that style. It's fine for dental work, but terrible on the hand and wrist for wood piercing. The NSK straight type handpiece is ideal and the 45 degree head handpiece is a very close second ... if not equal. Since you don't want oil or water on your turning, you need the type with ceramic bearings because they will last a long time without needing any kind of lubricant. The 2-hole handpieces are a little easier to modify for wood piercing, but the 4-hole units are fine and more plentiful on eBay. A nice feature if you can find it is a LED light built into the handpiece. So, you can enter the following in your eBay search: handpiece 45 ceramic 2H LED
For changing burs you have a choice between push button or wrench. The push button is is much quicker and doesn't require the use of tools. The wrench type probably holds the bur more securely, but that is just my idle speculation. A good bur for piercing is the FG170L (FG= friction grip, L = long).

There is another recent thread on piercing that has a lot of useful information.
 

john lucas

AAW Forum Expert
Joined
Apr 26, 2004
Messages
8,333
Likes
3,585
Location
Cookeville, TN
You won't notice any difference in 25,000 vs 35,000. Most of the difference is in how the hand piece feels in your hand vs the Dremel itself. Sometimes the flex shaft feels stiff and makes it hard to control the cut. Other times it's the Dremel itself that feels awkward so you just have to try both and see what you think. I can usually cut better with the Dremel it'self.
 
Joined
Feb 6, 2010
Messages
2,976
Likes
1,939
Location
Brandon, MS
http://www.ebay.com/itm/261347817089?_trksid=p2055119.m1438.l2649&ssPageName=STRK:MEBIDX:IT
This is the one I use and a friend of mine who does a lot of piercing tried it and told me he likes it better than the expensive straight type which Bill referred to. There is less wrist strain and easier to control pierce. Capt Eddie has a video on this unit on how to set it up. You do need a gauge and valve to control air and as Bill stated the air needs to be filtered to trap water. However if the turbine burns up then you can replace the unit cheaper than the turbine in the more expensive types.
Also bit selection (carbide preferred) will influence the cut you get. When you cut the hole you can then go backwards to clean up the burns. about 1/16 should be best but can be done at 1/8 thickness, just takes longer.
 

Bill Boehme

Administrator
Staff member
Beta Tester
TOTW Team
Joined
Jan 27, 2005
Messages
12,895
Likes
5,178
Location
Dalworthington Gardens, TX
Website
pbase.com
I presume that the straight expensive one that Gerald is referring to is the NSK Presto. I have never tried it and it seems to be a bit bulky and very very expensive. The kind that I own has a straight body and a head that is at a 45 degree angle. It's nice because it can be held like a pencil and the body doesn't obstruct your view. Here is a picture of the kind that I use.

image.jpeg

I just checked on eBay and the price averaged about $40 which might be a few dollars more than the one that Gerald uses, but far from expensive. I bought a couple spare "cartridges" (meaning the tiny turbine that goes in the head of the handpiece). I don't recall what I paid, but they were in the neighborhood of ten dollars each. Anoher necessary part is the connector and tubing that screws onto the back end. It also is very cheap ... about $11.

I have seen Captain Eddie's video and it is good, but IMO he would have like the one pictured above more if doing long piercing sessions.
 
Joined
Mar 19, 2016
Messages
1,183
Likes
1,278
Location
Haubstadt, Indiana
Thanks Gerald, for me as a hobbiest and not constantly piercing that would be more practical. Bill was making note of the ergonomic aspect regarding the style. Something to consider. Also the lubrication requirement. Amazon had one like Bill described with an extra turbine.

Do you use any type of lubrication for yours?

Bill mentioned one style of burr, are there others you use?

I did watch Captain Eddies video. I also found a PDF on line titled "Dental Handpieces 101" (40 pages) that has a lot of info.
 

Bill Boehme

Administrator
Staff member
Beta Tester
TOTW Team
Joined
Jan 27, 2005
Messages
12,895
Likes
5,178
Location
Dalworthington Gardens, TX
Website
pbase.com
If it has ceramic bearings then it doesn't need lubrication. For dental use one of the ports on the connector provides water to flush tooth particles from the bur, but by modifying the connector you can just divert a tiny bit of air to do the same job. The ceramic bearings last a reasonably long time without lubrication. Older design handpieces with steel bearings required frequent lubrication which would cause some oil staining on the wood.

I would say that the most useful burs are:
  • FG699L for faster stock removal. It is a fissure crosscut bur with chip breaker grooves.
  • FG169L is similar to the 699, but doesn't have the radial grooves. It is good for cleanup cuts.
  • FG170L, FG700L, and FG701L have slightly larger burs and are good for piercing, but I don't know anything about how they compare with the others.
  • I was thinking that a bur with a small ball on the end might be good for writing and drawing.
It wouldn't hurt to just try some different burs to see what you like.
 
Joined
Feb 6, 2010
Messages
2,976
Likes
1,939
Location
Brandon, MS
As Bill said FG699 is the main one that I use I think I got 100 for about 50 and split with another turner. Have a few others but this is the main one a friend suggested 3 that Binh Pho uses. Oh the straight pen is what Binh uses also (expensive) and my friend has severe arthritis in his fingers so probably the right angle is more comfortable for him because you can use more wrist action and less finger push. And this https://www.goldburs.com/
is where we get ours. I tried the overseas connection and just too hard to deal with.
You asked about lube and none is needed. There are 2 holes in the handle and if you watch the Capt Eddie video he shows how to connect using fuel line from the hardware store. I used a zip tie to hold the line on the handle.
 
Joined
Mar 19, 2016
Messages
1,183
Likes
1,278
Location
Haubstadt, Indiana
Thanks to everyone for all the information and suggestions. I thought I would follow up with what I ordered. I ordered a handpiece with 45 degree head, LED, ceramic bearings. I ordered the handpiece from Amazon (in stock) as it comes with a second turbine. From what I gathered from the vague information, one turbine is higher torque at 260,000 rpm and the other a standard torque at 350,000 rpm. I'll find out for sure once I get it. Everything else is from eBay. For burs I ordered 20 each FG169L and FG170L for starters from US supplier. The pressure gauge, hose, toggle switch to build the system are all from China. I will get the regulator with filter from HF. I already have a pancake compressor, but may use my large compressor. Now I just need to make some turnings to put it to use.

Edit grammar
 
Last edited:
Joined
Mar 19, 2016
Messages
1,183
Likes
1,278
Location
Haubstadt, Indiana
Total cost so far is about $123.00. I still need to buy a regulator from HF around $15.00. I could have saved $10-15 on the handpiece if I bought a China one without the extra turbine. I bought the NSK that is supposedly made in Japan, 45 degree head, ceramic bearings, LED. This one is push button and to some not as desirable compared to the wrench type, but from what I have read it is ok. I'll have about a $145.00 with a few fittings and misc parts. The reason I want to try this is I don't ever seem to get that great figured piece of wood or any burls. I feel I can take some bland wood and enhance it into something special.

Here is what I bought, everything was free shipping.

NSK Hadnpiece $56
0-60 Pressure Gauge. $5.05
Handpiece 2 hole hose. $10.46
Toggle air valve. $7.90
20 Dremel 240 grit flap sanders. $7.62
20 FG169L burs. $17.98
20 FG 170 burs. $17.98
 
Joined
Jul 5, 2016
Messages
469
Likes
244
Location
San Antonio, TX
William,

I setup mine thanks to bill's help. I ended up trying 3 switch valves before finding the right one. The challenge was finding the right size connectors and profitable hobbies valve worked for me with a tweak. The handpiece hose has a 1/8" OD (outer diameter) so had to use a 1/4" OD with 1/8" ID (inner diameter) hose to slip over it and make it fit in the valve.

Basically the valve has one 1/8"ID-1/4"OD coming from the regulator and one small similar host going out. I slipped the handpiece' hose in the small one going out.

IMG_0292.JPG IMG_0291.JPG
 
Joined
Nov 1, 2013
Messages
325
Likes
733
Location
Gulfport, MS
Website
www.woodtreasuresbybreck.com
William piercing is a lot of fun and can create some beautiful pieces of turned art. I will throw my 2 cents from experience in here and some of it will be repetitive but hope it helps. As to thickness 1/8" is too thick but it is possible to pierce it but only with great difficulty. 3/32 thick is fine with a mico motor tool 45,000 rpm but to do serious piercing of a large area you need to get 1/16 thick and use a 400,000 rpm unit I prefer the NSK but it is more expensive than the dental drills. With the NSK or high speed dental drills there are specific bits that will clean up your piercings leaving no fibers hanging around. Do all your major sanding before piercing, other than a light clean up. Don't try to pierce a large area without resting you hand for a while between areas believe me it will help. The best way to learn is by doing it!IMG_20161212_221341.jpg
 
Last edited by a moderator:
Joined
Mar 19, 2016
Messages
1,183
Likes
1,278
Location
Haubstadt, Indiana
Breck, that is a beautiful piece. Something for me to dream about. I really like the detail around the piercing. How did you get that effect? I appreciate any help and looking at others work is inspiring. I have the dental handpiece, still waiting on the tubing as the last thing. Right now I have the FG699L and FG169L burs to start. I've created two delays, one promising my wife to finally build a desk/ cabinet for her embrodiery machine. Flat work, ugh! I also ordered a new lathe today. I guessing deliver in about two weeks. So I'll be getting the PM 90 ready to sell. I envisioned my first piercing to be a platter from from cherry around 14". I figured it would be the easiest to get the thickness for piercing before trying any hollow forms. Seeing your work inspires me to work faster on the delays.
 
Joined
Nov 1, 2013
Messages
325
Likes
733
Location
Gulfport, MS
Website
www.woodtreasuresbybreck.com
Breck, that is a beautiful piece. Something for me to dream about. I really like the detail around the piercing. How did you get that effect? I appreciate any help and looking at others work is inspiring. I have the dental handpiece, still waiting on the tubing as the last thing. Right now I have the FG699L and FG169L burs to start. I've created two delays, one promising my wife to finally build a desk/ cabinet for her embrodiery machine. Flat work, ugh! I also ordered a new lathe today. I guessing deliver in about two weeks. So I'll be getting the PM 90 ready to sell. I envisioned my first piercing to be a platter from from cherry around 14". I figured it would be the easiest to get the thickness for piercing before trying any hollow forms. Seeing your work inspires me to work faster on the delays.
William the effect or border is done with pyrography, I make my own burning tips from nichrome wire got the idea from Molly Winton years ago it is a simple spiral tip created by wrapping the wire around a nail then putting it into my eagle burner pen. I score then burn two lines to act as borders then mask to prevent flash burns on the surrounding wood. Good luck it is a learning process but well worth the effort eventually.
 
Joined
Mar 19, 2016
Messages
1,183
Likes
1,278
Location
Haubstadt, Indiana
William the effect or border is done with pyrography, I make my own burning tips from nichrome wire got the idea from Molly Winton years ago it is a simple spiral tip created by wrapping the wire around a nail then putting it into my eagle burner pen. I score then burn two lines to act as borders then mask to prevent flash burns on the surrounding wood. Good luck it is a learning process but well worth the effort eventually.

Breck, This is timely. I have the burnmaster with 4 basic pens. I am going to order the 10 tip and pen for it, but didn't think about ordering the wire and making specials. The piercing any pyrography are something I want to include in my turnings.

Thanks
 
Joined
Jul 19, 2012
Messages
33
Likes
5
Location
Keller, Texas
There are a lot of good solutions to piercing woodturnings and I have tried most of them. I prefer the NSK Presto handpiece because of the torque but it is quite expensive. I have used the 45 degree Chinese handpieces which do a fairly good job though a little short or torque. They are available with a LED light to illuminate the the cutter, ceramic no-lube bearings and cost considerably less. After piercing several turnings, I did a demonstration at the Golden Triangle Woodturners which I called Piercing On The Cheap and is on youtube at:

View: https://www.youtube.com/watch?v=5P8Zh_pI-tU


This, I believe, was before Capt. Eddy did his with the same title, but who's counting. My video addresses the 45° Chinese handpiece and I sincerely agree with Bill Boehme about not using the 20° version. My video also shows how to build a system for under $100, less the air compressor which you probably already have.
I do some very fine intricate piercing so I use the smaller diameter FG169L bur. These work best if your turning's wall thickness is 0.1 to 0.06 thick.
 
Joined
Mar 19, 2016
Messages
1,183
Likes
1,278
Location
Haubstadt, Indiana
Glynn, I think I have watched your video 3 times now. It by far is one of the top demonstration videos. You really did a great job. I am basically following your guidelines to the letter. I did get the 45 degree, light, ceramic bearings dental handpiece. I'm just waiting on the tubing part to build it. The only thing I am nervous about is drilling the hand piece until I fully understand how much bleed air is bypassing. I think I'll just use a tee soldered close and drill that. It will be a little while before I can post any work as I have decided to replace my lathe and getting that accomplished. I got a lot of good direction from the members here and I think your video answered a lot of questions I would have had. When I saw you post I almost sent you a message thanking you for sharing.
 

Bill Boehme

Administrator
Staff member
Beta Tester
TOTW Team
Joined
Jan 27, 2005
Messages
12,895
Likes
5,178
Location
Dalworthington Gardens, TX
Website
pbase.com
William, I did it the easy way... since Glynn and I belong to the same club, I played dumb and talked him into doing the drilling for me. :D :p

After seeing it done by the master, the procedure is pretty simple and even I could now do it. The drilling isn't done to the handpiece, but to the little air line connector that plugs onto the handpiece so all isn't lost if it is ruined although that isn't likely to be the case.

Removing the small barb is easy as it is just sweated in with solder. Heat the barb with a soldering gun and then pull it out with needle nose pliers.

From the side of the connector above the stop collar of the connector drill the larger #76 hole into the smaller port. This is a guide hole for the #80 drill which is used next to drill through the web and into the larger port. After this, both the drilled hole in the side of the connector and the hole where the small barb was removed are sealed with solder.

Here is a picture of my connector after Glynn did the surgery. A first class job, I must say. I helped him as best as I could by keeping my hands in my pockets. :)

dental-connector.jpeg
 
Joined
Mar 19, 2016
Messages
1,183
Likes
1,278
Location
Haubstadt, Indiana
Thanks for the picture. I thought for some reason it was the handpiece. So should I sent it to you or Glynn for the mod? It's the last thing I'm waiting on.
 

Bill Boehme

Administrator
Staff member
Beta Tester
TOTW Team
Joined
Jan 27, 2005
Messages
12,895
Likes
5,178
Location
Dalworthington Gardens, TX
Website
pbase.com
Thanks for the picture. I thought for some reason it was the handpiece. So should I sent it to you or Glynn for the mod? It's the last thing I'm waiting on.

Send it to me and I'll get it back to you before the next Ice Age ... or maybe the one after that. :D
 
Joined
Jul 26, 2015
Messages
328
Likes
447
Location
Hot Springs, AR
Thanks to all who contribued to this thread almost 4 years ago. many of the links still work, and I've now got both "piercing on the chaep" videos. Just what I needed. will be making the jump here soon.
 
Back
Top